
Ready to unlock your cordless drill’s full potential? This guide walks you through five practical home projects that showcase your tool’s versatility. From hanging shelves to building decks, you’ll get clear steps, pro tips, and troubleshooting advice to ensure success every time.
Key Takeaways
- Master the basics first: Understand speed settings, clutch control, and bit types before starting any project
- Choose the right drill: Not all cordless drills handle every task; know when you need a hammer drill versus a standard driver
- Prepare your workspace: Measure twice, drill once, and always secure your materials properly
- Use proper technique: Let the drill do the work, apply steady pressure, and keep bits sharp for clean results
- Prioritize safety: Wear eye protection, check battery levels, and unplug when changing bits
- Maintain your tool: Regular cleaning and proper storage extend your drill’s life and performance
Transform Your Home with These Cordless Drill Work Examples
Your cordless drill sits in the toolbox, ready for action. But do you really know everything it can do? Most homeowners use this powerful tool for simple tasks like hanging pictures. They never discover its true potential. This guide changes that. You will learn five specific projects that will save you time, money, and frustration. Each example includes detailed steps, practical tips, and solutions to common problems. Let’s turn your cordless drill into the most valuable tool in your home.
Before we dive into specific projects, you need to understand your equipment. Choosing the best cordless drill makes all the difference. A quality tool gives you better control, longer battery life, and more power for tough materials. If you are in the market for a new drill, check out our comprehensive guide to the best cordless drill options available today.
Essential Cordless Drill Basics Every DIYer Should Know
Understanding your tool is crucial before starting any project. Your cordless drill has three main functions: drilling holes, driving screws, and sometimes hammering action for masonry work.

Visual guide about Cordless Drill Work Examples to Transform Your Home Projects
Image source: i.ytimg.com
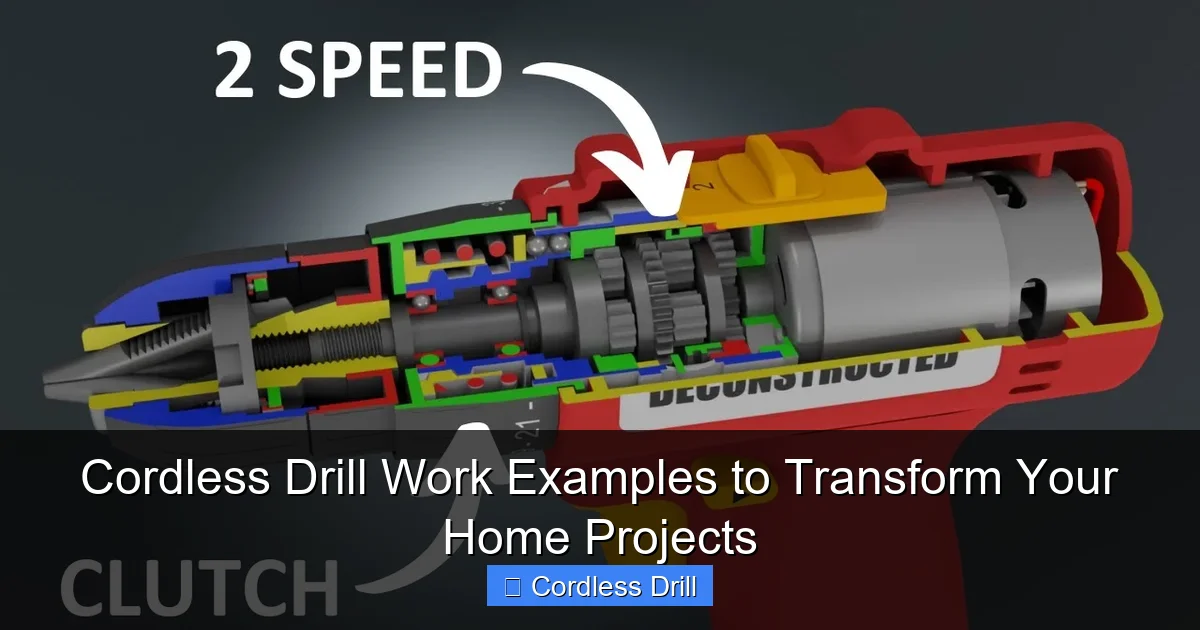
Speed and Torque Settings
Most drills feature a two-speed gearbox. Low speed (0-500 RPM) delivers high torque for driving screws and working with large bits. High speed (500-1500 RPM) works best for drilling holes in wood, metal, and plastic. The adjustable clutch, marked with numbers, controls how much torque the drill applies. Start with a lower setting and increase as needed to prevent stripping screws or damaging materials.
Choosing the Right Drill Bits
Using the correct bit makes your job easier and produces cleaner results. Twist bits work for general drilling in wood, metal, and plastic. Spade bits create large holes quickly in wood. For masonry, you need carbide-tipped bits and a hammer drill function. When working with metal, use high-speed steel bits and go slow to avoid overheating.
Not sure when to use a hammer drill versus a regular cordless drill? Our detailed comparison explains the key differences between a hammer drill and regular drill so you can select the right tool for your specific project.
Project 1: Hanging Floating Shelves Like a Pro
Floating shelves add style and storage to any room. This project demonstrates precision drilling and proper mounting techniques.

Visual guide about Cordless Drill Work Examples to Transform Your Home Projects
Image source: toolnerds.com
What You Will Need
- Cordless drill
- Stud finder
- Level
- Pencil
- Drill bits (appropriate for your wall type)
- Wall anchors
- Floating shelf brackets
- Screws
Step-by-Step Instructions
Step 1: Locate Studs
Use your stud finder to identify wall studs. Mark these locations with a pencil. Studs provide the strongest support for floating shelves. If your shelf spans multiple studs, you will need to locate each one.
Step 2: Position the Brackets
Hold your shelf brackets against the wall at your desired height. Use a level to ensure they are perfectly horizontal. Mark the screw holes with your pencil. Double-check measurements before proceeding.
Step 3: Drill Pilot Holes
Select a drill bit slightly smaller than your screw diameter. Set your drill to low speed and a moderate clutch setting. Drill pilot holes at each marked location. Drill straight into the wall, keeping the drill perpendicular to the surface. For drywall without studs, drill into the wall anchor instead.
Step 4: Install Anchors and Screws
Tap wall anchors into the pilot holes using a hammer if needed. Set your drill clutch to a higher setting. Drive screws through the brackets and into the anchors or studs. Stop when the bracket sits flush against the wall. Do not overtighten, as this can strip the hole or damage the bracket.
Step 5: Mount the Shelf
Slide the floating shelf onto the brackets. Some designs require additional screws from underneath. Wipe away any pencil marks and enjoy your new storage space.
Common Problems and Solutions
Problem: Drill bit slips off the mark.
Solution: Create a small indentation with a nail or awl before drilling. This gives the bit a starting point and prevents wandering.
Problem: Screw won’t go in all the way.
Solution: Check if you hit a stud. If so, drill a slightly deeper pilot hole. If not, your clutch setting may be too low. Increase the setting and try again.
For more detailed guidance on working with walls, our comprehensive guide on how to use a drill for screws into a wall covers additional techniques and safety tips.
Project 2: Building a Backyard Deck
A deck extends your living space outdoors. Your cordless drill proves essential for assembling frame components and attaching decking boards.
Visual guide about Cordless Drill Work Examples to Transform Your Home Projects
Image source: i.ytimg.com
Preparation and Planning
Start with a solid plan. Check local building codes for deck requirements. Purchase pressure-treated lumber or composite decking materials. Pre-cut all pieces according to your plan. This organization saves time and reduces errors during assembly.
Assembling the Frame
Step 1: Layout Your Joists
Position your ledger board against the house. Use a level to ensure it is perfectly horizontal. Secure it with lag screws into house studs. Space your joists according to your deck plan, typically 16 inches apart.
Step 2: Connect Joist Hangers
Attach joist hangers to the ledger board and beam. Use galvanized or stainless steel hardware for outdoor durability. Pre-drill holes to prevent wood splitting. Drive screws into each hanger tab, ensuring full contact with the wood.
Step 3: Set the Joists
Place joists into the hangers. Check for level and square before final tightening. Secure each joist with the recommended number of nails or screws through the hanger.
Installing Decking Boards
Step 1: Start Straight
Begin at the house with your first decking board. Leave a small gap (about 1/8 inch) between the board and the house for expansion. Use a chalk line to create a straight guideline.
Step 2: Drill and Screw
Set your drill to low speed with a higher clutch setting. Drill pilot holes through the decking board into each joist below. Use a drill guide or spacer to maintain consistent spacing. Drive deck screws through the pilot holes, sinking them slightly below the board surface.
Step 3: Continue the Pattern
Space each board evenly using deck spacers. Stagger end joints for structural integrity. Pre-drill all holes to prevent splitting, especially near board ends.
Pro Tips for Deck Success
- Use exterior-grade screws to prevent rust and ensure longevity
- Pre-drill every hole, especially near board ends
- Keep your battery charged; deck building consumes significant power
- Work with a partner for large decks to speed up the process
- Check for square frequently during assembly
Project 3: Installing Kitchen Cabinet Hardware
Updating cabinet hardware transforms your kitchen without a full remodel. This project focuses on precision and avoiding costly mistakes.
Measuring and Planning
Measure existing hole spacing if replacing old hardware. For new installations, create a template using cardboard or a purpose-made hardware template. Mark center points for each pull or knob location. Consistency is key for a professional appearance.
Drilling Techniques for Cabinets
Step 1: Choose the Right Bit
Most cabinet hardware requires a 3/16-inch or 1/4-inch hole. Select a sharp brad-point bit for clean, precise holes in wood.
Step 2: Set Your Drill
Use low speed for better control. Set the clutch to a moderate setting to prevent tear-out on the cabinet face.
Step 3: Drill from the Back
Place a scrap wood backing behind the cabinet face to prevent splintering. Drill slowly through the marked location. Let the bit cut at its own pace. Apply steady, gentle pressure.
Installing the Hardware
Insert screws from the inside of the cabinet door. Hold the knob or pull in place from the outside. Tighten nuts or caps by hand first, then use a screwdriver for final tightening. Avoid using your drill on final tightening, as overtightening can strip the threads or damage the hardware.
Avoiding Common Mistakes
Mistake: Drilling at the wrong angle.
Prevention: Keep the drill perpendicular to the cabinet surface. Use a square as a visual guide.
Mistake: Tearing out the wood veneer.
Prevention: Use painter’s tape on the drilling surface. Start with a small pilot hole, then step up to the final size.
Project 4: Creating a Custom Workbench
A sturdy workbench provides a dedicated space for all your DIY projects. Your cordless drill handles the entire assembly process.
Design and Cut List
Plan your workbench dimensions based on available space and intended use. A standard height is 36 inches, but adjust for your comfort. Use 2×4 lumber for the frame and 3/4-inch plywood for the top. Cut all pieces according to your plan before starting assembly.
Frame Assembly
Step 1: Build the Legs
Construct four leg assemblies using 2x4s. Pre-drill all connection points. Use 3-inch wood screws for strong joints. Attach horizontal supports between legs for stability.
Step 2: Create the Tabletop Frame
Build a rectangular frame from 2x4s to support your plywood top. Add cross-braces for additional strength. Pre-drill and screw all connections.
Step 3: Attach the Top
Place the plywood top on your frame. Pre-drill through the plywood into the frame below. Use 1-5/8 inch screws every 6 inches along each frame member.
Adding Features
Installing Vise Mounts: Position your vise on the bench edge. Mark mounting holes. Drill pilot holes through the benchtop. Use washers and nuts on the underside for secure mounting.
Creating Tool Storage: Build simple shelves underneath using leftover plywood. Drill pocket holes for hidden joinery. Attach supports and install the shelf surface.
Finishing Touches
Sand all surfaces smooth. Apply a protective finish like polyurethane or Danish oil. Consider adding a pegboard back for tool storage. Drill holes for bench dogs and hold-downs if desired.
Project 5: Mounting Your Television and Electronics
Modern TVs require secure mounting and careful cable management. This project demands precision and safety awareness.
Choosing the Right Mount
Select a mount rated for your TV’s weight and size. Measure your TV’s VESA mounting pattern. This determines hole spacing on the mount. Check wall type—studs are essential for drywall installations.
Finding and Securing to Studs
Use a high-quality stud finder to locate solid wood behind your wall. Mark the center of each stud in your mounting area. Position the mount template against the wall, ensuring it aligns with stud centers. Use a level to verify horizontal alignment.
Drilling for Mounting Hardware
Step 1: Pilot Holes
Select a drill bit matching your lag bolt diameter. Set your drill to low speed with high torque. Drill pilot holes into studs at marked locations. Drill deep enough to accommodate the full bolt length.
Step 2: Installing Lag Bolts
Insert lag bolts through the mount and into pilot holes. Use a socket attachment on your drill for final tightening. Stop when the mount sits firmly against the wall. Overtightening can damage the mount or wall.
Cable Management Solutions
Drill holes in wall studs to run cables through. Use a fish tape to pull wires. Install wall plates with HDMI and power connections. Label all cables before connecting. Use velcro ties to organize cords behind the TV.
Safety Considerations
Always turn off power at the breaker when working near electrical outlets. Use a circuit tester to confirm power is off. If mounting above a fireplace, ensure the TV is rated for high-temperature environments. When in doubt, hire a professional electrician for hardwired installations.
Troubleshooting Common Cordless Drill Issues
Even the best tools encounter problems. Knowing how to fix common issues saves time and frustration.
Battery Problems
Symptom: Drill stops working after minimal use.
Diagnosis: Battery may not be fully charged or has reached end of life.
Solution: Charge battery for the full recommended time. If problems persist, try swapping with another battery. Most batteries last 3-5 years with proper care.
Symptom: Battery won’t hold charge.
Solution: Clean battery contacts with a dry cloth. Store batteries at room temperature, never in extreme cold or heat. Avoid leaving batteries on chargers indefinitely.
Drill Bit Slipping or Wandering
Cause: Starting hole not properly marked or bit is dull.
Solution: Create a pilot indentation with a center punch or nail. Use a sharp bit appropriate for your material. Apply firm, steady pressure at the start of drilling.
Stripped Screw Heads
Cause: Wrong bit size or excessive torque.
Solution: Use the correct Phillips, Torx, or flathead bit. Set your clutch to a lower number. Apply consistent pressure while driving screws. Consider using a screw extractor if the head is already stripped.
Overheating Motor
Cause: Continuous heavy use or blocked vents.
Solution: Allow the drill to cool for 10-15 minutes. Clean dust from motor vents. Use lower speed settings for tough materials. Avoid pushing the drill beyond its capacity.
Poor Performance in Masonry
Cause: Standard drill mode instead of hammer function.
Solution: Engage hammer mode if your drill has this feature. Use carbide-tipped masonry bits. Apply moderate pressure and let the hammer action do the work. For best results, consider renting a dedicated hammer drill for large masonry projects.
Pro Tips for Professional-Quality Results
These expert techniques separate DIY projects from professional work.
Mastering the Clutch
Your drill’s clutch is your best friend for consistent results. Practice on scrap wood to find the right setting for each task. Lower numbers prevent overdriving. Higher numbers provide maximum torque. Adjust as needed when changing materials or screw sizes.
Keeping Bits Organized
Use a drill bit organizer or index case. Label each bit with its size and material type. Keep a selection of driver bits in a convenient belt pouch. Sharp bits work better and last longer. Replace dull bits immediately.
Battery Management Strategy
Own at least two batteries for uninterrupted work. Keep one charging while using the other. Bring spare batteries for large projects. Store batteries in a temperature-controlled environment. Remove batteries from the drill when not in use for extended periods.
Maintenance Routine
Clean your drill after each use. Wipe away dust and debris with a dry cloth. Check the chuck for tightness. Lubricate moving parts according to the manufacturer’s recommendations. Store your drill in its case to protect it from moisture and damage.
Advanced Techniques
Pocket Hole Joinery: Use a pocket hole jig with your drill for strong, hidden joints in furniture building.
Counterboring: Drill a larger hole to hide screw heads below the surface for a clean finish.
Countersinking: Create a conical hole for flat-head screws to sit flush with the material.
Depth Control: Use a depth stop or wrap tape around your bit to control drilling depth precisely.
Conclusion: Your Cordless Drill as a Home Transformation Tool
These five cordless drill work examples represent just the beginning of what you can accomplish. From simple shelf installations to complex deck building, your drill provides the power and precision needed for professional results. The key lies in understanding your tool, choosing the right accessories, and following proper techniques.
Remember to prioritize safety, maintain your equipment, and practice on scrap materials before tackling important projects. Each successful project builds confidence and skill. Soon, you will look at every home improvement challenge and see opportunities for your cordless drill to shine.
Start with the simplest project that matches your current skill level. Gather your materials, follow the steps carefully, and enjoy the satisfaction of a job well done. Your home will look better, function better, and feel more like your personal creation. The right tools make all the difference, and your cordless drill is the most versatile tool in your arsenal.
