
This guide helps you choose and use the perfect cordless drill for any project. You’ll learn key features, safety steps, and get project-specific recommendations. Save time and money with our expert tips and avoid common mistakes that ruin tools and materials.
Key Takeaways
- Voltage matters: 12V drills handle light tasks, while 18V-20V models work for most projects. Heavy jobs need 20V+ power.
- Battery type is crucial: Lithium-ion batteries last longer, charge faster, and weigh less than older NiCad options.
- Torque settings prevent damage: Use the clutch to control driving depth and avoid stripping screws or cracking materials.
- Right bit for the material: Wood, metal, and masonry need different drill bits for clean, safe holes.
- Maintenance extends life: Clean your drill after use, store batteries properly, and check for wear monthly.
- Safety first: Always wear eye protection, secure your workpiece, and keep hands away from the chuck.
- Brushless motors win: They’re more efficient, last longer, and provide better performance for demanding jobs.
Your Complete Cordless Drill Handbook: Everything You Need to Know
Welcome to the ultimate cordless drill tool guide. Whether you’re hanging shelves or building a deck, this guide gives you the knowledge to pick and use the right drill for every job. You’ll discover key features, step-by-step techniques, and pro tips that save you time and frustration.
Forget confusing specs and overwhelming choices. We break down everything into simple terms with practical examples. By the end, you’ll confidently select, operate, and maintain your cordless drill like a seasoned DIYer.
Understanding Cordless Drill Basics: Start Here
Before you buy or use a cordless drill, understand what makes these tools tick. This foundation helps you make smart decisions and avoid costly mistakes.
Visual guide about Cordless Drill Tool Guide Top Picks For Every Project
Image source: m.media-amazon.com
Voltage and Power Explained Simply
Voltage equals power in the drill world. Think of it like engine size in a car. More voltage means more muscle for tough jobs.
12V drills are compact and lightweight. Perfect for assembling furniture or drilling small holes in drywall. They fit in tight spaces but lack power for serious work.
18V drills handle 90% of home projects. They drive long screws into studs and drill through wood, metal, and plastic with ease. This is the sweet spot for most DIYers.
20V and higher models tackle construction work. They bore large holes in hardwood and work all day on job sites. If you’re building a shed or framing walls, go big.
Battery Types: Li-ion vs NiCad
Your drill is only as good as its battery. Modern cordless drills use two main types.
Lithium-ion (Li-ion) batteries dominate today’s market. They’re lighter, charge in 30-60 minutes, and last 3-5 years. They don’t suffer from memory effect, meaning you can charge them anytime without damage.
Nickel-Cadmium (NiCad) batteries are older technology. They’re cheaper upfront but heavier and slower to charge. They develop memory effect if not fully discharged before charging. Avoid these unless you find a truly exceptional deal.
Pro tip: Buy a drill with at least two batteries. One charges while you work with the other. This keeps projects moving without frustrating delays.
Key Components and What They Do
Every cordless drill has these essential parts:
- Motor: Creates the spinning force. Brushless motors are more efficient and last longer.
- Chuck: The clamp that holds drill bits. Keyless chucks tighten by hand. 3/8-inch chucks handle most bits, while 1/2-inch chucks accept larger bits for heavy work.
- Trigger: Controls speed. Press lightly for slow speeds, harder for fast. Variable speed gives you precise control.
- Forward/Reverse Switch: Drives screws in or removes them. Also helps free stuck bits.
- Torque Ring: Sets how much force the drill applies before slipping. Prevents stripping screws.
- Gear Selector: Low gear provides more torque for driving screws. High gear offers speed for drilling holes.
Essential Drill Features and What They Mean for Your Projects
Modern cordless drills pack features that make your work easier, faster, and more precise. Learn these to get the most from your tool.
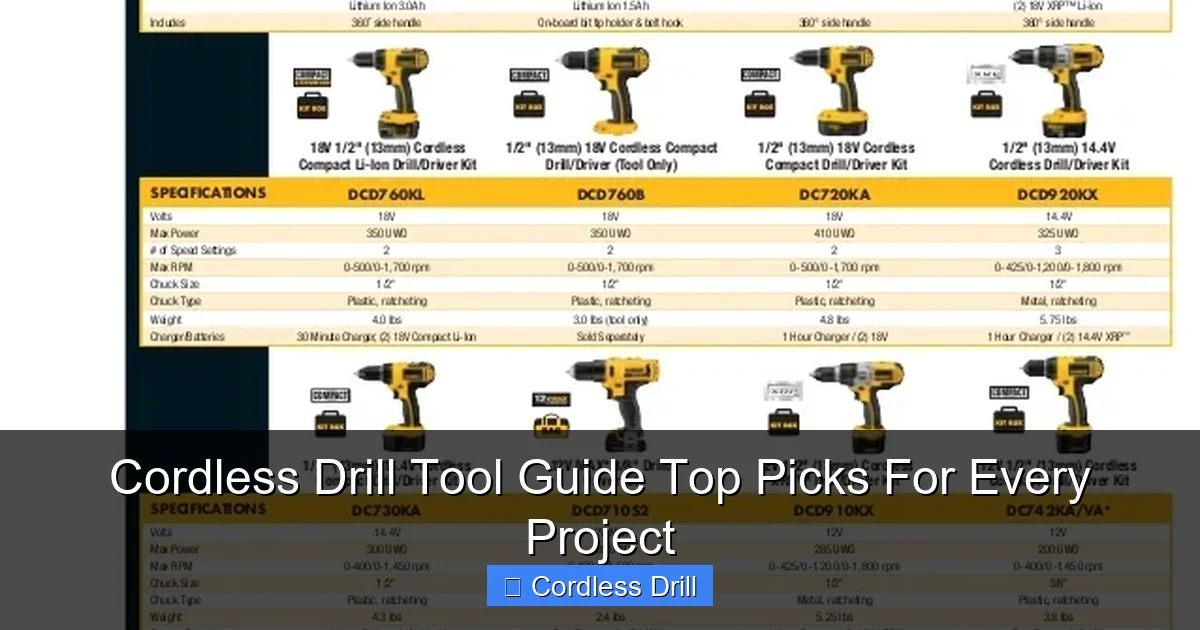
Visual guide about Cordless Drill Tool Guide Top Picks For Every Project
Image source: image.slidesharecdn.com
Speed Settings and Variable Speed Trigger
Different materials need different speeds. High speed (1,500-3,000 RPM) works best for drilling holes in wood and metal. Low speed (400-800 RPM) provides more control for driving screws.
The variable speed trigger is your best friend. Practice controlling it by starting slow and gradually increasing pressure. This prevents bits from slipping and ruining your project.
For delicate work like assembling cabinets, keep one hand near the trigger for quick control. For heavy drilling, brace yourself and use both hands for stability.
Torque Settings and Clutch Control
Torque is twisting force. Your drill’s clutch stops applying force once the screw is tight. This prevents damage.
Most drills have 10-20 torque settings. Start with a low setting for soft materials like drywall. Increase for hard woods or metal.
Test settings on scrap material first. Set the clutch too low and the screw won’t go in all the way. Set it too high and you’ll strip the head or crack the wood.
Chuck Types and Bit Security
A secure bit is a safe bit. Keyless chucks work great for quick changes. Tighten by holding the chuck and turning the sleeve until it clicks.
For heavy drilling, use a keyed chuck with a chuck key. These provide maximum grip and prevent bits from slipping during tough jobs.
Always clean bits before inserting them. Oil or debris on the shank reduces grip and can cause dangerous slipping.
Hammer Function: When to Use It
Regular drilling just spins the bit. Hammer drilling adds a forward pounding action. This is essential for masonry and concrete.
Use hammer mode only on brick, block, or concrete. Using it on wood or metal will damage both your bit and your material.
For light masonry work like hanging shelves, a regular drill with a hammer drill bit might suffice. For anything heavier, use a dedicated hammer drill or hammer drill function.
Choosing the Right Cordless Drill for Your Needs
The market offers hundreds of options. Focus on your most common projects to narrow choices quickly.

Visual guide about Cordless Drill Tool Guide Top Picks For Every Project
Image source: image.slidesharecdn.com
Light-Duty Projects: 12V Drills
These pocket-sized powerhouses weigh under 2 pounds. Perfect for:
- Hanging pictures and curtains
- Assembling IKEA furniture
- Drilling small pilot holes
- Electrical work in tight boxes
Brands like Bosch and Makita make excellent 12V models. They cost $80-$120 bare, or $120-$180 with a battery and charger.
Downsides: Limited runtime and can’t handle large bits or long screws. Keep one for convenience, but don’t expect it to replace a full-size drill.
Medium-Duty Workhorses: 18V-20V Drills
This is the DIYer’s sweet spot. These drills handle everything from deck building to kitchen remodeling.
Look for models with at least 1.5 Ah batteries. Higher Ah numbers mean longer runtime. A 4.0 Ah battery lasts twice as long as a 2.0 Ah battery.
Our best cordless drill recommendations focus on this category. Top brands include DeWalt, Milwaukee, and Ryobi. Prices range from $100 for basic kits to $300 for premium models with extra batteries.
Heavy-Duty Performance: 20V+ Models
Construction pros and serious DIYers need maximum power. These drills feature:
- Brushless motors for efficiency
- ½-inch chucks for large bits
- High capacity batteries (5.0 Ah or more)
- Metal gear housings for durability
Expect to pay $200-$400 for a quality heavy-duty kit. They weigh 4-6 pounds with a battery, so consider this for overhead work.
Brushless vs Brushed Motors: Why It Matters
Brushless motors have no physical brushes that wear out. This means:
- 30% longer runtime per charge
- More power in a smaller package
- 5-7 year tool life vs 2-3 years for brushed
- Better performance under load
Brushless drills cost $20-$50 more upfront. For a tool you’ll use for years, this investment pays off. Look for “brushless” clearly marked on the tool.
Step-by-Step: Using Your Cordless Drill Safely and Effectively
Master these steps to work safely and get professional results every time.
Pre-Operation Checklist
Before pulling the trigger, run through this quick safety routine:
- Inspect the battery for cracks or swelling
- Check that the chuck is tight and the bit is secure
- Wear safety glasses and hearing protection
- Secure your workpiece with clamps or a vise
- Keep your hands at least 4 inches from the drill bit
- Make sure the forward/reverse switch is in the correct position
- Verify the torque setting matches your task
Taking 10 seconds for this checklist prevents 90% of common accidents.
Inserting and Removing Bits
Changing bits takes seconds when you know how:
To insert a bit:
- Open the chuck by turning the sleeve counterclockwise
- Insert the bit shank fully into the chuck
- Hold the bit straight and tighten the chuck by turning clockwise
- For keyed chucks, use the key to tighten all three jaws securely
- Gently tug the bit to ensure it’s locked in place
To remove a bit:
- Open the chuck fully
- Pull the bit straight out
- Store bits in a case to keep them organized and sharp
Setting Speed and Torque for Success
Match your settings to the task:
Drilling wood: High speed (2,000+ RPM), low torque setting (1-3)
Drilling metal: Low speed (300-500 RPM), medium torque (5-8)
Driving screws into soft wood: Low speed, low torque (3-6)
Driving screws into hardwood: Low speed, high torque (10-15)
Deck screws: Low speed, maximum torque (15-20)
When in doubt, start low and increase as needed. This approach prevents damage and gives you better control.
Drilling Techniques for Different Materials
Each material needs a specific approach for clean, accurate holes.
Wood: Mark your spot with a pencil. Start drilling at low speed to prevent splintering. Increase speed once the bit bites. Pull straight out when complete.
Metal: Use a center punch to make a small indentation. This keeps the bit from wandering. Apply cutting oil for clean holes and longer bit life. Drill slowly to avoid overheating.
Drywall: Use a low speed setting. The bit will go through easily. Be careful not to drill too deep and damage pipes or wires behind the wall.
Masonry: Switch to hammer mode. Apply steady pressure but don’t force it. Let the drill do the work. Clear dust from the hole frequently by pulling the bit out.
Driving Screws Like a Pro
Driving screws seems simple until you strip one. Follow these steps:
- Choose the right driver bit for your screw head (Phillips, flathead, Torx, etc.)
- Set your drill to low speed and appropriate torque
- Start the screw by hand to keep it straight
- Place the bit firmly in the screw head
- Apply steady downward pressure while drilling
- Stop when the screw head meets the surface
- If you hit the clutch, increase torque and try again
For drilling into walls, always locate studs first using a stud finder. This prevents accidents and ensures secure mounting.
Project-Specific Drill Recommendations
Match your drill to the job for best results and tool longevity.
Home DIY Projects: Shelving and Furniture
For most home projects, an 18V drill with a 2.0 Ah battery is perfect. You’ll drill pilot holes and drive screws all day without recharging.
Recommended features:
- Keyless chuck for quick bit changes
- At least 15 torque settings
- LED work light for dark spaces
- Compact design for overhead work
Typical tasks: Hanging shelves, assembling furniture, installing door hardware, mounting TVs.
Woodworking Projects
Woodworkers need precision and power. Look for:
- Variable speed trigger with good modulation
- 3/8-inch or larger chuck for Forstner bits
- Side handle for better control during heavy drilling
- Depth stop for consistent hole depths
Use brad point bits for clean wood holes. They have a sharp point that prevents wandering and clean exits that don’t splinter.
Metalworking Projects
Metal requires patience and the right setup:
- Low speed capability (under 500 RPM)
- High torque for stubborn materials
- Metal drill bits (black oxide or cobalt)
- Cutting oil for holes over 1/4 inch
Secure metal pieces in a vise. Never hold small metal pieces in your hand while drilling. The drill can grab and spin the piece dangerously.
Masonry and Concrete Work
Regular drills struggle with concrete. For serious masonry:
- Use hammer drill mode or a dedicated hammer drill
- SDS bits work better than regular bits for concrete
- Start with a small pilot hole (1/4 inch)
- Drill in short bursts to clear dust
- Wear a dust mask and eye protection
For occasional concrete work, a hammer-capable drill driver works. For frequent use, invest in a dedicated hammer drill.
Outdoor and Construction Projects
Construction sites demand durability and runtime:
- 20V+ brushless drill with 5.0 Ah batteries
- Metal gear case for drop protection
- ½-inch chuck for large auger bits
- Second battery for all-day work
Keep batteries warm in cold weather. Cold reduces power output. Store them in an insulated bag when working outside in winter.
Maintenance and Care for Long-Lasting Performance
Your cordless drill is an investment. Proper care keeps it running for years.
Battery Maintenance
Lithium-ion batteries last longest when you:
- Store at 40-60% charge, not fully charged
- Keep batteries at room temperature when possible
- Remove batteries when not in use for weeks
- Clean battery contacts with a dry cloth monthly
- Replace batteries after 500 charge cycles or 3-5 years
Never leave batteries on the charger overnight. Modern chargers stop charging when full, but it’s still best practice to remove them promptly.
Cleaning and Storage
Clean your drill after every use:
- Wipe the housing with a damp cloth
- Blow dust from vents and chuck with compressed air
- Never spray water directly on the tool
- Lubricate the chuck annually with light oil
- Store in a dry place with moderate temperature
Use a carrying case to protect your drill during transport. Cases also keep bits and batteries organized and easy to find.
Regular Inspection Tips
Monthly checks prevent major problems:
- Test the trigger for smooth operation
- Check the chuck for wobble or damage
- Inspect the power cord on the charger
- Listen for unusual noises during operation
- Verify all screws and housing pieces are tight
If you notice reduced power or strange sounds, stop using the drill immediately. These signs often indicate motor or gear problems that need professional repair.
Troubleshooting Common Cordless Drill Issues
When your drill acts up, these solutions fix most problems quickly.
Battery Won’t Hold Charge
If your battery dies quickly or won’t charge:
- Clean the battery contacts on both battery and drill
- Check if the charger fan is working
- Try a different outlet to rule out power issues
- Test with your second battery to isolate the problem
- Replace batteries older than 4 years
Most battery problems stem from dirty contacts or age. Replacement batteries cost $30-$80 depending on brand and capacity.
Drill Won’t Turn On
No power when you pull the trigger? Try this:
- Ensure the battery is fully seated
- Check for debris in the battery slot
- Test the battery in another tool if possible
- Inspect the trigger switch for visible damage
- Look for loose wiring inside the housing
If the drill still won’t start after these checks, it may need professional repair. Trigger switches and internal wiring often require a technician’s expertise.
Overheating Problems
Drills get warm during use, but excessive heat signals trouble:
- Stop using the drill if it’s too hot to touch
- Check for blocked ventilation holes
- Reduce pressure during drilling
- Switch to a lower speed for tough materials
- Allow the drill to cool for 15 minutes every hour of heavy use
Overheating usually means you’re asking too much of your drill. Either the material is too hard for your drill’s capacity, or you’re applying too much pressure.
Chuck Issues and Bit Slipping
When bits won’t stay tight:
- Clean the chuck and bit shank thoroughly
- Check for wear on chuck jaws
- Tighten the chuck more firmly
- For keyed chucks, ensure the key is fully engaged
- Replace the chuck if it’s damaged or worn
Bit slipping ruins holes and damages bits. If your chuck won’t hold bits securely, replace it immediately. Chuck replacement costs $20-$40 and takes 30 minutes with basic tools.
Conclusion: Making the Most of Your Cordless Drill
Your cordless drill is the most versatile tool in your workshop. By choosing the right model, mastering its features, and maintaining it properly, you’ll complete projects faster and with better results.
Start with an 18V lithium-ion drill for most DIY work. Add two batteries and a basic bit set. This setup handles 95% of home projects. As your skills grow, expand your collection with specialized bits and possibly a second drill for heavy-duty tasks.
Remember: the best cordless drill is the one you use confidently and safely. Take time to practice on scrap materials before tackling important projects. Read your manual thoroughly. And always, always wear safety glasses.
With this guide, you’re ready to tackle any project that comes your way. Happy drilling!
