
Hammer drills aren’t just for construction workers. This guide reveals how this powerful tool can transform your everyday home projects. You’ll learn simple techniques for hanging heavy items, installing fixtures, and tackling repairs that would otherwise need professional help. Save time and money with these unexpected applications.
Key Takeaways
- Versatility is key: Your hammer drill works on wood, metal, concrete, and masonry, making it a true multi-purpose tool for any DIY project.
- Right bit matters: Always match your drill bit to the material. Masonry bits for concrete, wood bits for furniture, and metal bits for fixtures.
- Speed control is crucial: Start slow to prevent slipping and increase speed gradually. This protects both your workpiece and the tool.
- Safety first: Wear eye protection, secure your workpiece, and maintain a firm grip. These simple steps prevent accidents.
- Depth stops save time: Use the built-in depth stop or masking tape to drill consistent holes without measuring each time.
- Hammer mode isn’t always needed: For wood and metal, switch to regular drill mode to avoid damaging materials.
- Regular maintenance extends life: Clean air vents, lubricate moving parts, and store properly to keep your hammer drill running for years.
Introduction: Your Hammer Drill Is Hiding Its True Power
That hammer drill sitting in your garage isn’t just a one-trick pony for concrete walls. Most homeowners only use it when hanging heavy shelves or mounting TVs, but this tool holds secrets that can revolutionize how you tackle everyday projects. From quick furniture fixes to emergency plumbing repairs, the hammer drill’s unique combination of rotational force and concussive action makes it indispensable for modern DIYers.
In this guide, you’ll discover seven unexpected uses that will make you wonder how you ever lived without this versatile powerhouse. We’ll walk through each application with simple, step-by-step instructions that anyone can follow. No engineering degree required. Just grab your safety glasses and let’s unlock your tool’s hidden potential.
What Exactly Is a Hammer Drill?
Before diving into the surprising uses, let’s clear up a common confusion. A hammer drill looks like a regular drill but works differently. While a standard drill simply spins, a hammer drill adds a rapid hammering motion that pounds the bit forward as it rotates. This dual action makes it perfect for tough materials like concrete and brick.
Visual guide about Hammer Drill Everyday Uses You Never Knew Were Possible
Image source: i.ytimg.com
Understanding the difference between a drill and a hammer drill helps you choose the right tool for each job. For most wood and metal projects, a regular drill works fine. But when you need to tackle masonry or make large holes in dense materials, that hammer function becomes your best friend. Many modern hammer drills let you switch between modes, making them incredibly versatile for mixed-material projects.
Everyday Use #1: Hanging Heavy Pictures and Mirrors the Right Way
We’ve all been there. You hang a beautiful heavy mirror using regular wall anchors, only to find it crashing down weeks later. A hammer drill prevents this disaster by creating perfect holes for proper anchors that actually hold.
Visual guide about Hammer Drill Everyday Uses You Never Knew Were Possible
Image source: toptiertool.com
Step-by-Step Process
Choose your wall type first. Drywall needs different technique than plaster or concrete. For drywall, locate a stud using a stud finder. Mark your spot with a pencil. Select a drill bit that matches your anchor size—typically 1/4 inch for most heavy mirrors.
Set your drill to hammer mode. Most models have a simple switch near the trigger. For drywall, you might actually want regular drill mode to avoid tearing the paper surface. For masonry walls, definitely use hammer mode. Place the tip firmly on your mark at a perfect 90-degree angle. Start at low speed to create a pilot groove, then increase pressure steadily.
Drill to the correct depth. Your hole should be slightly deeper than your anchor length. Many hammer drills include an adjustable depth stop. If yours doesn’t, wrap masking tape around the bit at the right measurement as a visual guide. Pull the bit out periodically to clear dust, especially in deep holes.
Pro Tips for Success
Always wear safety glasses. Wall dust is nasty stuff. For mirrors over 20 pounds, use toggle bolts instead of standard anchors. The hammer drill makes quick work of creating the necessary holes. Test your anchor by gently wiggling it. If it feels loose, go up one bit size and try again.
Everyday Use #2: Installing Kitchen and Bathroom Fixtures
Granite countertops and ceramic tile backsplashes intimidate many DIYers. But with a hammer drill, you can confidently install faucets, soap dispensers, and cabinet hardware without calling a professional. The key is using the right technique for these delicate surfaces.
Visual guide about Hammer Drill Everyday Uses You Never Knew Were Possible
Image source: 64.media.tumblr.com
Working with Stone and Tile
Start with masking tape. Place a small piece of masking tape over your drill point. This prevents the bit from slipping and protects the surface from chipping. Mark your hole location precisely with a marker on the tape. For granite, use a diamond-tipped drill bit specifically designed for stone. These bits work best at low speeds.
Apply gentle, consistent pressure. Let the tool do the work. Pushing too hard can crack tile or chip granite edges. Use the hammer mode sparingly on stone—sometimes regular drill mode with the right bit works better. Keep the drill perpendicular to the surface. For tile, start at an angle to create a small dimple, then straighten up once you have a groove.
Cool the bit periodically. Drilling through stone generates heat. Dip the bit in water every 30 seconds to extend its life and prevent cracking the material. Clear away dust frequently to maintain visibility of your mark.
Installing Hardware
For cabinet knobs and pulls, measure carefully from the edge and bottom of each drawer. Use a template if your manufacturer provides one. Drill pilot holes using a small bit first, then step up to your final size. This prevents splitting the wood and ensures clean holes. For bathroom towel bars and toilet paper holders, use the hammer function for any masonry walls, but switch to regular mode for stud-mounted installations.
Everyday Use #3: Emergency Home Repairs and Maintenance
When pipes leak or walls get damaged, a hammer drill helps you fix problems fast. It’s not just for making new holes—it can help you remove broken fixtures and prepare surfaces for repair.
Removing Broken Screws and Anchors
Use the reverse function. Most hammer drills have a reverse switch. Set your drill to reverse and select a bit slightly smaller than the stuck screw. Apply firm pressure and start slowly. The reverse rotation often catches and backs out the screw. For stripped heads, try a specialty extraction bit that grips the damaged metal.
Extract broken plastic anchors. When an anchor breaks off flush with the wall, drill into the center of it with a small bit. The hammer action will often shatter the plastic, allowing you to remove the pieces with needle-nose pliers. Clean out the hole completely before installing a new anchor.
Creating Access Panels
Need to reach plumbing behind a wall? A hammer drill makes quick work of cutting access holes in drywall. Score your cutting line with a utility knife first. Then drill a series of holes along the line using the hammer drill in regular mode. Connect the holes with the knife. This technique creates a clean, removable patch that you can repair later.
For HVAC access or electrical repairs, use a hole saw attachment. The hammer drill’s power drives through drywall, wood, and even thin metal ducts. Support the wall from behind if possible to prevent blowout. Always check for electrical wires and pipes before drilling into walls.
Everyday Use #4: DIY Furniture and Craft Projects
That hammer drill isn’t just for demolition. With proper technique, it becomes a precision instrument for building and repairing furniture. The hammer function actually helps create cleaner holes in dense hardwoods.
Working with Hardwood
Pre-drill all joinery. Hardwoods like oak and maple will split without pilot holes. Use a brad-point bit for clean, accurate holes. Set your drill to regular mode, not hammer mode, for most woodworking. The hammer action can splinter the wood surface. Clamp your workpiece securely to prevent spinning.
Create pocket holes quickly. While pocket hole jigs typically use regular drills, a hammer drill on low speed works in a pinch. The key is controlling the depth. Use the depth stop or tape method mentioned earlier. For outdoor furniture that might sit on concrete, you’ll need the hammer function to drill into patio bases for anchoring.
Repairing Wicker and Rattan
Surprisingly, a hammer drill on its lowest setting can repair wicker furniture. Use a very small bit (1/16 inch) to reattach loose strands. The gentle hammer action helps the bit pass through without splitting the delicate material. Work slowly and support the piece from behind.
For macrame and fabric projects that need wall mounting, use your hammer drill to create perfect holes for eye hooks and mounting hardware. This ensures your art hangs level and secure.
Everyday Use #5: Masonry and Brick Home Improvements
This is where the hammer drill truly shines. While regular drills struggle with brick and mortar, the hammer function makes these materials feel like soft wood. The secret is matching technique to material density.
Hanging Outdoor Lighting and Decorations
Choose the right bit for brick. Masonry bits feature a carbide tip that withstands the hammering action. For brick walls, use a bit 1/16 inch larger than your anchor. This accounts for the slight wobble during drilling. Start at low speed to create a guide mark, then increase to full speed with steady pressure.
Drill into mortar joints carefully. Mortar is softer than brick but can crumble. Use a smaller bit and less pressure. The hammer function works well here, but keep the speed moderate. Test your anchor in an inconspicuous area first. Some mortar is too soft for standard anchors.
Install outdoor TV mounts and security cameras. These require larger holes and stronger anchors. Use a hammer drill with a 3/8-inch bit for most mounting bolts. Drill slightly deeper than needed to allow for adjustment. Blow out dust completely before inserting anchors.
Creating Garden Features
Want to install a mailbox post or bird bath in a concrete pad? Your hammer drill handles this easily. Use a masonry bit and full hammer mode. For deep holes, withdraw the bit every few seconds to clear dust. This prevents overheating and bit binding. In extreme cold, concrete becomes more brittle. Reduce hammer intensity to prevent cracking.
Everyday Use #6: Electrical and Plumbing Prep Work
Running new electrical or plumbing lines seems daunting, but a hammer drill simplifies the process. You’ll create clean holes through studs, joists, and even concrete foundations with precision.
Drilling Through Studs and Joists
Locate your path first. Use a stud finder to map where studs sit. Mark drilling points at the center of each stud bay. This keeps holes away from nails and electrical wires. For plumbing, drill through the center of studs to meet code requirements. Use a 1-inch spade bit for most pipes and 3/4-inch for electrical conduit.
Use regular drill mode for wood. The hammer function isn’t necessary for wood studs and can splinter the edges. Set your drill to regular mode and use a sharp spade bit. Apply firm, steady pressure. Let the bit’s cutting edges do the work. For deep holes through multiple studs, drill from both sides to prevent tear-out.
Running Lines Through Concrete
Basement renovations often require drilling through concrete walls for electrical or plumbing. This is hammer drill territory. Use a 1/4-inch masonry bit to start, then step up to your final size. Mark your hole location with a pencil. Place a piece of scrap wood behind the drilling area to prevent blowout on the other side.
Drill in short bursts. Let the tool hammer rather than forcing it. Keep the bit cool by dipping it in water periodically. For large holes needed for pipe chases, use a hole saw attachment designed for hammer drills. These cut clean holes up to 4 inches in diameter.
Everyday Use #7: Seasonal Home Preparation
Your hammer drill earns its keep year-round. From winterizing your home to summer projects, it handles seasonal tasks that would otherwise require multiple tools or professional help.
Winter Weatherproofing
Install storm windows and doors. These often require precise holes in brick or wood siding. Use your hammer drill to create pilot holes for mounting screws. For brick siding, drill into the mortar if possible. It’s easier and less damaging than drilling brick itself. Use the depth stop to ensure all holes are the same depth for level installation.
Mount gutter guards and downspout extensions. These prevent ice dams and water damage. Use a 1/8-inch bit for pilot holes in aluminum or vinyl gutters. For mounting brackets on brick, switch to hammer mode and a masonry bit. Work from a stable ladder and have someone steady it. Always wear safety glasses—gutter debris is nasty.
Summer Outdoor Projects
Install patio lighting, outdoor speakers, or a pergola with confidence. Your hammer drill anchors directly into concrete, brick, or wood. For string lights across a deck, drill small pilot holes at joist locations. Use the hammer function sparingly on decking to avoid splintering.
Build raised garden beds and anchor them to concrete pads. Drill into the concrete for rebar anchors that keep your beds from shifting. For compost bins and tool sheds, create ventilation holes in siding using a step drill bit. The hammer drill’s power makes quick work of metal and plastic panels.
Troubleshooting Common Hammer Drill Problems
Even the best tools need occasional TLC. Recognizing and fixing common issues keeps your hammer drill running smoothly for years.
Drill Isn’t Hammering
First, check that the hammer mode is actually engaged. Some models require you to pull the trigger fully to activate hammering. If it’s still not working, the clutch might be worn. This is common after heavy use. Try adjusting the torque settings. For many models, setting 3 or higher activates the hammer mechanism. If that fails, the motor brushes may need replacement—a job for a professional repair shop.
Bits Keep Slipping
Inspect the chuck for wear. A worn chuck won’t grip bits properly. Clean out any dust or debris from the chuck using compressed air. Tighten the chuck fully using the key or the manual tightening ring. For keyless chucks, make sure you’re twisting it enough. Some users don’t apply enough force. Try marking the chuck and bit with a marker line to see if they’re rotating together.
Excessive Vibration
Some vibration is normal in hammer mode, but too much indicates a problem. Check that your bit is sharp and undamaged. Dull bits cause more vibration and can damage the tool. Make sure the bit is fully inserted into the chuck. A loose bit wobbles excessively. Also, check that you’re using the correct bit type for the material. Using a wood bit in concrete creates terrible vibration and can break the bit.
Overheating Issues
Let your tool rest every few minutes during heavy use. Most hammer drills overheat after 5-10 minutes of continuous drilling. Check the air vents for blockage. Dust buildup restricts airflow and causes overheating. Clean vents with compressed air monthly. If the motor smells burnt, stop immediately. This indicates serious electrical issues. Have it professionally serviced.
Poor Performance in Concrete
Concrete drilling requires sharp carbide bits. If your bit isn’t cutting, it’s likely dull. Look for worn or chipped carbide tips. Replace dull bits immediately—they can damage the concrete and the tool. Also, check that you’re using enough pressure. Let the hammer do the work, but apply firm, steady force. Too little pressure actually dulls bits faster.
Conclusion: Transform Your DIY Game Today
Your hammer drill is far more than a one-trick tool for concrete walls. From hanging that perfect mirror to running new plumbing lines, it handles everyday tasks with power and precision that regular drills simply can’t match. The key is understanding when to use hammer mode and when to switch to regular drilling.
Remember to always match your bit to the material, control your speed, and prioritize safety. Keep your tool maintained by cleaning vents and storing it properly. With these techniques in your toolkit, you’ll tackle projects faster, with better results, and without calling expensive contractors for routine jobs.
Start with one project from this guide this weekend. You’ll quickly discover that the hammer drill you thought you only needed for emergencies might just become your most-used power tool. The confidence to fix, build, and improve your home is literally at your fingertips.
Frequently Asked Questions
Can I use my hammer drill on wood furniture?
Yes, but switch to regular drill mode. The hammer function can splinter wood surfaces. Use sharp brad-point bits and clamp your workpiece securely. For deep holes, periodically withdraw the bit to clear sawdust and prevent overheating.
Do I really need a hammer drill for home use?
If you plan to hang heavy items on masonry walls or do serious DIY projects, absolutely. For basic tasks on drywall and wood, a regular drill works. But a hammer drill’s versatility makes it worth owning for most homeowners. It handles both regular drilling and tough masonry work.
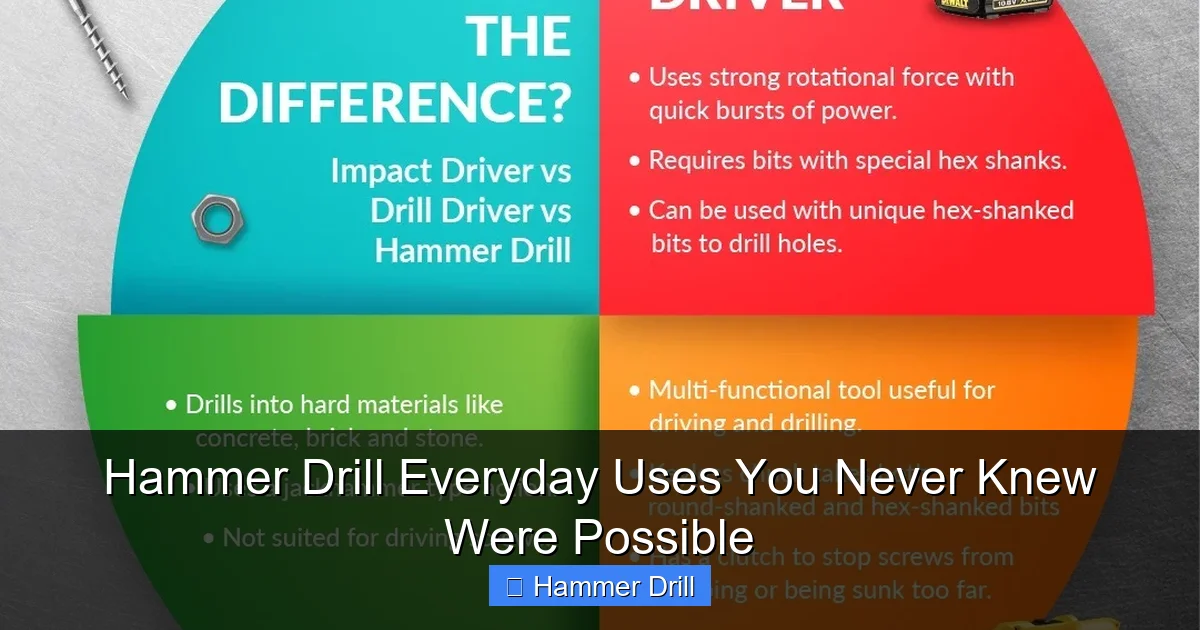
What’s the difference between a hammer drill and an impact driver?
Hammer drills combine rotation with a forward hammering action for drilling into hard materials. Impact drivers provide rotational force with bursts of torque for driving screws. They look similar but serve different purposes. Many professionals carry both, but a hammer drill can handle light driving tasks in a pinch.
How do I prevent wall damage when drilling?
Always start at low speed to create a pilot groove. Use masking tape on the wall surface to prevent bit slip and reduce chipping. Drill at a perfect 90-degree angle. For tile, start at an angle to create a dimple, then straighten up. Clear dust frequently from the hole to prevent overheating and binding.
Can a hammer drill drill through metal?
Yes, but use regular drill mode and high-speed steel bits. The hammer function isn’t designed for metal and can damage both the bit and workpiece. Apply cutting fluid for thick steel. Use low speed and steady pressure. Let the bit’s sharp edges cut rather than forcing it.
How often should I maintain my hammer drill?
Clean air vents monthly with compressed air. Check and lubricate the chuck every three months. Inspect power cords for damage before each use. Replace motor brushes annually under heavy use. Store in a dry place with the chuck cover on to keep dust out.
