
This guide helps you match your hammer drill to the right material every time. You’ll learn which materials require hammer action and which don’t, how to select the correct drill bits and settings, and essential safety tips to prevent damage and ensure perfect results for your project.
Key Takeaways
- Hammer Action is for Masonry: Only use the hammer function on brittle materials like concrete, brick, stone, and cinder block. Using it on metal or wood can damage both the material and your tool.
- Bit Selection is Critical: Always use a carbide-tipped masonry bit for hammer drilling into hard materials. For metal or wood, use high-speed steel (HSS) or specialty bits and turn the hammer function OFF.
- Speed and Pressure Matter: Use slower speeds for harder materials and let the tool do the work. Applying excessive pressure can overheat the bit and wear out the drill’s mechanism.
- Know Your Drill’s Modes: Modern hammer drills have multiple settings (drill-only, hammer-drill, chisel). Selecting the wrong mode is a common cause of project failure and tool damage.
- Safety is Non-Negotiable: Always wear safety glasses and a dust mask when hammer drilling. Secure your workpiece and be aware of hidden hazards like wires and pipes behind walls.
- When in Doubt, Start Slow: If you’re unsure about a material, begin with a small pilot hole at a low speed without hammer action to test its hardness and composition.
Comprehensive Hammer Drill Material Compatibility Guide
Welcome, DIYers and pros! Have you ever grabbed your hammer drill for a project, only to get poor results, a broken bit, or a scary noise? The problem often isn’t the tool—it’s using it on the wrong material. A hammer drill is a powerhouse, but it’s not a universal tool. This guide will walk you through hammer drill material compatibility step-by-step. You’ll learn exactly what you can and cannot drill into, how to choose the right bit, and the settings to use for a clean, safe, and efficient job every time. Let’s turn confusion into confidence.
Understanding Your Hammer Drill’s Capabilities
Before we talk materials, let’s understand the tool. A hammer drill combines a spinning drill bit with a rapid, pounding hammering action. This “hammer and rotate” motion is perfect for pulverizing brittle materials. However, it’s crucial to know that most hammer drills have a selector switch. You can choose: Drill-only (for standard drilling), Hammer-drill (for masonry), and sometimes a Chisel-only mode for light demolition.
Visual guide about Comprehensive Hammer Drill Material Compatibility Guide
Image source: i0.wp.com
Confused about how this differs from other tools? It’s a common question. For a clear breakdown, check out our article on the difference between an impact driver and a hammer drill. Knowing this distinction is the first step to proper material compatibility.
Step 1: Identify Your Material
This is the most critical step. Drilling into the wrong material is the top cause of problems.
Visual guide about Comprehensive Hammer Drill Material Compatibility Guide
Image source: imgv2-1-f.scribdassets.com
Common Materials for Hammer Drilling (Use Hammer Action ON)
These are brittle, mineral-based materials that need the impact force to break apart.
- Concrete: The classic job for a hammer drill. This includes poured foundations, slabs, and precast concrete.
- Brick: Solid brick, face brick, and engineering brick. Be gentler on old, soft brick.
- Concrete Block (Cinder Block): Often hollow, so be prepared for the bit to punch through into empty space.
- Stone: Natural stone like granite, limestone, and sandstone. These can be very hard and may require specialized diamond-tipped bits for larger holes.
- Mortar: The softer material between bricks or blocks. It’s easier to drill but doesn’t hold anchors as well as the brick itself.
Common Materials for Standard Drilling (Use Hammer Action OFF)
These are ductile or fibrous materials that will be damaged by the hammering action.
- Wood: All types (softwood, hardwood, plywood, MDF). The hammer action will splinter and tear the wood fibers.
- Metal: Steel, aluminum, iron. Hammering will work-harden the metal, dull bits instantly, and create an awful racket.
- Plastic & PVC: The impacts will crack and shatter most plastics.
- Drywall/Plaster: These materials offer almost no resistance. The hammer function is unnecessary and will create a huge, messy hole.
- Ceramic Tile: Use a specialized tile bit and drill on a slow speed WITHOUT hammer action to prevent cracking the glaze.
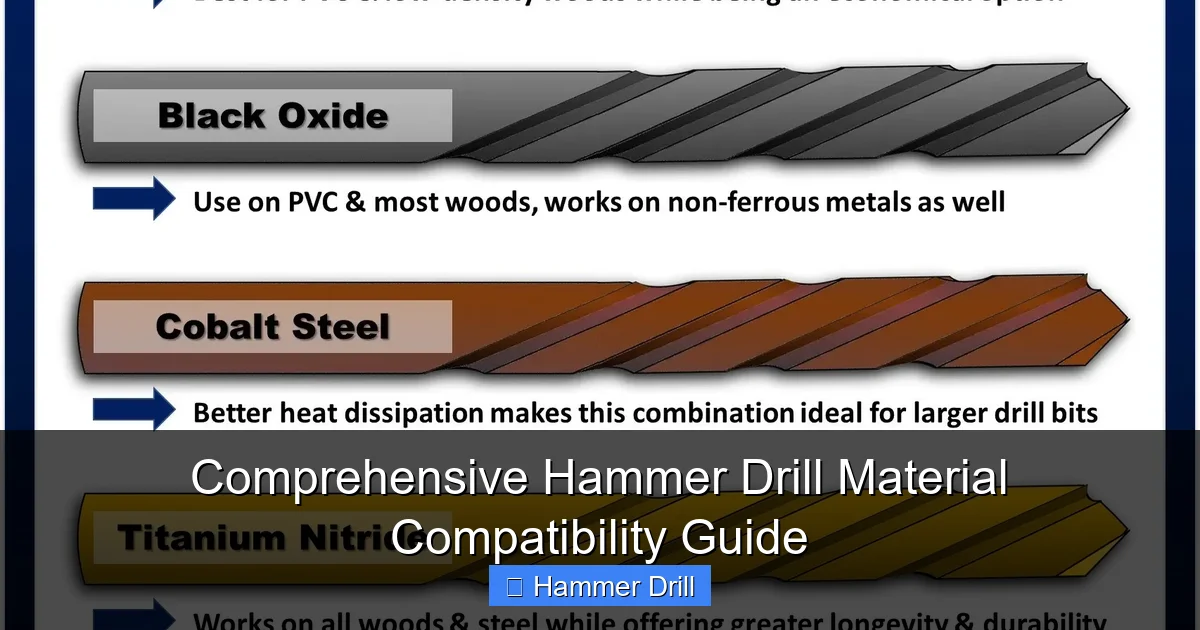
Step 2: Select the Perfect Drill Bit
The bit is just as important as the drill mode. Using a wood bit on concrete will destroy it in seconds.
Visual guide about Comprehensive Hammer Drill Material Compatibility Guide
Image source: toolsadvisers.com
- For Masonry (Hammer Action ON): You must use a carbide-tipped masonry bit. The tip is made of ultra-hard tungsten carbide to withstand the pounding and abrasion. Look for a spiraled design to remove dust.
- For Wood (Hammer Action OFF): Use standard twist bits, spade bits, or hole saws. A high-quality cordless drill in drill-only mode is perfect for these tasks.
- For Metal (Hammer Action OFF): Use High-Speed Steel (HSS) twist bits. For harder steel, cobalt or titanium nitride-coated bits are better. Use cutting oil to keep things cool.
- For Tile & Glass (Hammer Action OFF): Use a spear-tipped carbide or diamond grit hole saw. Start at a very low speed.
Step 3: Configure Your Drill Settings
Now, let’s match the settings to the material.
For Concrete, Brick, and Stone
- Mode: Hammer-Drill.
- Speed (RPM): Low to Medium. Harder material = slower speed. This gives the hammer mechanism time to deliver effective blows.
- Clutch/Torque: Set to the highest drill setting (often marked with a drill bit icon).
- Technique: Apply firm, steady pressure, but let the tool do the work. Periodically pull the bit out to clear dust from the hole.
For Wood
- Mode: Drill-Only. If you’re doing a lot of woodwork, you might not even need a hammer drill. A standard drill or the tool in our hammer drill vs. regular drill comparison might be more versatile for you.
- Speed (RPM): High for softwoods, Medium for hardwoods.
- Clutch/Torque: For driving screws, use the clutch. For drilling holes, use the highest drill setting.
For Metal
- Mode: Drill-Only.
- Speed (RPM): Very Slow. This prevents the bit from overheating.
- Technique: Use a center punch to make a small dimple first. Apply steady pressure and use cutting oil liberally.
Step 4: Execute with Proper Technique and Safety
Good technique ensures success and safety.
- Always Wear PPE: Safety glasses are mandatory. A dust mask is essential for masonry work. Hearing protection is recommended for prolonged use.
- Secure Your Workpiece: Use clamps or a vice. Never hold material in your hand while drilling.
- Check for Hidden Hazards: Use a stud, wire, and pipe detector before drilling into any wall, especially when you’re using a drill for screws into a wall.
- Start Straight: Begin drilling at a slow speed to establish the hole before increasing speed or pressure.
Troubleshooting Common Problems
Things don’t always go perfectly. Here’s how to fix common issues.
Problem: The drill isn’t making progress in concrete.
Solutions: 1) Ensure you are in hammer-drill mode. 2) Check that you are using a sharp, carbide-tipped masonry bit. 3) Apply more firm, downward pressure. 4) The concrete may have extremely hard aggregate (rock); try a new, high-quality bit or a smaller pilot hole.
Problem: The bit is smoking or glowing red.
Solutions: 1) STOP IMMEDIATELY. The bit is overheating. 2) You are likely using a non-masonry bit on masonry, or a dull bit. 3) You may be using too high a speed. Let the bit cool completely and replace it with the correct type.
Problem: The hole is chipped or too big (in tile or wood).
Solutions: 1) You almost certainly have the hammer action turned ON. Turn it OFF for these materials. 2) For tile, start at an angle to create a groove before straightening the drill. 3) Use a piece of masking tape over the spot to help prevent splintering in wood.
Problem: The drill is making a horrible grinding/banging noise in metal.
Solution: The hammer function is on. Turn it off immediately. You may have already damaged the bit and work-hardened the metal spot. Start over with a new, sharp HSS bit, lots of oil, and no hammer action.
Conclusion: Drill with Knowledge and Confidence
Mastering hammer drill material compatibility transforms this powerful tool from a source of frustration into your most reliable project partner. Remember the golden rule: Hammer action is for brittle minerals (concrete, brick), and drill-only is for everything else (wood, metal, tile). Pair this with the correct bit, the right speed, and safe technique, and there’s almost no hole you can’t tackle. Start your next project by identifying the material first, and let this guide ensure you use the perfect combination of tool and technique for flawless results. Happy drilling!
