
Choosing the right saw blade transforms your cuts from frustrating to flawless. This guide breaks down exactly how to match blades to your saw, material, and project needs. Stop wasting money on wrong blades and achieve professional results every time.
Key Takeaways
- Match blade to saw type first: Using the wrong blade diameter or arbor size is dangerous and ineffective. Always check your saw’s specs.
- Material dictates tooth count & type: Hardwoods need fine-tooth blades (60-80+ TPI), plywood uses medium (40-60 TPI), while rough framing requires coarse (24-40 TPI).
- Tooth geometry matters: ATB (Alternate Top Bevel) blades give clean crosscuts, FTG (Flat Top Grind) rips efficiently, and Combination blades offer a versatile middle ground.
- Don’t ignore coatings & construction: Anti-friction coatings reduce heat and binding, while carbide-tipped blades last significantly longer than steel ones.
- Budget wisely: Invest in quality blades for frequent use; cheaper blades dull fast and ruin your workpiece. Consider cost-per-cut, not just upfront price.
- Safety is non-negotiable: Never force a blade. If it’s burning, chipping, or vibrating excessively, stop immediately – it’s likely the wrong blade or needs sharpening.
Why Choosing the Right Saw Blade is Non-Negotiable (And How It Saves You Time & Money)
You’ve got the perfect project planned. Your saw is humming, ready to go. But when you pull the trigger, instead of a clean, smooth cut, you get burning, chipping, or a wobbly, inaccurate line. Sound familiar? Nine times out of ten, the culprit isn’t your skill – it’s the wrong saw blade. Choosing saw blades seems simple, but it’s a critical decision that impacts safety, cut quality, tool lifespan, and your bottom line. A mismatched blade forces your saw, creates dangerous kickback, ruins your material, and leaves you frustrated. This guide cuts through the confusion. We’ll walk you step-by-step through exactly how to choose saw blades that deliver flawless results, project after project. Whether you’re a weekend warrior or a pro, mastering blade selection is the secret weapon for professional-quality work.
Step 1: Identify Your Saw Type – The Absolute Foundation
Before you even look at tooth count or material, you MUST know what saw you’re using. Blades are engineered specifically for different saw types. Using the wrong blade is dangerous and guarantees poor results.

Visual guide about Expert Guide Choosing Saw Blades For Flawless Results
Image source: woodarchivist.com
Circular Saws (Handheld & Table Saws)
These are the workhorses of most shops. Blades are typically 7-1/4″, 8-1/4″, or 10″ in diameter. Crucially, check your saw’s arbor size – the hole in the blade center. Most common are 5/8″ arbors, but some older or specialized saws use 1″ arbors. Never force a blade onto an incorrect arbor. For table saws, also consider if you need a blade compatible with your riving knife or splitter. If you own a Ryobi table saw, understanding how to change the blade on a Ryobi table saw is essential maintenance knowledge.
Miter Saws (Chop Saws & Sliding Compound Miter Saws)
These usually take 10″ blades, but 12″ is common on larger sliding models. Arbor size is almost always 5/8″. Miter saw blades are optimized for crosscutting, often featuring higher tooth counts (80+ TPI) and specialized ATB geometry for clean cuts across the grain.
Reciprocating Saws (Saber Saws)
These use entirely different blades – long, narrow, and mounted in a clamp. Blade length (6″, 8″, 12″) and shank type (Universal, T-Shank, etc.) are critical. Choosing the right reciprocating saw blade depends heavily on the material (wood, metal, demo) and the cut type (flush, plunge). Knowing how to use a reciprocating saw safely starts with the correct blade.
Band Saws
Blades are continuous loops, measured by wheel diameter (e.g., 14″ band saw) and width (1/4″ to 1″). Tooth count (TPI) varies significantly based on material and cut complexity. Fine-tooth blades (10-14 TPI) for metal or intricate curves, coarse (3-6 TPI) for resawing thick wood.
Jigsaws
Use short, narrow blades with a shank that fits your specific jigsaw model (U-shank or T-shank). TPI and tooth geometry vary for wood, metal, or plastics.
Step 2: Determine the Material You’re Cutting – The Primary Driver
Your material is the biggest factor in choosing the right blade characteristics. Cutting soft pine requires a different blade than slicing through stainless steel or laminate.
Visual guide about Expert Guide Choosing Saw Blades For Flawless Results
Image source: woodarchivist.com
Wood (The Most Common Material)
- Hardwoods (Oak, Maple, Cherry): Demand fine-tooth blades (60-80+ TPI) with sharp ATB geometry for clean crosscuts and minimal tear-out. Higher quality carbide tips are essential for longevity against dense grain.
- Softwoods (Pine, Fir – Framing/Lumber): Coarser blades (24-40 TPI) with FTG or Combination geometry rip efficiently through the grain without excessive splintering. Speed over ultimate finish.
- Plywood & Engineered Wood (MDF, Particleboard): Medium tooth count (40-60 TPI) is ideal. Look for blades specifically labeled “plywood” or “laminate” – they often have a higher tooth count and special anti-chip geometry (like a negative hook angle) on the top and bottom to prevent tear-out on both surfaces. A sharp blade is critical here as these materials dull blades quickly.
- Exotic Woods: Often very hard or resinous. Require high-quality carbide blades with fine teeth (60+ TPI) and potentially special coatings to resist sap buildup.
Metal
- Ferrous Metals (Steel, Iron): Requires blades with bi-metal construction (HSS teeth welded to a flexible spring steel body) or carbide-tipped blades specifically for metal. Crucially, use a blade designed for metal cutting – NEVER use a wood blade on metal! Wood blades will overheat, warp, and potentially shatter. TPI is lower (10-24 TPI) to clear chips and prevent binding. Lubrication (cutting oil) is usually necessary.
- Non-Ferrous Metals (Aluminum, Copper, Brass): Can use bi-metal blades, but carbide-tipped blades with a high tooth count (24-36 TPI) and a specific geometry (often with a positive rake) designed for non-ferrous metals are superior for cleaner cuts and longer life. A coolant/lubricant is highly recommended.
Other Materials
- Plastics & Acrylics: Fine-tooth blades (60+ TPI) with ATB geometry, similar to hardwoods. A blade with a low hook angle helps prevent chipping. Slow cutting speed is key.
- Laminate & Countertops: Requires specialized blades with very fine teeth (80+ TPI) and often a triple-chip grind (TCG) or specific anti-chip design to prevent chipping the top surface. Often coated.
- Concrete/Masonry: Uses diamond blades (continuous rim, turbo rim, or segment rim) or abrasive blades. Grit size and bond hardness are critical factors, not TPI. How to tell if a diamond saw blade is dull involves checking for reduced cutting speed, excessive vibration, or visible wear on the diamond segments.
- Tile (Ceramic/Porcelain): Requires continuous rim diamond blades. Wet cutting is standard for porcelain; dry cutting is possible for ceramic with the right blade. Grit size (typically 40-60 for porcelain) matters.
Step 3: Decipher Tooth Count (TPI) and Geometry – The Cut Quality Secret
Tooth count (Teeth Per Inch – TPI) and the shape of the teeth (geometry) directly determine how aggressively the blade cuts and the finish it leaves.

Visual guide about Expert Guide Choosing Saw Blades For Flawless Results
Image source: bucktool.com
Understanding TPI (Teeth Per Inch)
- Low TPI (24-40): Fewer, larger teeth. Best for: Ripping wood (cutting WITH the grain), rough cuts, thick materials, metal cutting. Cuts fast but leaves a rougher surface. Good chip clearance.
- Medium TPI (40-60): Balanced tooth count. Best for: General-purpose woodcutting, plywood, panel products. Offers a good compromise between speed and finish.
- High TPI (60-80+): Many small teeth. Best for: Crosscutting wood (cutting ACROSS the grain), fine woodworking, hardwoods, plywood (to prevent tear-out), plastics, non-ferrous metals. Cuts slower but delivers a much smoother finish. Less chip clearance.
Rule of Thumb: More teeth = smoother cut but slower feed rate. Fewer teeth = faster cut but rougher finish. Always match TPI to your material thickness – thicker materials generally need lower TPI to clear chips effectively.
Decoding Tooth Geometry
- ATB (Alternate Top Bevel): Teeth are beveled alternately left and right on the top edge. Best for: Crosscutting wood. The bevel slices the wood fibers cleanly, resulting in minimal tear-out on the top surface. The most common geometry for general-purpose and fine woodworking blades.
- FTG (Flat Top Grind): Teeth have a flat top edge. Best for: Ripping wood. The flat top shears the wood fibers efficiently along the grain, cutting very fast. Leaves a rougher surface than ATB. Less prone to grabbing.
- Combination (ATB/FTG): Alternates groups of ATB teeth with a single FTG tooth. Best for: General-purpose use on table saws. Aims to offer decent crosscutting (ATB groups) and ripping (FTG tooth) performance in one blade. A good “do-it-all” option for many woodworkers.
- TCG (Triple Chip Grind): Alternates a pointed tooth with a flat-topped “raker” tooth. Best for: Cutting laminates, plastics, non-ferrous metals, and hardwoods prone to chipping. The raker tooth clears chips, while the pointed tooth shears cleanly, minimizing chipping.
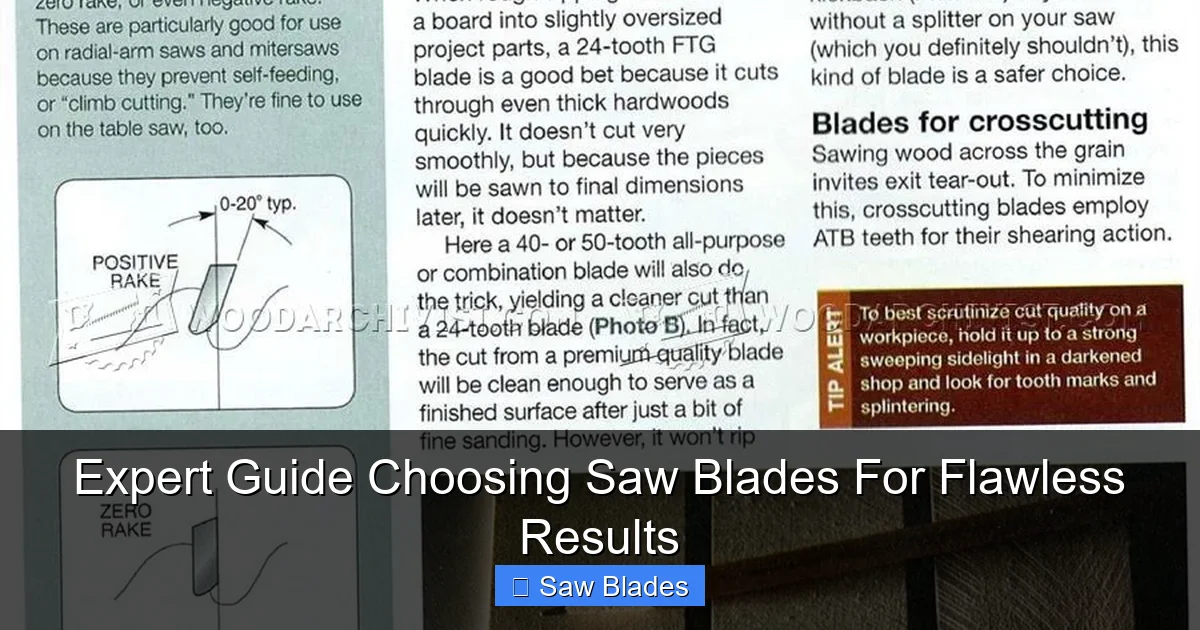
- Hook Angle: The angle at which the tooth face meets the material. A positive hook angle (tooth leans forward) pulls the blade into the cut, making it aggressive and fast (good for ripping). A negative hook angle (tooth leans back) resists pulling, giving more control and less chance of kickback (good for crosscutting, plywood, fine work). Zero hook is neutral.
Step 4: Consider Blade Diameter, Arbor Size, and Kerf Width
These physical specs must match your saw and influence performance.
Diameter & Arbor Size
As covered in Step 1, this is non-negotiable. Always use the diameter and arbor size specified for your saw. Using a smaller diameter blade on a larger saw reduces cutting depth and can be unsafe. Forcing a larger blade is impossible and dangerous. Double-check your saw’s manual!
Kerf Width
Kerf is the width of the cut the blade makes. It’s determined by the blade’s thickness.
- Standard Kerf (1/8″ – 3/32″): Most common. Good balance of cut width, stability, and material waste.
- Thin Kerf (3/32″ or less): Removes less material, saving wood (especially important for expensive hardwoods) and requiring less power from your saw. However, thin kerf blades can be less stable in deep cuts or on less powerful saws, potentially leading to wobble or binding. Ensure your saw’s riving knife/splitter is compatible with thin kerf blades.
Tip: If you frequently cut expensive hardwoods, a quality thin kerf blade can pay for itself in saved material over time.
Step 5: Evaluate Blade Construction, Coatings, and Quality
Not all blades are created equal, even with the same TPI and geometry. Construction and coatings significantly impact performance and lifespan.
Blade Body Material
- High-Speed Steel (HSS): Basic, inexpensive. Good for occasional light-duty woodcutting. Dulls quickly, especially on hardwoods or plywood. Not suitable for metal.
- Carbide-Tipped: The standard for quality woodcutting blades. Tungsten carbide teeth are brazed onto a steel body. Far superior durability and heat resistance compared to HSS. Essential for hardwoods, plywood, and frequent use. Look for “full carbide” or “micro-grain carbide” for the best edge retention.
- Bi-Metal (for Recip/Jig Blades & Metal Cutting): High-Speed Steel teeth welded to a flexible spring steel body. Combines cutting edge hardness with blade flexibility (for reciprocating saws) or toughness (for metal cutting).
- Diamond (for Masonry/Tile): Diamond grit embedded in a metal bond matrix. Continuous rim for smooth cuts, turbo rim for faster cutting (often dry), segment rim for aggressive dry cutting and better cooling.
Coatings
- Anti-Friction Coatings (e.g., Non-Stick, Teflon-based): Reduce heat buildup and resin/sap buildup on the blade plate, especially important for cutting plywood, MDF, or resinous woods. Helps maintain cutting speed and reduces binding.
- Heat-Resistant Coatings: Some premium blades have specialized coatings to further dissipate heat during heavy use.
Quality Matters: Cheap blades often have poor plate flatness, inconsistent tooth geometry, and low-grade carbide. This leads to vibration, poor cut quality, and rapid dulling. Investing in a reputable brand (like Freud, Diablo, Makita, Forrest, Leitz) for your main blades pays off in performance and longevity. Think cost-per-cut, not just purchase price.
Step 6: Set Your Budget Wisely – Value Over Rock Bottom Price
It’s tempting to grab the cheapest blade, but this is usually a false economy.
- Occasional Hobbyist: A good quality general-purpose carbide blade (like a 40-60 TPI Combination blade) is a solid investment. Don’t buy the absolute cheapest; look for reputable mid-tier brands.
- Frequent User / Professional: Invest in specialized blades for your main tasks (e.g., a dedicated rip blade, a dedicated crosscut blade, a plywood blade). The improved cut quality, speed, and blade life justify the higher cost. A $60 blade that lasts 10x longer and cuts better is cheaper per cut than a $20 blade that dulls in one project.
- Metal Cutting: Never skimp. Using a wood blade on metal is dangerous and destroys the blade. Buy blades specifically rated for the metal you’re cutting.
Remember: A dull or wrong blade damages your saw motor, ruins your workpiece, and creates safety hazards. Spending a bit more upfront prevents these costly mistakes.
Troubleshooting Common Blade Problems
Even with the right blade, issues can arise. Here’s how to diagnose:
Burning or Scorching
- Likely Cause: Blade too dull, wrong TPI (too high for material thickness/speed), incorrect feed rate (too slow), lack of lubrication (metal), or blade binding due to warped plate or incorrect hook angle.
- Solution: Sharpen or replace blade. Ensure correct TPI for material. Push the cut at a consistent, moderate speed (don’t force it, but don’t go too slow). Check for binding; ensure material is properly supported. Use cutting oil for metal.
Excessive Chipping or Tear-Out
- Likely Cause: Wrong geometry (e.g., FTG for crosscutting), too few teeth (low TPI) for the material, dull blade, incorrect hook angle (too positive for fine work), or cutting unsupported plywood/MDF.
- Solution: Use an ATB or TCG blade for crosscuts and plywood. Increase TPI for finer finish. Ensure blade is sharp. Use a negative or zero hook angle blade for plywood/laminate. Support the material on both sides of the cut (use a sacrificial board underneath for plywood).
Vibration or Wobble
- Likely Cause: Warped blade, incorrect arbor size (blade not seated properly), damaged arbor flange on saw, or excessively thin kerf blade on a less powerful saw.
- Solution: Inspect blade for flatness (lay on glass). Ensure correct arbor size and that the blade is tightened securely against a clean arbor flange. Consider a standard kerf blade if using a thin kerf on a weak saw.
Poor Cut Accuracy (Drifting, Not Straight)
- Likely Cause: Dull blade, incorrect blade alignment (table saw/miter saw), wrong geometry (e.g., aggressive hook angle causing pull), or blade binding due to warped plate or insufficient support.
- Solution: Sharpen or replace blade. Check and adjust saw alignment (fence, miter gauge, blade parallelism). Ensure proper material support. Use a blade with a suitable hook angle for the cut type.
Conclusion: Your Path to Flawless Cuts Starts with the Right Blade
Choosing saw blades doesn’t have to be overwhelming. By systematically working through these steps – identifying your saw, understanding your material, decoding TPI and geometry, checking physical specs, evaluating quality, and budgeting wisely – you transform blade selection from a guessing game into a precise science. The right blade is the single most impactful upgrade you can make for your saw’s performance. It eliminates frustration, ensures safety, saves material, and delivers the professional-quality results you strive for. Remember, a sharp, correctly chosen blade works *with* your saw and material, not against them. Stop settling for mediocre cuts. Invest the time to choose wisely, and experience the difference a perfect blade makes on your very next project. Your saw – and your finished work – will thank you.
🎥 Related Video: Choosing the right saw blade for the job
📺 NuKraft Workshop – Builds, Deals & DIY
Table saws are incredibly versatile tools, capable of handling a wide range of cutting tasks with precision and efficiency. However …
