
Always disable hammer mode when drilling wood—this aggressive action will splinter your material and instantly dull your bits. Switch to standard drill mode, use sharp brad-point bits at moderate speeds, and clamp your workpiece securely for clean, precise holes every time.
Key Takeaways
- Disable hammer function: Always turn off hammer mode when drilling wood to prevent splintering and ensure clean holes.
- Select proper drill bits: Use sharp wood twist bits or brad-point bits, never masonry bits designed for concrete.
- Start with a pilot hole: Drill a small pilot hole first to guide the larger bit and reduce wandering.
- Apply steady, moderate pressure: Let the bit do the work; excessive force can cause tear-out or break-through damage.
- Secure your workpiece: Clamp wood firmly to prevent spinning or movement during drilling for safety and accuracy.
- Use a depth stop: Set the depth stop to avoid drilling deeper than needed and damaging underlying surfaces.
- Drill at moderate speed: Use lower RPM settings for hardwood and higher speeds for softwood to optimize cut and prevent burning.
Why This Matters / Understanding the Problem
I learned this the hard way. Last summer, I tried to install a heavy bookshelf into a wooden beam using my hammer drill. I thought more power meant better results. Instead, I ended up with a smoking, splintered mess and a drill bit that looked like it had lost a fight with a wood chipper.
That’s when I realized something important. Hammer drills are incredible tools, but they’re like giving a toddler a flamethrower when you try to use them on wood without knowing the right approach. You’ll get power, sure, but you won’t get precision. Today, I’m sharing the expert hammer drill wood drilling tips you need to know so you don’t make my same expensive mistakes.
Wood is a living material. It has grain, knots, and personality. The hammer action that makes these drills perfect for concrete will tear through wood like a tornado through a trailer park. The key is understanding when and how to use this tool properly on timber.
What You Need
Before we dive into the steps, let’s gather our gear. You don’t need a truckload of fancy equipment, just the right basics.
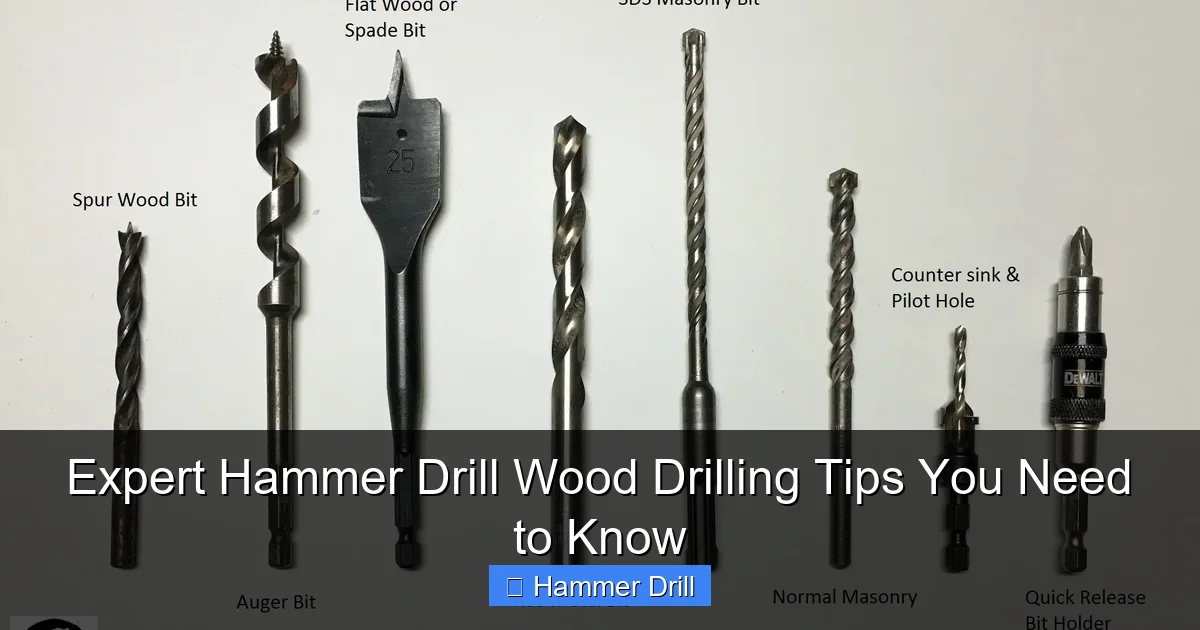
Visual guide about Expert Hammer Drill Wood Drilling Tips You Need to Know
Image source: carpentry-tips-and-tricks.com
- Hammer drill – Either corded for maximum power or cordless for mobility. Check out our best cordless drill recommendations if you’re shopping.
- Quality drill bits – Brad point bits for precision, spade bits for larger holes, or auger bits for deep drilling. Forget masonry bits here.
- Clamps – At least two quick-grip clamps to secure your workpiece.
- Safety gear – Safety glasses are non-negotiable. Add a dust mask for longer sessions.
- Measuring tools – Tape measure, pencil, and a square for accurate marking.
- Center punch – This little tool prevents your bit from wandering.
- Vacuum or brush – For clearing wood chips during drilling.
Keep these handy. You’ll need them all for different steps in the process.
Step-by-Step Guide to Expert Hammer Drill Wood Drilling Tips You Need to Know
Let’s walk through this together. I’ll share exactly what I do now, step by step, for clean, professional results every time.

Visual guide about Expert Hammer Drill Wood Drilling Tips You Need to Know
Image source: sierrahydrovac.com
Step 1: Choose the Right Bit and Hammer Drill Setting
This is where most people crash and burn. Your hammer drill likely has three settings: drill only, hammer drill, and sometimes an impact setting. For wood, you want drill only mode for most applications.
Wait, you’re thinking. This is a hammer drill guide. Why aren’t we using hammer mode? Here’s the truth: for 95% of wood drilling tasks, you don’t need hammer action. That percussive force is designed for brittle materials like concrete and brick. Wood fibers are different. They tear instead of crumble under hammer action.
Select your bit based on hole size. Brad point bits are my go-to for most wood projects. They have a sharp point that bites into wood and flutes that clear chips efficiently. For holes larger than 1/2 inch, switch to spade bits. If you’re drilling deep holes in softwood, auger bits work wonders.
Proper bit installation matters too. Insert the bit fully into the chuck, then tighten it in three stages. First, hand-tighten. Then use the chuck key to snug it. Finally, give it one more quarter-turn. This prevents slippage that can ruin your hole and damage the bit.
Step 2: Mark Your Spot and Secure the Wood
Measure twice, drill once. I know it’s old advice, but it’s gold. Use a tape measure to find your exact location. Mark it with a pencil, then make a small X to guide your eye.
Here’s a trick I stole from a cabinetmaker. Place a piece of masking tape over your mark. Then mark the tape. The tape prevents splintering and gives you a clear, visible target. Plus, it’s easier to see pencil on tape than on raw wood.
Now, secure that workpiece. I can’t stress this enough. A loose board will twist, bind, and create a dangerous situation. Clamp it to your workbench or sawhorses. If you’re drilling into a wall stud, make sure it’s solidly backed. Use at least two clamps—one near the drilling point and one farther away for stability.
Forgetting this step is how I ruined my first project. The wood spun like a top, the bit grabbed, and I ended up with a jagged hole and a bruised ego. Don’t be like me.
Step 3: Start with a Pilot Hole
For larger holes, always drill a pilot hole. This isn’t just for screws anymore. When you’re making a 3/4-inch hole, start with a 1/4-inch bit. This guides your larger bit and prevents wandering.
Place your center punch on the mark and give it a sharp tap with a hammer. This creates a small dimple that keeps the drill bit from skating across the wood surface. It’s a tiny step that makes a huge difference.
Start the drill at low speed. Keep it perpendicular to the wood surface. Apply gentle pressure and let the bit do the work. You should feel it bite into the wood within a few seconds. If it’s not cutting, you might have a dull bit or you’re pushing too hard.
Step 4: Apply Steady, Moderate Pressure
Here’s where your instincts will lie to you. You’ll want to push hard. Don’t. Let the weight of the drill do most of the work. Apply steady, moderate pressure—think firm handshake, not arm-wrestling match.
Keep your RPMs consistent. For hardwoods, run your drill slower. For softwoods, you can go faster. Listen to the motor. If it’s straining, slow down. If it’s screaming, you’re pushing too hard. If it’s humming along smoothly, you’re golden.
Hold the drill with both hands. One on the handle, one on the side grip. This gives you maximum control and prevents the drill from twisting if the bit catches. I learned this when a knot grabbed my bit and tried to wrench the drill from my hands. The side grip saved me.
Step 5: Clear Chips and Maintain Speed
Wood chips build up fast. They clog the flutes, overheat the bit, and burn your wood. Every 15-20 seconds, pull the bit out partially to clear chips. Don’t fully retract it—just pull back enough to let the flutes do their job.
For deep holes, you might need to pull out completely to clear chips. Use a brush or vacuum to clean the hole. This prevents binding and ensures a clean cut. A clogged bit is a dull bit waiting to happen.
Watch for smoke. It’s the universal sign you’re doing something wrong. Smoke means you’re pushing too hard, your bit is dull, or you’re running too fast. Stop immediately. Let the bit cool. Clear the chips. Adjust your speed or pressure.
Step 6: Finish Cleanly and Check Your Work
As you approach the end of the cut, reduce your pressure slightly. This prevents tear-out on the backside of the wood. For through-holes, place a scrap piece of wood behind your workpiece. This supports the fibers and gives you a clean exit.
Slow down as you break through. Let the bit cut through gently rather than punching out. This makes a world of difference in finish quality. I used to rush this part. My holes looked like something exploded. Now I take my time, and the results speak for themselves.
Once you’re through, inspect the hole. Run your finger around the edge (carefully, when the bit stops). It should be clean and smooth. If there’s splintering, you might need to adjust your speed or use a sharper bit next time.
Pro Tips & Common Mistakes to Avoid
After years of drilling holes in everything from pine to oak, I’ve collected some hard-won wisdom. Let me save you some headaches.

Visual guide about Expert Hammer Drill Wood Drilling Tips You Need to Know
Image source: bryandrilling.com
Pro Tip: If you absolutely must use hammer mode on wood (for dense hardwoods or engineered lumber), set it to the lowest hammer setting and reduce your speed by half. This gives you a fighting chance at control.
One mistake I see constantly is using the wrong bit. Masonry bits have a different tip geometry. They’ll skid across wood and create a terrible hole. Use wood-specific bits only. They’re designed to cut fibers, not crush them.
Another common error is ignoring wood grain direction. Drilling with the grain creates cleaner holes than drilling against it. When possible, position your work so you’re drilling parallel to the grain. This reduces tear-out and makes the job easier.
Temperature matters too. Cold wood is more brittle. If you’re working in a chilly garage, let your wood warm up for an hour before drilling. This is especially true for plywood and engineered woods that can delaminate when cold.
Warning: Never use hammer mode on green wood or wet lumber. The moisture content combined with percussive action will destroy the wood structure and likely ruin your bit.
Bit sharpness is critical. A dull bit burns wood, creates friction, and can catch unexpectedly. Learn to recognize the signs: excessive heat, smoking, rough cuts, and increased effort required. When you see these, stop and sharpen or replace your bit.
Finally, understand your wood type. Softwoods like pine and cedar are easy but tear easily. Hardwoods like oak and maple are tough but give cleaner holes. Plywood has layers that can delaminate. MDF is dense but creates fine dust. Adjust your technique accordingly.
FAQs About Expert Hammer Drill Wood Drilling Tips You Need to Know
Let me answer the questions I get most often about drilling wood with a hammer drill.
Can I really use hammer mode on wood at all?
You can, but sparingly. For most wood applications, keep hammer mode off. It’s designed for masonry. If you’re drilling into dense hardwoods, engineered lumber like MDF, or need to punch through a knot, you can use the lowest hammer setting. But reduce your speed dramatically. Think of it as a last resort, not your first choice.
What happens if I use hammer mode incorrectly on wood?
You’ll get tear-out, splintering, and potentially a dangerous situation where the bit catches and twists. The wood fibers will shred instead of cutting cleanly. You might also overheat and dull your bit instantly. In worst cases, the bit can snap, sending shards flying. That’s why safety glasses are mandatory.
How do I prevent splintering on the backside?
Use the scrap wood trick I mentioned. Clamp a piece of waste wood behind your workpiece. This supports the exit fibers and prevents blowout. Also, slow down as you approach the end. Let the bit cut through gently rather than punching out. If you’re drilling plywood, place the good side down and drill from the back to minimize surface splintering.
Should I use a regular drill instead of a hammer drill for wood?
For most wood drilling, yes. A regular drill or impact driver gives you better control. But if a hammer drill is what you have, use it wisely. Just remember to switch off hammer mode. The difference between a drill and a hammer drill is significant when working with wood.
How do I know if my bit is dull?
Watch for these signs: the bit smokes, requires excessive pressure, creates rough or splintered holes, or makes a squealing sound. You might also notice it’s not cutting as quickly as it used to. When in doubt, swap it out. A sharp bit makes all the difference in quality and safety.
Can I drill any size hole in wood with a hammer drill?
Practically speaking, yes. But for holes larger than 1 inch, consider using a hole saw or step bit. These create cleaner large holes than spade bits. Also, for very deep holes (more than 6 inches), an auger bit or spade bit extension works better. Take your time with large holes. Drill in stages, clearing chips frequently.
What’s the best speed setting for different woods?
Softwoods like pine: 1500-2000 RPM. Hardwoods like oak: 800-1200 RPM. Plywood and MDF: 1000-1500 RPM. These are general guidelines. Your drill’s variable speed trigger lets you adjust on the fly. Start slow and increase until you find the sweet spot where the bit cuts cleanly without burning.
Final Thoughts
Mastering your hammer drill on wood isn’t about brute force. It’s about finesse, the right settings, and respecting the material you’re working with. I still use my hammer drill for wood projects regularly, but now I use it intelligently.
Start with these expert hammer drill wood drilling tips you need to know on a scrap piece. Practice your technique. Learn how your specific drill behaves. Pay attention to speed, pressure, and chip clearing. Before long, you’ll be drilling clean, precise holes that look professional.
Remember, the best tool is the one you know how to use. Your hammer drill is versatile, powerful, and capable—when you wield it correctly. Now get out there and make some holes. Just don’t make my rookie mistakes.
