
Understanding your cordless drill’s charging time is crucial and depends entirely on battery capacity and charger output, not a fixed duration. This guide cuts through the confusion, revealing how to significantly minimize job site downtime by selecting the right charger and battery combo. Get the precise charging know-how you need to keep working efficiently.
Key Takeaways
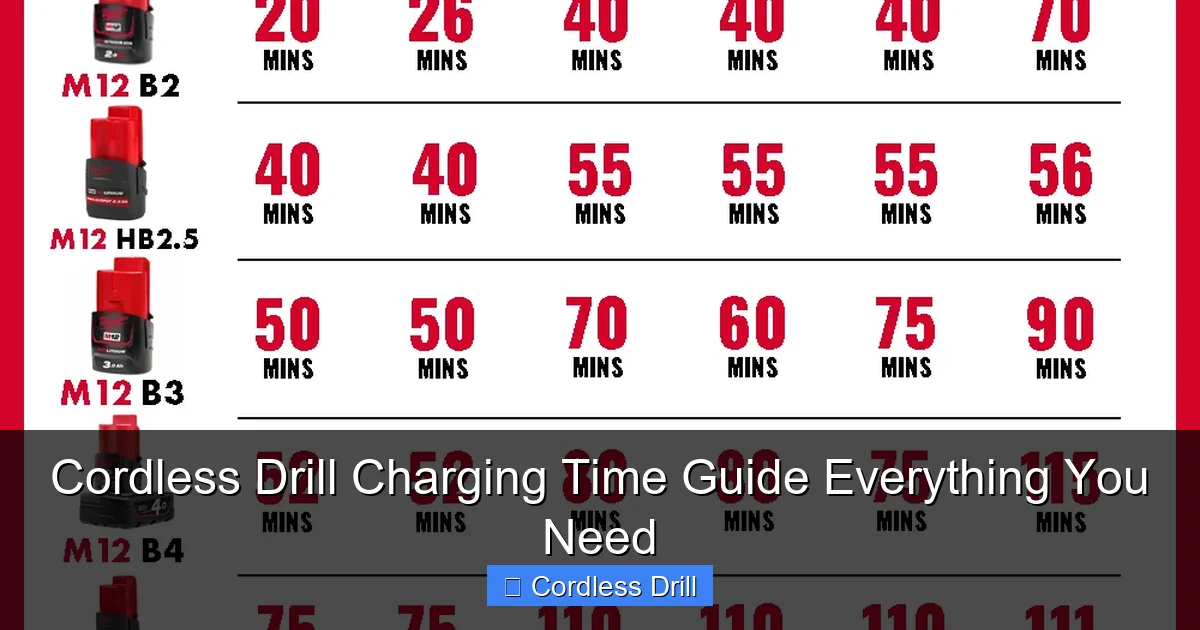
- Charging times vary significantly by battery type and charger amperage.
- Fast chargers (3-5A) slash charging to just 15-60 minutes.
- Lithium-ion batteries thrive on partial charges and resist full discharges.
- Calculate charging time by dividing battery Ah rating by charger Amps.
- Extreme temperatures slow charging and permanently damage battery cells.
- Store batteries at 40-50% charge to maximize lifespan and performance.
- Replace batteries when runtime drops 30-40% below original capacity.
Why This Matters: Understanding Your Drill Battery Reality
We’ve all been there. You’re halfway through hanging shelves, and your cordless drill gives up. That frustrating click of a dead battery stops your project cold. I learned this the hard way last summer while building a treehouse for my kids.
Knowing your cordless drill charging time isn’t just convenient. It’s the difference between finishing your project and abandoning it. This cordless drill charging time guide everything you need will change how you work. You’ll plan better, avoid downtime, and actually extend your battery’s life. Trust me, your future self will thank you.
Different batteries charge differently. Nickel-cadmium, nickel-metal hydride, and lithium-ion each have their own personality. Your charger matters too. A fast charger isn’t always better. Let’s explore what really works.
When you understand charging times, you make smarter choices. You’ll know when to buy that second battery. You’ll stop guessing if it’s “almost ready.” And you’ll save money by not destroying batteries with bad habits. This is real talk from someone who’s killed their share of drill batteries.
What You Need Before Starting
Don’t worry, you probably have most of these already. Let’s gather your simple toolkit for this cordless drill charging time guide everything you need.

Visual guide about Cordless Drill Charging Time Guide Everything You Need
Image source: toolsadvisers.com
- Your cordless drill battery: Obviously. But check the label. You need to know if it’s NiCd, NiMH, or Li-ion. The voltage matters too—12V, 18V, 20V, etc.
- The original charger: Third-party chargers can be tricky. They might not play nice with your battery’s brain.
- A reliable power outlet: Surge protectors are fine, but avoid extension cords if possible. They can cause voltage drops.
- A timer: Your phone works perfectly. You need to track exactly how long charging takes.
- A cool, dry spot: Heat is the enemy. Never charge on a hot garage floor or in direct sun.
That’s it. No fancy tools required. Just five minutes of prep saves hours of frustration later. I keep my charger on my workbench where I can see it. Out of sight means out of mind, and that’s when I forget to unplug it.
Step-by-Step Guide to Cordless Drill Charging Time Guide Everything You Need
Step 1: Identify Your Battery Type and Specifications
Flip that battery over and read the fine print. Seriously, do it now. You’ll see something like “18V Li-ion 2.0Ah” or “14.4V NiMH 3.0Ah.” This tells you everything.
Visual guide about Cordless Drill Charging Time Guide Everything You Need
Image source: hub.its.co.uk
Lithium-ion is the modern standard. It’s lightweight and holds charge well. NiMH is older but tougher in cold weather. NiCd is ancient but still kicking around in some budget tools. Your battery type determines everything about charging. It’s like knowing if you’re feeding a cat or a dog—different needs.
Write down your voltage and amp-hour rating. The amp-hour (Ah) number is crucial. A 2.0Ah battery charges faster than a 5.0Ah battery, all else being equal. This simple number explains so much confusion.
Step 2: Choose the Right Charger for Your Battery
Match your charger to your battery like a key to a lock. Using the wrong charger is like putting diesel in a gasoline car—it ends badly. The charger that came with your drill is perfect. It’s programmed for that exact battery.
Fast chargers sound great. They promise 30-minute charging. But they stress your battery. For regular use, a standard charger is better. Save the fast charger for emergencies. Think of it like fast food versus a home-cooked meal.
Smart chargers are worth the upgrade. They stop charging when full. They cool the battery during charging. They even tell you the battery’s health. I spent $20 extra on mine and never regretted it.
Step 3: Prepare the Battery and Charging Area
Let your battery cool down first. If you’ve been drilling hard, that battery is hot. Charging a hot battery is dangerous. It can cause swelling or even fire. I wait at least 15 minutes after heavy use. Better safe than sorry.
Find a flat, stable surface. Concrete garage floors get cold. Metal workbenches conduct heat. Wood is ideal. Room temperature is perfect—between 60°F and 75°F. Avoid your car trunk or a sunny windowsill.
Check the battery contacts. Dirt and grime mess with charging. Wipe them gently with a dry cloth. If they’re corroded, use a bit of rubbing alcohol on a cotton swab. Let it dry completely before charging.
Step 4: Connect and Monitor the Initial Charge
Plug the battery into the charger firmly. You should hear a click. The charger’s LED will light up. Most show red for charging and green for full. Some have more colors—yellow for warming, blinking red for problems.
Start your timer the moment you connect. This is your baseline. You’ll use this data for future reference. I keep a little notebook in my toolbox. One page per battery. It takes 30 seconds and saves so much guesswork.
Don’t walk away yet. Watch the first few minutes. The charger should start actively charging. If the light stays off or blinks weirdly, something’s wrong. Unplug and check your connections. Better to catch problems early.
Step 5: Track Charging Time Accurately
When that light turns green, stop your timer. Note the exact time. A 2.0Ah battery might take 60 minutes. A 5.0Ah could need 2.5 hours. This varies by charger amperage too. A 2-amp charger takes twice as long as a 4-amp charger.
Here’s the math that matters: Charging time (hours) = Battery Ah ÷ Charger amps. So a 5.0Ah battery on a 2-amp charger needs about 2.5 hours. Plus 15-20% for inefficiencies. It’s not perfect, but it’s a solid estimate.
Don’t rely on the green light alone. Some chargers switch early. Others stay green forever. That notebook I mentioned? This is where it shines. You’ll know your battery’s true charging pattern after a few cycles.
Step 6: Test the Battery After Charging
Put that battery in your drill and run it for 30 seconds. Feel the power. It should be strong and smooth. If it feels weak or stutters, it’s not fully charged. Or worse, the battery is dying.
Check the battery indicator if your drill has one. Many modern drills show remaining charge. This confirms the charger’s story. If the drill shows half-charge but the charger says full, you have a communication problem.
Let the battery rest for 10 minutes after charging. Then measure voltage with a multimeter if you have one. A fully charged 18V Li-ion should read around 20V. This tells you the battery is truly topped off, not just showing green.
Step 7: Maintain Battery Health for Faster Charging
Partial charges are better than full drains. Lithium-ion loves being at 50% charge when stored. Never run it to zero if you can help it. I charge mine at 20% instead of waiting for the dead click.
Store batteries at room temperature. That junk drawer in your kitchen? Too hot in summer. Your basement? Too damp. A closet shelf is perfect. I keep mine in their original case, standing up like drinks in a six-pack.
Charge cycles matter. A charge cycle is using 100% of the battery’s capacity. But it doesn’t have to be one go. Three 33% discharges equal one cycle. Modern batteries handle this well. Just don’t constantly top them off from 90% to 100%.
Pro Tips & Common Mistakes to Avoid
Let me save you from my rookie errors. These cost me three batteries before I learned.

Visual guide about Cordless Drill Charging Time Guide Everything You Need
Image source: homesguide.co.uk
Warning: Never charge a swollen battery. It’s a fire hazard. Stop using it immediately and recycle it properly. Most hardware stores take old batteries.
Overcharging is a myth with modern smart chargers. But with older chargers? Big problem. Leaving a NiCd battery on overnight destroys it. Lithium-ion is safer, but still, unplug it. I set a phone alarm if I’m using an old charger.
Temperature kills batteries faster than anything. Charging in freezing temps ruins Li-ion batteries permanently. I brought my drill inside during winter. Took 20 minutes to warm up. That battery lasted two years longer than my old one.
Don’t buy cheap chargers. They don’t regulate voltage properly. They overheat batteries. That $10 savings costs you $60 in ruined batteries. Stick with the manufacturer or a reputable brand like DEWALT or Milwaukee.
Fast charging has its place. But use it sparingly. It creates heat, which degrades batteries. I keep one fast charger for weekend projects and a standard one for weekdays. Balance is everything.
Keep a spare battery. This is the real secret to never waiting. While one charges, you work. Rotate them every few months to keep both healthy. I label mine Battery A and Battery B. Simple but effective.
When choosing your next tool, consider battery ecosystem. Sticking with one brand means batteries and chargers work together. Check out our guide to the best cordless drill options if you’re shopping.
FAQs About Cordless Drill Charging Time Guide Everything You Need
How long does it take to charge a cordless drill battery?
Most 18V to 20V batteries take 1 to 3 hours. Small 12V batteries might need 45 minutes. Larger 6.0Ah batteries can take 4+ hours. It depends on battery size and charger speed. Your manual has the exact number.
Can I leave my drill battery on the charger overnight?
With a modern smart charger, yes. It stops charging when full. But I still don’t recommend it. Power surges happen. Chargers fail. Unplugging after full charge adds a layer of safety. Old chargers? Never leave them overnight.
Why does my drill battery take so long to charge?
You probably have a large battery (4.0Ah or more) with a slow charger (2 amps or less). Math time: 4.0Ah ÷ 2A = 2 hours minimum. Plus inefficiencies. Consider a faster charger or smaller battery for quick jobs.
How do I know when my drill battery is fully charged?
The green light is a good start. But test it in your drill. Run it under light load. It should feel powerful. If your drill has a battery gauge, check that. And watch the voltage with a multimeter if you’re serious about it.
Does charging time affect battery lifespan?
Yes, but not how you think. How you charge matters more than how long. Frequent partial charges are better than full cycles. Heat is the real killer. Fast charging creates heat, which shortens life. Slow charging is gentler.
What’s the best charger for my cordless drill?
The one that came with it is perfect. If you need a replacement, get the same brand. Match the voltage exactly. For lithium-ion, a smart charger with temperature control is worth the extra cost. Avoid generic brands.
How can I make my drill battery charge faster?
Use a higher-amp charger if your battery supports it. A 4-amp charger cuts time in half versus a 2-amp model. Keep the battery cool during charging. And make sure you’re using the correct charger type. That means checking your battery’s manual first.
Final Thoughts
Understanding your cordless drill charging time isn’t rocket science. It’s about paying attention to what you already have. That battery in your hand has a story. Learn to read it.
Keep it simple. Use the right charger. Track your times. Avoid heat. And for goodness sake, buy a spare battery if you can afford it. Your projects will thank you.
Remember this cordless drill charging time guide everything you need when you’re planning your next project. A little prep goes a long way. You’ll work faster, smarter, and with fewer frustrations.
Now go charge that battery properly. And maybe check out our cordless drill resources if you want to dive deeper. Your future DIY self is counting on you.
