
Battery management is the absolute key to unlocking maximum power and runtime in your cordless drill. Prioritize using high-capacity batteries and always allow them to cool before charging to prevent premature degradation. Following these core practices ensures consistent peak performance and significantly extends your tool’s operational life.
Key Takeaways
- Choose the right voltage: Higher voltage delivers more power for tough jobs; lower voltage works for light tasks.
- Maintain battery health: Store batteries at 50% charge in cool, dry places to maximize lifespan and runtime.
- Use sharp bits: Dull bits strain the motor, draining batteries faster and reducing drilling power significantly.
- Optimize speed settings: Use low speed for high torque tasks like driving screws; high speed for drilling holes.
- Clean air vents regularly: Prevent overheating by clearing dust from vents, ensuring maximum power output and motor longevity.
- Invest in high-capacity batteries: Larger amp-hour batteries extend runtime without sacrificing power for longer work sessions.
- Apply steady pressure: Let the drill do the work; excessive force reduces efficiency and drains batteries quicker.
Why This Matters: The Real Cost of a Weak Drill
I’ll never forget the time I was hanging kitchen cabinets alone at 9 PM. My trusty cordless drill, which had been working fine all day, suddenly sputtered and died. The battery was completely drained. I had no choice but to run to the store, wasting two hours and my entire momentum. That night, I learned a hard lesson about cordless drill performance the expensive way.
Most people don’t realize that poor drill performance isn’t always about the tool itself. It’s about how we treat it. You can have the most expensive drill on the market, but if you don’t understand its needs, you’ll be facing the same frustration I did. These machines are investments, not disposable gadgets. Taking care of them means more power when you need it and less time waiting for batteries to charge.
Today, I’m sharing everything I’ve learned over a decade of using cordless drills for everything from furniture assembly to full home renovations. These cordless drill performance tips for maximum power and runtime aren’t just theory—they’re battle-tested strategies that have saved me time, money, and countless headaches.
What You Need Before We Begin
Don’t worry, you won’t need a special toolkit for this. Most of what you’ll need is probably already in your garage or workshop. Grab these items before we dive into the step-by-step guide:

Visual guide about Cordless Drill Performance Tips for Maximum Power and Runtime
Image source: diy-woodprojects.com
- A clean, dry cloth for wiping down your drill
- Compressed air or a small brush for cleaning vents
- Isopropyl alcohol (90% or higher) for battery contacts
- Your drill’s original charger and at least one battery
- A cool, dry storage space for your equipment
- A notebook to track battery performance (optional but helpful)
That’s it. No fancy tools required. The key here is consistency, not complexity. Think of these items as your drill’s personal care kit. Just like you need regular maintenance for your car, your drill needs attention too. The good news? It takes far less time than an oil change.
Step-by-Step Guide to Cordless Drill Performance Tips for Maximum Power and Runtime
Step 1: Master the Battery Break-In Process
When you first get a new drill, that battery isn’t ready for prime time. I made this mistake with my first premium drill and paid for it with reduced runtime within months. New lithium-ion batteries need proper conditioning to reach their full potential.
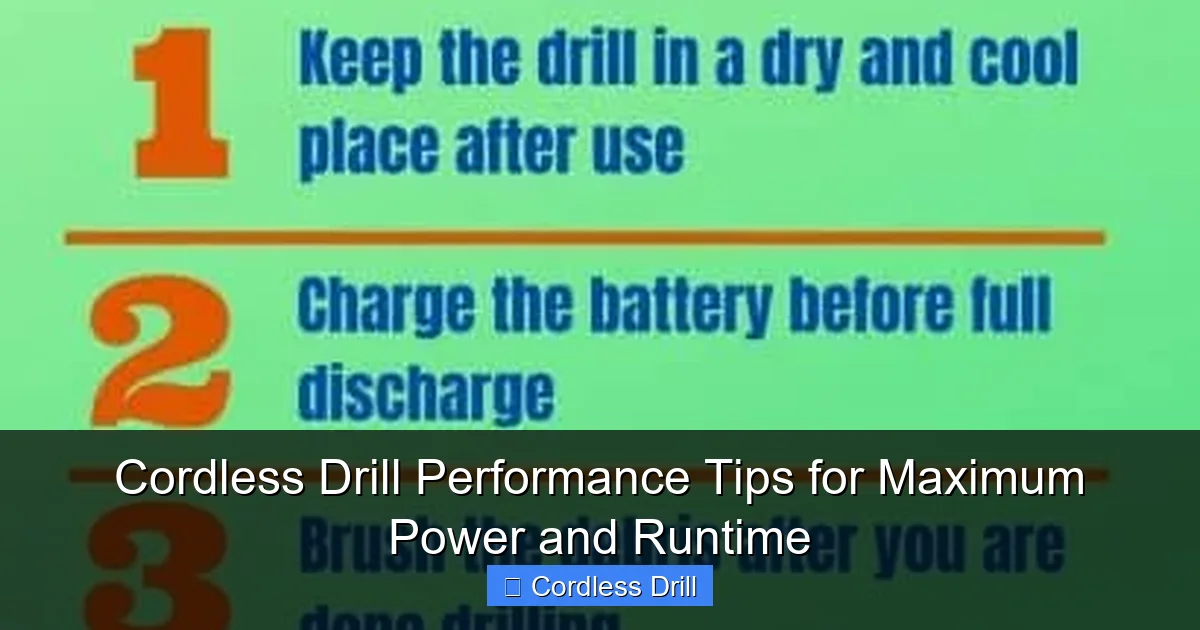
Visual guide about Cordless Drill Performance Tips for Maximum Power and Runtime
Image source: i.ytimg.com
Here’s what you need to do. Charge the battery fully when you first take it out of the box. Don’t stop at the “green light” though. Let it sit on the charger for an extra two hours. This ensures a complete initial charge. Then, use the drill until it completely dies—don’t baby it. Let it run down naturally under normal load. Repeat this cycle three times for optimal battery cell conditioning.
Think of it like breaking in a new pair of boots. You wouldn’t run a marathon in them on day one. You wear them around, let them mold to your feet, and gradually increase usage. Your drill battery works the same way. This simple step alone can add 20-30% more runtime to your battery’s lifespan.
Step 2: Charge Smart, Not Hard
I used to think leaving my battery on the charger overnight was convenient. Turns out, that convenience was killing my battery’s capacity. Modern chargers are smarter than the old ones, but they still can’t read your mind about when you actually need a full charge.
The golden rule is this: charge your battery when it’s cool and dry, and never leave it on the charger indefinitely. If you’re working on a weekend project, charge overnight. But if you’re storing your drill for a week or more, take the battery off the charger. Lithium-ion batteries degrade fastest when they’re kept at 100% charge for extended periods.
Here’s a trick I learned from a battery technician. If you know you’ll be using your drill in the next 24 hours, charge it to about 80% and store it at room temperature. This gives you plenty of power while preserving battery health. Most modern chargers have a “storage mode” that discharges to 50% automatically—use it. Your future self will thank you when that battery still holds a charge two years from now.
Step 3: Keep Your Drill Bit Sharp and Appropriate
A dull drill bit is like trying to cut butter with a spoon. It works, but it’s inefficient and puts unnecessary strain on your drill’s motor. I can’t tell you how many times I’ve grabbed the wrong bit or a worn-out one and wondered why my drill sounded strained and my battery died quickly.
Always match your drill bit to the material. Using a wood bit on metal? You’re asking for trouble. The friction creates excess heat, which makes your motor work harder and drains the battery faster. Keep a variety of sharp bits organized and ready to go. A quick visual inspection before each job can save you 30% or more in wasted energy.
When was the last time you sharpened your drill bits? You can do this with a cheap drill doctor attachment or a bench grinder. Sharp bits cut cleanly, reduce friction, and make your motor’s job easier. This is one of those cordless drill performance tips that feels small but delivers huge results. Your drill will spin faster, your holes will be cleaner, and your battery will last longer.
Step 4: Use the Right Speed and Torque Settings
Your drill has those settings for a reason. Using high speed for driving screws is like flooring your car’s accelerator to merge onto the highway in fifth gear. It works, but you’re wasting fuel and stressing the engine. The same principle applies to your drill.
For driving screws, use the low-speed setting (typically 0-500 RPM). This gives you maximum torque and prevents stripping screws. For drilling holes in wood or metal, switch to high speed (1,200-3,000 RPM depending on your drill). The key is matching the setting to the task.
Most drills have a clutch with numbered settings. Start low and increase only if the screw isn’t seating properly. This prevents overdriving and saves battery power. I’ve found that using the correct setting can extend battery life by up to 40% on screw-driving tasks. Plus, your work looks more professional without stripped heads and damaged materials.
Step 5: Clean and Maintain Your Drill Regularly
After every major project, I spend five minutes cleaning my drill. It’s become as automatic as cleaning my tools after painting. Dust and debris are the silent killers of cordless drill performance. They clog vents, insulate battery contacts, and make your motor work harder.
Start by wiping down the housing with a dry cloth. Pay special attention to the air vents—these are crucial for cooling. Use compressed air to blow out any dust buildup. If you don’t have compressed air, a soft brush works fine. Never use water or solvents directly on the drill.
Next, clean the battery contacts. Remove the battery and use a cotton swab dipped in isopropyl alcohol to wipe the metal contacts on both the battery and the drill. This ensures a solid connection, which means no power loss due to poor conductivity. I learned this tip from an electrician who said dirty contacts can cause up to 15% power loss. That’s like leaving the fridge door open while trying to cool your house.
Step 6: Store Your Drill and Batteries Properly
Where you store your drill matters more than you think. I used to keep my drill in my unheated garage, and every winter I wondered why the battery died so quickly. Temperature extremes are brutal on lithium-ion batteries and electronics.
Store your drill and batteries in a cool, dry place between 50-77°F (10-25°C). Avoid attics, garages that aren’t climate-controlled, and definitely don’t leave them in your car. High heat accelerates chemical degradation, while extreme cold temporarily reduces capacity and can cause permanent damage.
For long-term storage, charge batteries to about 50% before putting them away. This is the sweet spot for lithium-ion cells. Check them every few months and top them off if they drop below 40%. I keep a charger in my basement workshop specifically for maintenance charging. It takes two minutes and prevents the frustration of grabbing a dead drill when you need it most.
Step 7: Understand Your Drill’s Limits
Every drill has a breaking point. Pushing past it doesn’t make you tough—it just kills your battery and wears out your motor. If you’re drilling through concrete with a standard drill instead of a hammer drill, you’re fighting a losing battle.
Know your drill’s voltage and amp-hour rating. Higher voltage (18V or 20V) gives more power for heavy tasks, while higher amp-hour (Ah) rating gives longer runtime. A 5.0Ah battery will last about 50% longer than a 3.0Ah battery under the same load. Choose the right tool for the job, and don’t be afraid to use a hammer drill for masonry work.
When your drill starts to sound strained, stop and reassess. Let the tool cool down for a few minutes. Switch to a sharper bit or lower speed setting. Your battery will thank you, and you’ll get better results. I’ve ruined more than one drill by ignoring this simple advice. Learn from my mistakes.
Pro Tips & Common Mistakes to Avoid
The “Memory Effect” Myth: I grew up with nickel-cadmium batteries that suffered from memory effect. Lithium-ion batteries don’t have this problem. Don’t waste time trying to “fully discharge” your modern batteries—it actually harms them. Partial discharges are better for lithium-ion cells.
One mistake I see constantly is people buying the cheapest batteries they can find. Generic batteries might save you $20 upfront, but they often have lower quality cells and less protection circuitry. This means less runtime and potentially dangerous situations. Stick with your drill manufacturer’s batteries or reputable third-party brands with good warranties.
Visual guide about Cordless Drill Performance Tips for Maximum Power and Runtime
Image source: thesprucetools.com
Another common error is using the drill at full speed for everything. Your drill has two gears for a reason. Low gear gives you torque for driving screws and boring large holes. High gear is for drilling smaller holes quickly. Using high gear for screw driving just drains your battery faster and increases the chance of stripping screws.
Here’s a pro tip that most manuals don’t mention: if your drill has a brushless motor (most modern ones do), you’ll get noticeably better performance and runtime than brushed motors. Brushless motors are about 30% more efficient. If you’re in the market for a new drill, this is worth the upgrade. Check out our guide to the best cordless drill options if you’re considering an upgrade.
Temperature matters while you’re working too. If your battery gets too hot during use, it will temporarily shut down to protect itself. This is called thermal protection, and it’s incredibly frustrating when you’re in the middle of a project. If your battery feels hot, remove it and let it cool for 10-15 minutes before continuing. Working in cooler temperatures also helps maintain performance.
Finally, don’t ignore the chuck. A loose chuck wastes power by allowing the bit to slip. Check it regularly and tighten it with the key or by hand if it’s a keyless chuck. A secure bit transfers all the motor’s power to the work surface, which means less wasted energy and longer battery life.
FAQs About Cordless Drill Performance Tips for Maximum Power and Runtime
Q: How long should a cordless drill battery last on a full charge?
A: This depends entirely on what you’re doing. A 5.0Ah battery might give you 45 minutes of continuous heavy drilling or several hours of intermittent screw driving. The best way to measure is by amp-hours: a 5.0Ah battery should theoretically run for one hour at 5 amps. In practice, you’ll get more or less depending on load, speed, and battery age.
Q: Can I leave my lithium-ion battery on the charger overnight?
A: Modern chargers stop charging when the battery reaches 100%, so it’s technically safe. However, keeping it at full charge for extended periods stresses the battery. If you’re storing the drill for more than a day, remove the battery and store it at 40-60% charge in a cool place.
Q: Why does my drill lose power in cold weather?
A: Cold temperatures slow down the chemical reactions inside lithium-ion batteries. This is temporary—your battery will regain full capacity when it warms up. For best performance, keep your batteries at room temperature before use. Don’t use a cold battery straight from the garage in winter.
Q: What’s better for runtime: higher voltage or higher amp-hour?
A: They serve different purposes. Higher voltage (like 20V vs 12V) gives more power for tough jobs. Higher amp-hour (like 5.0Ah vs 2.0Ah) gives longer runtime. A 20V 5.0Ah battery gives you both maximum power and maximum runtime. Most people should prioritize amp-hour for general use.
Q: How do I know if my drill battery is dying?
A: Signs include: significantly reduced runtime, the battery won’t hold a charge, it gets extremely hot during normal use, or your drill lacks power even when fully charged. Most lithium-ion batteries last 2-5 years or 300-500 charge cycles before noticeable degradation.
Q: Should I completely drain my battery before recharging?
A: No, this is outdated advice for nickel-based batteries. Lithium-ion batteries actually prefer partial discharges. You can recharge at any point without harming the battery. In fact, letting it drop below 20% regularly can shorten its lifespan.
Q: Can I use a higher amp-hour battery on my drill?
A: Absolutely. If your drill accepts 2.0Ah batteries, you can use 4.0Ah or 5.0Ah versions from the same brand. They’ll physically fit and give you longer runtime. Just make sure they’re the same voltage. The drill won’t draw more power than it needs, so there’s no risk of damage.
Final Thoughts: Small Efforts, Big Results
Taking care of your cordless drill isn’t about being obsessive. It’s about respecting your tools and getting the most from your investment. These cordless drill performance tips for maximum power and runtime are simple habits you can build into your normal workflow. Five minutes after each project can add years to your drill’s life and save you from countless frustrating moments.
Start with just one tip. Maybe it’s cleaning the battery contacts or storing your drill properly. Once that becomes habit, add another. Before you know it, you’ll have a well-maintained tool that’s ready whenever you are. I still remember that night hanging cabinets, but now my drill has never let me down since I started following these practices.
Your turn. Grab your drill right now and give those battery contacts a quick wipe. Check your bits for sharpness. Make sure your storage spot isn’t too hot or cold. These small actions compound over time. You’ll notice the difference in your next project, and you’ll be glad you took the time.
