
Proper cordless drill storage extends tool life and saves valuable workspace. This guide covers battery maintenance, cleaning routines, and smart organization solutions. You’ll learn how to protect your investment while keeping your workshop tidy and efficient.
Key Takeaways
- Clean before storing: Always remove dust and debris to prevent damage and maintain performance.
- Store batteries at 50% charge: This optimal charge level prevents degradation during long-term storage.
- Choose climate-controlled spaces: Avoid extreme temperatures and humidity to protect internal components.
- Use vertical wall space: Mounting drills on pegboards or racks frees up valuable floor and shelf space.
- Keep accessories organized: Separate bit storage prevents loss and makes projects more efficient.
- Implement a maintenance schedule: Regular checks ensure your drill stays ready for any job.
Introduction: Why Proper Cordless Drill Storage Matters
Your cordless drill represents a significant investment in your toolbox. Whether you’re a professional contractor or a dedicated DIY enthusiast, proper cordless drill storage protects that investment and keeps your workspace functional. Storing your drill incorrectly can lead to battery damage, lost accessories, and even safety hazards. This comprehensive guide walks you through proven storage solutions that maximize space while ensuring your tool stays in peak condition. You’ll discover practical tips for battery care, cleaning routines, and organization systems that work in any workshop, garage, or job site.
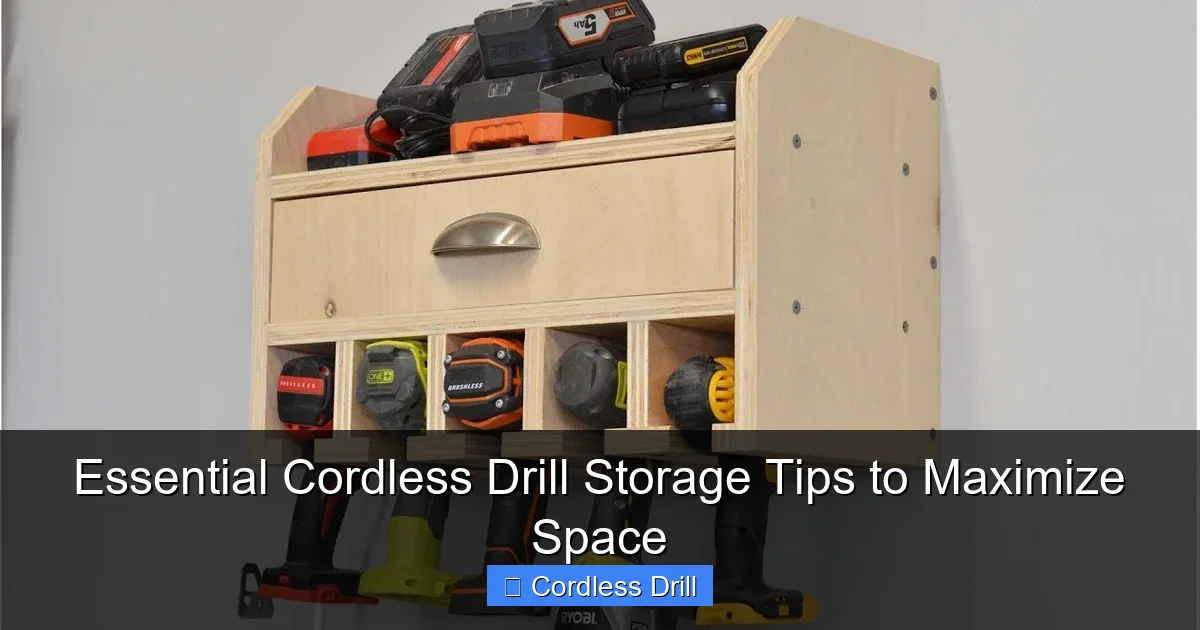
Step 1: Assess Your Available Storage Space
Before implementing any storage solution, take stock of where you’ll store your cordless drill. The right approach depends entirely on your available space and environment.
Visual guide about Essential Cordless Drill Storage Tips to Maximize Space
Image source: i.ytimg.com
Evaluate Your Workshop or Garage Layout
Measure your available space carefully. Look for unused wall areas, the inside of cabinet doors, or corners that often get overlooked. Vertical space remains the most underutilized resource in most workshops. A simple pegboard system can hold multiple tools without consuming floor space. Consider the height at which you’ll store your drill—eye level or slightly below works best for easy access.
Think about your workflow patterns. Store your drill near where you’ll use it most. If you frequently work in different areas, consider a mobile storage solution like a toolbox with compartments. For job sites, a dedicated drill bag that protects against drops and weather might be your best option.
Consider Environmental Factors
Temperature and humidity dramatically affect cordless drill storage. Never store your drill in an unheated garage during winter if temperatures drop below freezing. Extreme cold can damage battery cells and internal components. Similarly, excessive heat causes batteries to degrade faster. Aim for a climate-controlled environment between 50-75°F (10-24°C) with moderate humidity.
Moisture is another enemy of power tools. If you live in a humid climate, add silica gel packets to your storage container to absorb excess moisture. For long-term storage, consider a small dehumidifier for your workshop. Direct sunlight can also fade plastic components and damage batteries, so choose a shaded storage location.
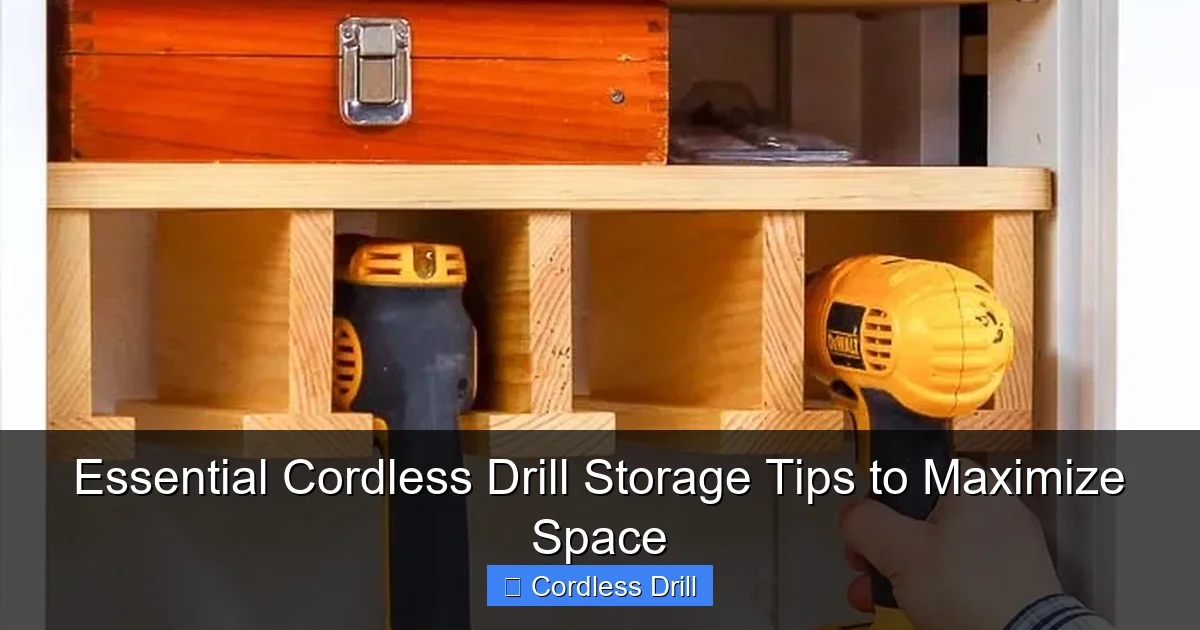
Step 2: Clean Your Drill Thoroughly Before Storage
Never store a dirty drill. Residual dust, metal shavings, and grime can damage moving parts and create safety hazards. A clean tool also makes your next project start smoothly.
Visual guide about Essential Cordless Drill Storage Tips to Maximize Space
Image source: i2.wp.com
Remove Debris from the Exterior
Start by unplugging the battery. Use a soft brush to remove dust from the housing, vents, and trigger mechanism. Pay special attention to the chuck area where metal chips love to accumulate. Compressed air works wonders for blowing out stubborn debris from tight spaces. Wipe down the entire drill with a slightly damp cloth, then dry immediately with a clean towel. Never use harsh chemicals that could damage plastic components.
For stubborn grease or oil buildup, use a mild soap solution. Apply it with a cloth rather than spraying directly onto the tool. This prevents moisture from seeping into electrical components. Once clean, inspect all surfaces for cracks or damage that might need attention before storage.
Check and Clean the Chuck
The chuck deserves special attention during cleaning. Open the jaws completely and inspect for metal shavings or wood dust trapped inside. Use a small brush or compressed air to clean the threads and internal mechanism. If your chuck appears stiff or difficult to open, apply a light coat of machine oil to the threads. Wipe away any excess oil before storage to prevent attracting more dust.
Check that the chuck is securely tightened. A loose chuck can vibrate during storage and cause internal damage. If you have a keyed chuck, make sure you have the chuck key available for your next use—don’t store it separately where it can get lost.
Step 3: Master Battery Care and Storage
Battery health is the single most important factor in cordless drill storage. Lithium-ion batteries, which power most modern drills, require specific storage conditions to maintain their capacity and lifespan.
Visual guide about Essential Cordless Drill Storage Tips to Maximize Space
Image source: i1.wp.com
Optimal Charge Level for Storage
Never store your battery fully charged or completely dead. Both extremes cause long-term damage. The sweet spot is around 50% charge. This state minimizes stress on the battery cells and prevents capacity loss during storage. Most drills have a battery indicator light that shows the charge level. If you’re storing for an extended period, check the battery every few months and top it off to maintain that 50% level.
For short-term storage (less than a month), you can leave the battery attached to the drill. This makes it convenient for quick projects. However, for storage longer than a month, remove the battery completely. This prevents any potential battery drain and allows you to store both items separately for better organization.
Temperature and Physical Protection
Store batteries in a cool, dry place away from metal objects. Never toss loose batteries into a toolbox where they can contact nails, screws, or other tools. This creates a short circuit risk. Use the original battery case or a dedicated battery holder that keeps terminals separated. Some storage systems include specific compartments designed for battery safety.
Extreme temperatures are battery killers. Don’t store batteries in your car during summer or in an unheated shed during winter. The metal contacts can also corrode if exposed to moisture. If you notice any corrosion on the terminals, clean them gently with a cotton swab and rubbing alcohol before storage.
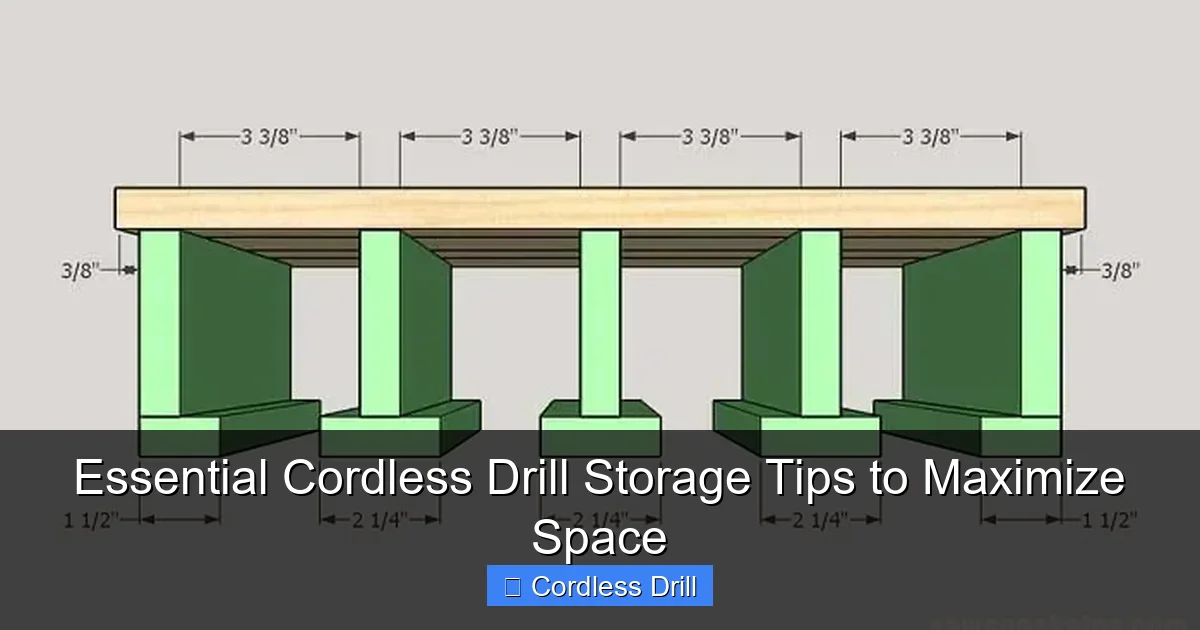
Step 4: Choose the Right Storage Method for Your Needs
Your storage method should match your available space, budget, and how frequently you use your drill. The wrong system creates frustration and defeats the purpose of organization.
Wall-Mounted Solutions for Maximum Space Savings
Pegboards remain one of the most effective cordless drill storage solutions. Install a pegboard on your workshop wall and add hooks specifically designed for power tools. These hooks hold the drill securely while keeping it visible and accessible. You can find universal hooks or brand-specific mounts that match your drill’s shape. The advantage is immediate visibility—you’ll always know where your drill lives and when it’s missing.
Wall-mounted drill charging stations offer another space-saving option. These units combine storage with charging capability, so your drill is always ready to go. Look for models with built-in shelves for batteries and accessories. Some even include LED lighting to illuminate your workspace. Installation is simple with basic wall anchors, and they create a professional appearance.
Toolboxes and Cases for Portability
If you transport your drill frequently, a dedicated toolbox or case provides the best protection. Hard plastic cases with custom foam inserts hold your drill, batteries, and accessories in place during transport. The foam prevents scratches and absorbs shocks from drops or bumps. Many cases are stackable, which helps when you own multiple tools.
For a more budget-friendly option, soft-sided tool bags offer flexibility and lighter weight. Look for bags with multiple compartments and reinforced pockets. Some include padded dividers that you can customize to fit your specific drill model. These bags often have shoulder straps for easy carrying to job sites. Just ensure the bag has adequate padding to protect against impacts.
When considering a new drill purchase, look for models that come with a storage case. The best cordless drill options often include custom-fit cases that make organization effortless.
Shelving Systems for Multiple Tools
Freestanding shelving units work well for workshops with multiple power tools. Adjustable shelves let you customize the height for different tools. Add plastic bins to the shelves to corral smaller accessories like drill bits and screws. Label each bin for quick identification. This system keeps everything off the floor and creates clear walking paths in your workspace.
Mobile tool carts provide flexibility for workshops where you move tools between stations. These carts typically feature multiple shelves, locking casters, and side racks for additional storage. You can roll your drill to wherever you’re working, then return it to its designated spot when finished. This reduces the need for multiple storage locations and keeps your drill with its accessories.
Step 5: Organize All Accessories and Attachments
A drill without its accessories is nearly useless. Proper accessory storage prevents loss and makes your workflow more efficient. The best systems keep everything together but separated.
Bit Storage Solutions
Drill bits multiply quickly and can become a jumbled mess if not stored properly. A bit organizer case with labeled slots keeps each bit type visible and accessible. These cases often mount to walls or sit on shelves. For quick access during projects, a portable bit holder that attaches to your drill’s belt clip can be invaluable.
Consider sorting bits by type and size. Create separate sections for wood bits, masonry bits, and specialty bits. This organization saves time when you’re in the middle of a project and need the right tool quickly. Many bit sets come with their own storage cases—keep these cases and store them together in a larger container.
Manage Additional Components
Don’t forget about the smaller items that complete your drill setup. The chuck key, extra batteries, charger, and instruction manual all need designated spots. Use small parts organizers with removable dividers to create custom compartments for each item. Clear plastic containers let you see contents at a glance.
If your drill came with a side handle or depth gauge, store these in a labeled bag or container. These accessories often get lost because they’re not permanently attached. Keeping them with the drill ensures you have them when needed. For long-term storage, include a copy of the manual in case you need to reference specifications later.
Step 6: Create a Regular Maintenance Schedule
Even the best cordless drill storage system needs periodic attention. A simple maintenance schedule ensures your drill stays ready for any project and extends its overall lifespan.
Monthly Inspection Checklist
Once a month, take your drill out of storage and perform a quick inspection. Check the battery charge level and top it off if needed. Look for any signs of corrosion on the metal parts or battery contacts. Test the trigger and forward/reverse switch to ensure smooth operation. Spin the chuck to verify it moves freely without grinding or excessive play.
While inspecting, clean any dust that may have accumulated during storage. Check that all accessories are present and undamaged. This monthly routine takes just a few minutes but prevents unpleasant surprises when you start your next project. If you notice any issues during inspection, address them immediately rather than waiting for a problem to worsen.
Lubrication and Component Care
Apply a light coat of protective lubricant to the chuck threads every three months. This prevents rust and ensures smooth operation. Use only light machine oil—never use heavy grease that can attract dust. A drop of oil on the moving parts of the trigger mechanism can also keep it operating smoothly.
Inspect the power cord on your charger for any fraying or damage. Damaged chargers can be dangerous and should be replaced immediately. Store the charger in a clean, dry location separate from the drill to prevent dust transfer. If you have multiple batteries, rotate them during use to ensure even wear and store them in different locations as a safety precaution.
Troubleshooting Common Storage Problems
Even with careful planning, storage issues can arise. Knowing how to address these problems quickly can save your tools and your sanity.
Dealing with Battery Issues
If your battery won’t hold a charge after storage, it may have been stored at too high or too low a charge level. Try cycling the battery—fully charge it, use it until it’s completely drained, then recharge. This sometimes revives batteries that have been stored incorrectly. However, if the battery shows significant swelling, replace it immediately. Swollen batteries are dangerous and should not be stored or used.
Corroded battery contacts can prevent proper charging. Clean the contacts on both the battery and drill with a cotton swab dipped in rubbing alcohol. Gently scrub until the metal shines. Allow to dry completely before reconnecting. If corrosion returns quickly, the battery may be leaking and needs replacement.
Preventing Rust and Corrosion
Light surface rust on metal parts can be removed with fine steel wool or a wire brush. After removing rust, apply a light coat of oil to prevent recurrence. If rust appears on the battery terminals, clean them carefully as described above. For severe rust that affects the drill’s function, consult a professional repair service.
To prevent rust from occurring, store your drill in a low-humidity environment. Use moisture-absorbing products like silica gel in your storage container. For extremely humid climates, consider a small dehumidifier for your workshop. Wipe down metal surfaces with a dry cloth before storage, especially if you live near the ocean where salt air accelerates corrosion.
Managing Clutter and Disorganization
If your storage system isn’t working, it’s likely too complicated. The best system is one you’ll actually use consistently. Simplify by reducing the number of steps required to store your drill. If you have to open three containers to put away your drill, you won’t do it properly. Create a single designated spot where everything drill-related belongs.
Label everything clearly. Even if you think you’ll remember where things go, labels prevent confusion on busy days. Use a label maker or printed stickers that resist fading and peeling. Color-coding works well for families or shared workshops—assign a specific color to each person’s tools.
Remember that cordless drill storage should adapt to your needs, not the other way around. Review your system every few months and make adjustments as your tool collection grows or your projects change.
Conclusion: Protect Your Investment for Years to Come
Proper cordless drill storage isn’t just about keeping your workspace tidy—it’s about protecting a valuable tool that helps you complete projects efficiently. By following these essential tips, you’ll extend your drill’s lifespan, maintain battery health, and create an organization system that saves time and frustration. Start with a thorough cleaning, store batteries at the optimal charge level, and choose a storage method that fits your space and usage patterns. Remember to inspect your drill monthly and address any issues immediately. With these practices in place, your cordless drill will remain reliable and ready for any task, whether you’re hanging shelves at home or working on a professional construction site. Invest a little time in proper storage today, and you’ll enjoy years of dependable performance from your power tools.
If you travel with your tools, check out our guide on cordless drill storage for air travel to ensure you’re following transportation regulations.
🎥 Related Video: Protect Your Cordless Drill! A Trick with a Bottle #shorts #tools
📺 Handy Space
Protect Your Cordless Drill! A Trick with a Bottle Join us as a sponsor and unlock exclusive benefits!
