
Understanding the difference between TPI and teeth is crucial for selecting the right saw blade. TPI measures tooth density per inch, while teeth are the physical cutting edges. This guide explains how both factors affect your cutting performance and material results.
Key Takeaways
- TPI is a measurement: Teeth Per Inch (TPI) quantifies how many teeth fit in a 1-inch section of the blade, directly impacting cut smoothness and speed.
- Teeth are physical components: The actual cutting edges shaped from hardened steel, with geometry (like bevel angle) determining material removal efficiency.
- Higher TPI = smoother cuts: More teeth per inch create finer finishes but cut slower; ideal for crosscuts in wood or thin metals.
- Lower TPI = faster rough cuts: Fewer teeth clear debris quicker, perfect for ripping lumber or demolition work.
- Material dictates TPI choice: Hardwoods need higher TPI than softwoods; metals require specialized high-TPI blades with fine teeth.
- Tooth geometry matters too: Alternate Top Bevel (ATB) teeth excel at crosscuts, while Flat Top Grind (FTG) teeth dominate ripping tasks.
- Match TPI to your saw type: Circular saws use 24-80 TPI, jigsaws 6-24 TPI, and bandsaws 3-14 TPI—always check manufacturer guidelines.
Introduction: Why TPI and Teeth Confusion Costs You Time and Money
Ever bought a saw blade only to watch it burn through wood or chatter on metal? You’re not alone. Most DIYers and even pros mix up TPI (Teeth Per Inch) and teeth—two concepts that sound similar but control everything from cut quality to blade lifespan. This guide cuts through the confusion. You’ll learn exactly how TPI measures tooth density, why physical teeth geometry makes or breaks your project, and how to pick the perfect blade for wood, metal, or plastic. By the end, you’ll stop wasting money on wrong blades and start achieving clean, efficient cuts every time. Let’s dive in!
What is TPI? The Measurement That Defines Blade Performance
TPI stands for Teeth Per Inch—a simple metric that tells you how densely packed a blade’s teeth are. Imagine measuring a 1-inch strip of the blade: if it has 24 teeth, it’s a 24 TPI blade. This number isn’t arbitrary; it’s engineered to balance speed, finish quality, and material compatibility.
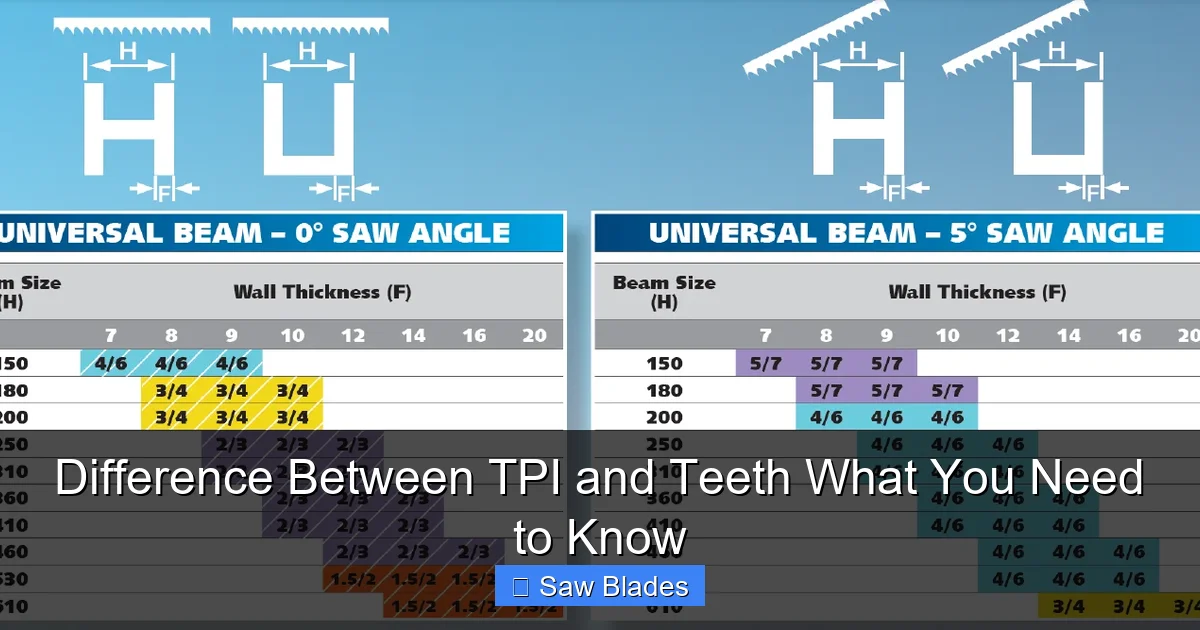
Visual guide about Difference Between TPI and Teeth What You Need to Know
Image source: sawblade.com.au
How TPI Works: The Science Behind the Number
TPI directly controls how much material each tooth removes per pass. Higher TPI blades have teeth closer together, meaning each tooth takes a smaller “bite.” This reduces tear-out and heat buildup but slows cutting speed. Lower TPI blades have spaced-out teeth that clear sawdust faster, ideal for aggressive cuts but prone to roughness. For example:
- A 10 TPI blade might remove 1/10 inch of material per tooth—great for fast rip cuts in pine.
- A 60 TPI blade takes micro-bites, producing glass-smooth finishes on oak but taking twice as long.
Pro Tip: Always check TPI before buying. A 40 TPI blade for plywood might seem “medium,” but if you’re cutting 3/4-inch hardwood, you’ll need 60+ TPI to avoid splintering.
Why TPI Varies by Saw Type
Different saws demand different TPI ranges because of their mechanics:
- Circular saws: Typically 24–80 TPI. Lower TPI (24–40) for ripping, higher (60–80) for crosscuts. Circular saw blades often feature variable TPI for versatility.
- Jigsaws: 6–24 TPI. Lower TPI (6–10) for curves in plywood, higher (18–24) for metal.
- Bandsaws: 3–14 TPI. Coarse (3–6 TPI) for resawing thick lumber, fine (10–14 TPI) for veneers.
Fun Fact: A hacksaw blade might have 14–32 TPI because hand sawing requires finer control than power tools.
What Are Saw Blade Teeth? The Physical Cutting Powerhouses
While TPI is a measurement, teeth are the actual steel edges that slice through material. They’re not just “points”—they’re engineered with specific shapes, angles, and sets to optimize performance.
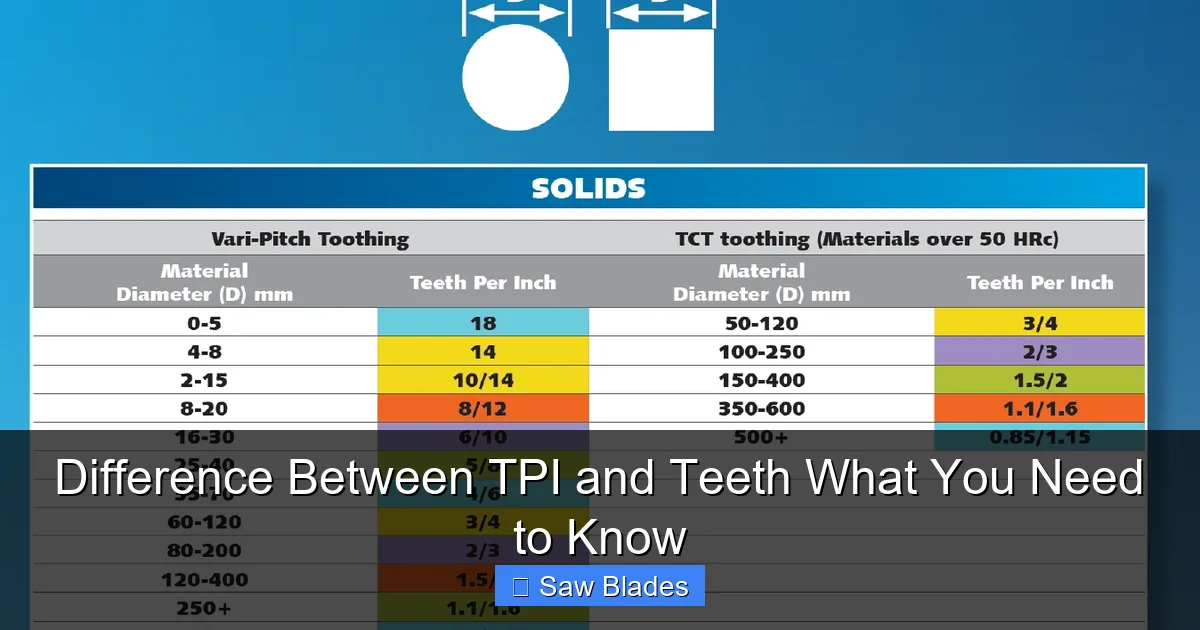
Visual guide about Difference Between TPI and Teeth What You Need to Know
Image source: sawblade.com.au
Tooth Geometry: More Than Just Sharp Edges
Teeth have three critical features:
- Bevel angle: The slant of the cutting edge. A 10°–20° bevel (common in ATB teeth) slices cleanly across wood fibers for crosscuts. Flat-top teeth (0° bevel) crush fibers for fast ripping.
- Tooth set: How much teeth bend left/right. A “wavy set” clears sawdust better in dense woods, while a “raker set” suits metal cutting.
- Gullet size: The space behind each tooth. Larger gullets handle thick materials; smaller ones prevent chip clogging in thin metals.
Example: A crosscut blade uses Alternate Top Bevel (ATB) teeth with a 20° bevel to sever wood fibers cleanly. A ripping blade uses Flat Top Grind (FTG) teeth to push fibers apart aggressively.
Tooth Material and Hardness
Teeth are forged from high-carbon steel, bi-metal (HSS + steel), or carbide-tipped. Harder materials stay sharper longer but cost more:
- Carbide-tipped teeth: Best for abrasive materials like MDF or fiberboard. Last 10x longer than steel.
- Bi-metal teeth: Flexible for curved cuts in jigsaws. Resist snapping on nails.
Warning: Using a wood blade on metal will dull teeth in seconds. Always match tooth material to your project!
How TPI and Teeth Work Together: The Cutting Performance Connection
TPI and teeth aren’t rivals—they’re a team. TPI sets the stage for speed and finish, while tooth geometry executes the cut. Get this wrong, and you’ll face burning, chatter, or premature blade death.

Visual guide about Difference Between TPI and Teeth What You Need to Know
Image source: cdn.shopify.com
Cut Quality vs. Speed: The TPI Trade-Off
Here’s how TPI impacts results:
- High TPI (40+): Teeth overlap slightly, creating multiple cuts per inch. Perfect for finish carpentry—think cabinet backs or picture frames. But in thick lumber? You’ll smell burning as sawdust jams the gullet.
- Low TPI (10–24): Teeth have room to breathe, ejecting chips fast. Ideal for framing or demolition. However, on plywood, you’ll get tear-out on the backside.
Real-World Test: Cutting 1/2-inch plywood with a 24 TPI blade leaves splintered edges. Switch to 60 TPI? Flawless finish—but it takes 3x longer.
Material Matters: Matching TPI to What You’re Cutting
Different materials demand specific TPI ranges:
- Softwoods (pine, cedar): 14–24 TPI. Coarse teeth prevent gum-up from resins.
- Hardwoods (oak, maple): 24–40 TPI for ripping, 40–80 TPI for crosscuts. Higher TPI avoids splintering dense grains.
- Metals (aluminum, steel): 14–32 TPI. Fine teeth prevent work-hardening; always use cutting fluid.
- Plastics/Acrylic: 60+ TPI. Prevents melting and chipping.
Pro Tip: For jigsaw blades, start with 10 TPI for wood curves. If edges fray, bump to 18 TPI.
Choosing the Right TPI: A Step-by-Step Guide
Follow this workflow to pick the perfect blade:
Step 1: Identify Your Material and Thickness
Grab a scrap piece of your material. Is it:
- Thin (1/8–1/2 inch): Higher TPI (40+). Prevents tear-out.
- Thick (3/4 inch+): Lower TPI (14–24). Ensures chip clearance.
Example: Cutting 1/4-inch aluminum? Use 24 TPI. Cutting 2×4 lumber? 18 TPI is ideal.
Step 2: Determine Cut Type
- Crosscut (across grain): Higher TPI (40–80). Cleaner finish.
- Rip cut (with grain): Lower TPI (14–24). Faster removal.
- Curves or demolition: Medium TPI (18–24) with flexible teeth.
Remember: A reciprocating saw blade for pruning needs 6–10 TPI to power through branches without binding.
Step 3: Consult Manufacturer Charts
Top brands like Diablo or Freud include TPI guides on packaging. When in doubt:
- Woodworking: Start with 24 TPI for general use.
- Metalworking: Use 18–24 TPI for steel, 32+ for thin aluminum.
Red Flag: If a blade claims “all-purpose” with 10–80 TPI? It’s a compromise—good for light tasks but fails at specialized cuts.
Troubleshooting Common TPI and Tooth Problems
Even with the right blade, issues happen. Here’s how to fix them:
Problem: Burning or Smoking Wood
Cause: Too high TPI for material thickness or dull teeth.
Solution: Switch to lower TPI (e.g., 18 instead of 40) or sharpen teeth. Always cut at full speed—slow feeds overheat blades.
Problem: Rough or Chattered Cuts
Cause: Too low TPI for finish work or incorrect tooth geometry.
Solution: Use higher TPI (60+ for plywood) and ensure teeth are set correctly. For crosscuts, choose ATB-ground blades.
Problem: Blade Binding or Kickback
Cause: Gullet clogging from low TPI in resinous woods.
Solution: Clean gullet with a wire brush or switch to a blade with larger gullets (e.g., 10 TPI for pine).
Conclusion: Master Your Cuts with TPI and Teeth Knowledge
You now know the critical difference between TPI and teeth: TPI is the measurement dictating cut speed and finish, while teeth are the physical tools executing the work. Remember, high TPI = smooth but slow, low TPI = fast but rough—and always match tooth geometry to your material. Stop guessing and start cutting with confidence. Whether you’re building a deck or crafting furniture, the right blade turns frustration into flawless results. Ready to upgrade your toolkit? Check our guide on cordless drill and impact driver sets for the perfect power tool pairings!
🎥 Related Video: 1060 – 04 – Understanding TPI & Tooth Pitch
📺 SawbladeUniversity
A couple of the most important variables in selecting your saw blade are tooth pitch and teeth per inch or TPI. TPI, tooth per inch, …
