
Hammer action is the essential feature that distinguishes hammer drills, delivering a rapid pounding motion alongside rotation to conquer masonry, concrete, and stone with ease. This powerful mechanism, combined with variable speed settings and dedicated modes (drill-only or hammer-drill), gives you precise control for versatile applications from light chiseling to heavy-duty anchoring. Understanding these core features ensures you select the right tool and maximize efficiency on demanding projects.
Key Takeaways
- Hammer action combines rotation with rapid impacts to power through masonry and concrete.
- Use hammer mode only on hard materials like brick, concrete, or stone to avoid damage.
- Variable speed control provides precision for different materials and bit sizes.
- Adjustable torque prevents screw stripping and protects your workpiece.
- Depth stops ensure consistent hole depths for repetitive, professional results.
- Always wear safety gear including eye protection and dust masks when hammer drilling.
- Regular maintenance extends tool life—clean vents and lubricate chuck periodically.
Why This Matters: Understanding the Problem
Let me tell you about the time I tried to hang a heavy bookshelf on my concrete basement wall. I grabbed my regular drill, pushed hard, and made barely any progress. My arm ached after ten minutes, and I’d only managed a shallow hole. The wall dust looked like I’d sneezed on it. I felt defeated.
That’s when a friend showed up with his hammer drill. In thirty seconds flat, he had the perfect hole ready for my anchor. I stood there wondering what I’d been doing wrong for all those years. The truth? I didn’t understand hammer drill features explained properly. I was trying to use a regular drill for a job that needed serious power.
Here’s the thing: hammer drills aren’t just “stronger drills.” They’re specialized tools with specific features that make them perfect for masonry, concrete, and brick work. But if you don’t know what those features do, you’re wasting money, time, and energy. You might even damage your walls or the tool itself.
Whether you’re a DIY beginner or a seasoned home improver, knowing these features means the difference between a frustrating afternoon and a job done right in minutes. Let’s break it down together.
What You Need Before We Start
Don’t worry, you don’t need a toolbox full of expensive gear to understand hammer drill features. Here’s what I keep handy when I’m teaching someone or testing out a new drill:
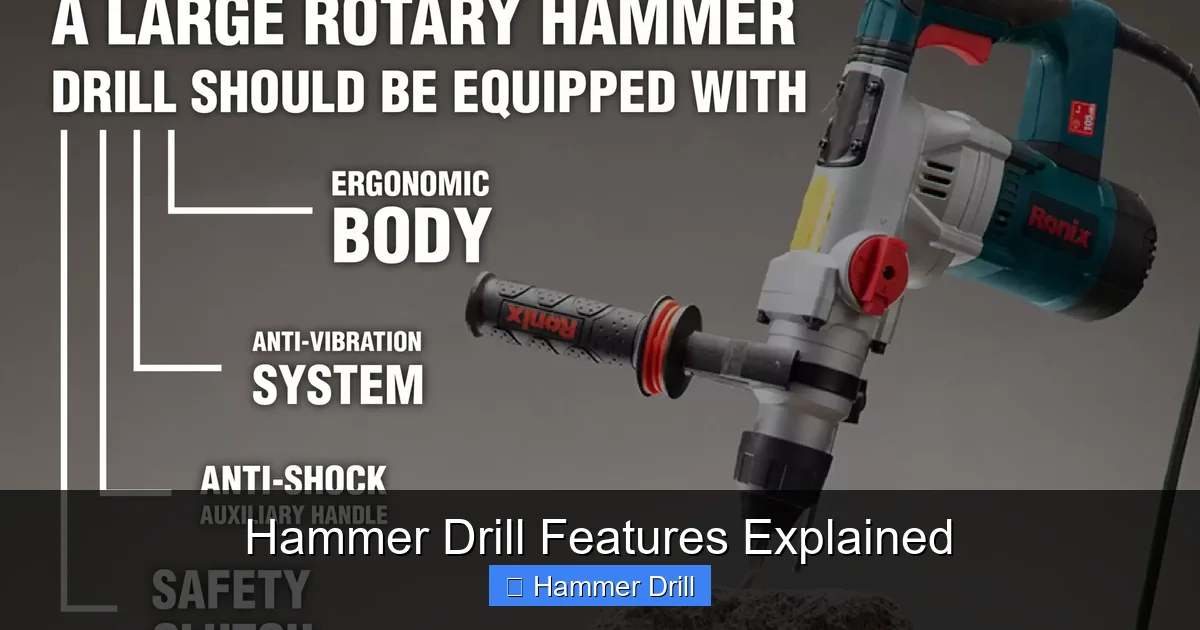
Visual guide about Hammer Drill Features Explained
Image source: ronixtools.com
- The hammer drill itself – either corded or cordless (we’ll cover both)
- Masonry drill bits – these have carbide tips and look different from regular bits
- Standard drill bits – for when you want to use it as a regular drill
- Safety glasses – concrete dust gets everywhere
- A dust mask – seriously, you don’t want to breathe this stuff
- Work gloves – hammer drills vibrate, and blisters are no fun
- A practice material – a concrete block or brick works perfectly
- Pencil or marker – for marking your drill spots
- Depth gauge or tape measure – most drills have this built-in
That’s it. With these basics, you can explore every feature without breaking the bank. I learned this the hard way when I bought a fancy hammer drill stand before even understanding the basic settings. Save yourself that mistake.
Step-by-Step Guide to Hammer Drill Features Explained
Step 1: The Hammer Mechanism – Your Concrete-Busting Heart
This is the feature that gives the hammer drill its name, and honestly, it’s pure magic when you see it work. Inside your drill, there’s a clutch mechanism that moves the chuck forward and backward at high speed. This creates a hammering action that pounds the drill bit into the material while it rotates.
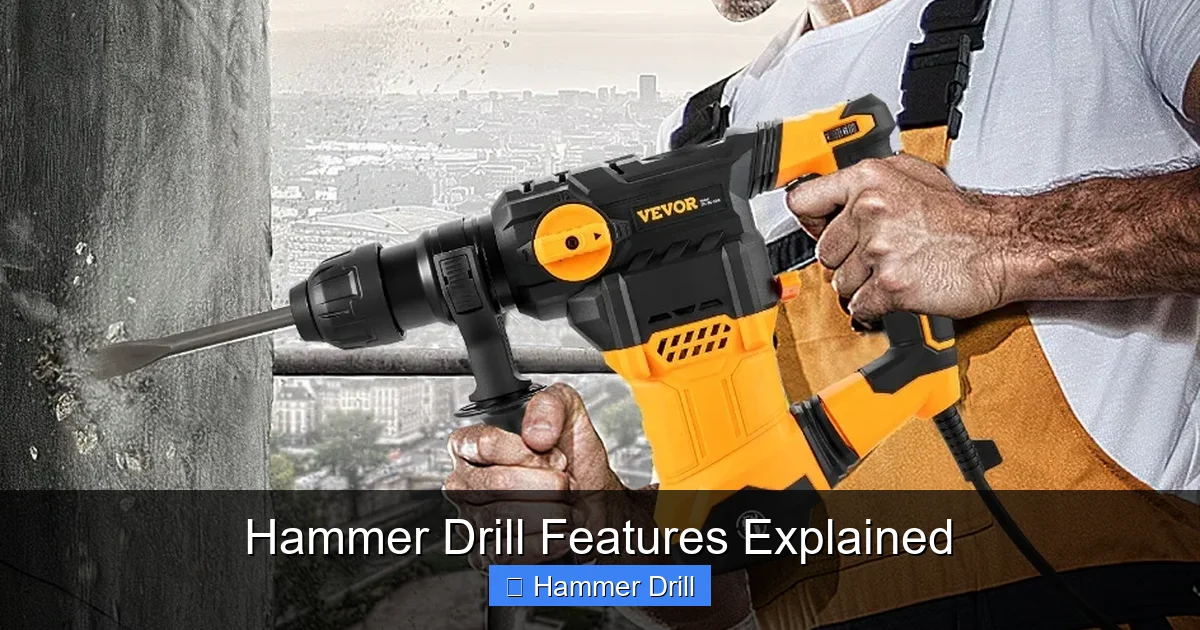
Visual guide about Hammer Drill Features Explained
Image source: diy-ideas.oss-accelerate.aliyuncs.com
Think of it like this: a regular drill just spins and hopes for the best. A hammer drill spins AND hammers at the same time. That hammering action is measured in blows per minute (BPM). Entry-level drills might hit 20,000 BPM, while professional models can exceed 50,000 BPM.
Here’s what you need to know: the hammer mechanism only engages when you’re pushing forward. That’s why you feel that distinctive “jackhammer” vibration when you press hard. On softer materials like wood, this mechanism either disengages automatically or you switch it off completely. This brings me to our next crucial feature.
Step 2: Mode Selection Switch – Three Tools in One
Most hammer drills have a rotating switch near the chuck that lets you choose between modes. I remember staring at mine for five minutes trying to figure out which icon meant what. Let me decode it for you:
- Drill Mode (🔧 or “Drill” icon) – This turns OFF the hammer action. Use this for wood, metal, plastic, and regular screw driving. It functions exactly like a standard drill.
- Hammer Drill Mode (🔨 or “Hammer” icon) – This ENGAGES the hammer mechanism. Use this for concrete, brick, stone, and masonry. This is where the magic happens.
- Driver Mode (⚡ or “Screwdriver” icon) – Some models include this separate setting that adds a clutch to control torque. It’s perfect for driving screws without stripping them.
Pro tip: Always make sure this switch clicks into place. I once tried to drill with it halfway between modes and stripped the internal gears. It sounded like grinding metal and cost me $80 in repairs. Don’t be like me.
Step 3: Variable Speed Trigger – Your Control Center
The trigger under your handle isn’t just on/off. It’s a variable speed control that responds to how hard you squeeze. This feature is incredibly important and often overlooked by beginners.
When you’re starting a hole in concrete, you want to squeeze gently at first. This lets the drill bit find its purchase without skating across the surface. Once it’s started, you can squeeze harder for maximum power. In wood or metal, you use lighter pressure for precision work.
Most hammer drills run between 0 and 1,000 RPM in low range, and up to 2,000+ RPM in high range. The trigger controls this smoothly. I’ve found that light, consistent pressure works better than mashing the trigger all the way down. Your holes will be cleaner, and your bits will last longer. Plus, you won’t get as tired.
Step 4: Two-Speed Gearbox – Range Selection
Next to the mode switch, you’ll usually find a gear selector that says “1” and “2” or “Low” and “High.” This isn’t about the trigger sensitivity—it’s about mechanical gear ranges.
- Low Range (Gear 1) – Higher torque, lower speed. Perfect for driving large screws, mixing paint, or drilling big holes in masonry. This is where you get the most power.
- High Range (Gear 2) – Lower torque, higher speed. Ideal for drilling smaller holes in wood or metal, or driving smaller screws quickly.
I keep mine in low range 90% of the time for masonry work. The extra torque makes a huge difference when you’re fighting through rebar or tough concrete. For woodworking, I switch to high range for cleaner, faster holes.
Step 5: Torque Settings and Clutch – Preventing Disaster
This feature saved me from stripping countless screws when I first started. Around the base of the chuck, you’ll find a ring with numbers on it (usually 10-30). This is your torque adjustment clutch.
Torque is just a fancy word for rotational force. When you’re driving a screw into soft wood, you need less torque. Into hard concrete, you need more. The clutch slips when it reaches the preset torque, preventing you from overdriving and damaging the screw or material.
Here’s my simple method: Start with a low number and increase until the screw sits flush. For delicate trim work, I use setting 5-8. For heavy-duty framing anchors, I go to 15-20. In hammer mode, these settings usually don’t engage, which is why you need separate driver mode for precision screw work.
Step 6: Chuck Types and Quick-Change Systems
The chuck is that sleeve at the front that holds your bits. Hammer drills come with two main types:
Keyed Chuck – You need the little metal key to tighten it. These grip tighter and are less likely to slip under heavy load. They’re great for serious masonry work.
Keyless Chuck – You twist it by hand. Much faster for changing bits, but can loosen under extreme vibration. Most modern hammer drills have keyless chucks with carbide teeth that grip surprisingly well.
I prefer keyless chucks for DIY work because I’m constantly switching between drill bits and driver bits. But if you’re doing professional concrete drilling all day, get a keyed chuck. It won’t let you down.
Pro tip: Always clean your bits before inserting them. Grease or dirt on the shank can cause slipping. I learned this when a bit flew out and put a hole in my drywall. Not my finest moment.
Step 7: Depth Gauge and Side Handle – Precision and Control
These two features work together to make your drilling accurate and comfortable. The depth gauge is usually a sliding rod or collar that you set to stop the drill at a specific depth. This is perfect for installing anchors or electrical conduit where you need consistent hole depths.
The side handle (sometimes called the D-handle) screws into either side of the drill. You should always use this handle when drilling into masonry. The vibration is intense, and trying to hold the drill with one hand is both unsafe and ineffective. I attach mine to the left side and tuck my elbow into my body for maximum stability.
Most depth gauges have markings in both inches and millimeters. Set it by loosening a thumb screw, sliding to your measurement, and tightening again. For a 2-inch anchor, I set mine to exactly 2 inches and never have to measure each hole. Game changer.
Step 8: Power Source – Corded vs. Cordless Trade-offs
This is where personal preference meets practicality. Corded hammer drills deliver consistent power without fading. They’re lighter since there’s no battery. But that cord limits you, and you need an outlet nearby.
Cordless models run on 18V or 20V batteries. They’re more versatile and you can take them anywhere. But batteries add weight, and power drops as the battery drains. I own both. For indoor work near outlets, I grab the corded one. For outdoor projects or when I’m on a ladder, cordless wins every time.
Modern cordless hammer drills have amazing power. My 20V model drills through concrete just as fast as my corded one. The real difference is runtime. A 4.0Ah battery lasts about 30-40 minutes of continuous heavy drilling. Keep a spare charged, and you’ll never be stuck.
Step 9: Extra Features That Actually Matter
Manufacturers love to load up drills with features, but most are gimmicks. These three actually help me:
- LED Work Light – Shines right where you’re drilling. Essential for dark basements or under sinks. Mine has saved me from drilling into a pipe more than once.
- Battery Indicator – Shows remaining charge on cordless models. No more guessing games.
- Brushless Motor – More efficient, runs cooler, and lasts longer. Worth the extra $30-50 if you plan to use it regularly.
Skip the laser guides and Bluetooth speakers. They add cost and complexity without real benefit. Focus on the core features that affect performance.
Pro Tips & Common Mistakes to Avoid
My biggest lesson: Using a regular drill bit in hammer mode is like using a spoon to dig a grave. It will take forever, ruin your bit, and might damage your drill. Always use masonry bits with carbide tips when hammering. They’re designed to handle the impact.
Let me share some hard-won wisdom from years of trial and error. First, don’t press too hard. Let the drill do the work. I used to lean into it with all my body weight, thinking more pressure meant faster drilling. Actually, too much pressure can cause the bit to bind, overheat the motor, and give you less control. Apply firm, steady pressure instead.
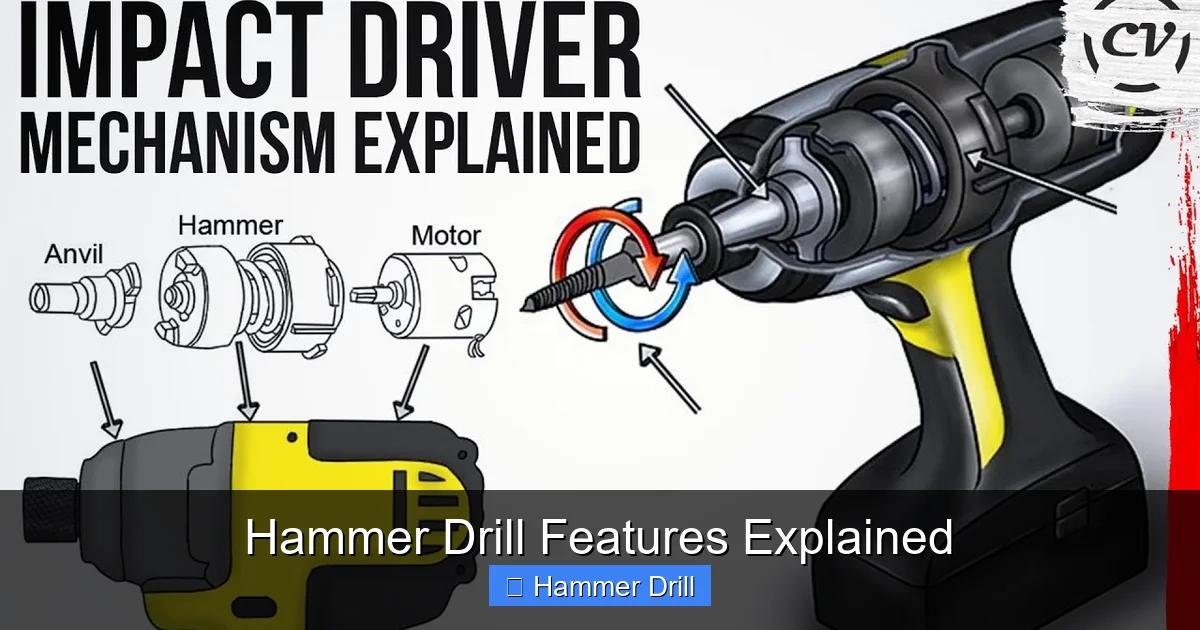
Visual guide about Hammer Drill Features Explained
Image source: i.ytimg.com
Another mistake: forgetting to blow out the dust. When you drill into concrete, dust packs into the hole. If you don’t clear it, your anchor won’t go in all the way. I pull the bit out every few seconds and blow or brush the dust away. It adds 10 seconds to the job but makes everything fit perfectly.
Here’s something that surprised me: hammer drills get hot. Like, really hot. After drilling five or six deep holes, give it a 5-minute break. Overheating can burn out the motor brushes. I learned this when my first drill died after an afternoon of anchor installation. The warranty claim was denied because I’d “overheated it.” Learn from my wallet’s pain.
Also, never switch modes while the drill is running. Always stop completely before changing from drill to hammer mode. The internal gears need to disengage fully. I’ve seen people strip the transmission by trying to switch on the fly. It’s a $100+ repair that’s completely avoidable.
Finally, understand when NOT to use a hammer drill. For most wood and metal applications, a regular drill is better. The hammer action can splinter wood and leave rough holes. Save the hammer drill for masonry, and you’ll get cleaner results everywhere else. Check out our article on the difference between a hammer drill and regular drill for more details on when to use each tool.
FAQs About Hammer Drill Features Explained
Q: Can I use my hammer drill on wood?
A: Absolutely! Just switch it to regular drill mode (turn off the hammer action). In fact, most hammer drills make excellent regular drills for wood, metal, and plastic. The variable speed trigger and torque settings work the same way. I use mine for woodworking all the time. Just remember: hammer mode on wood is overkill and will damage your material.
Q: What’s the difference between a hammer drill and an impact driver?
A: Great question, and this confuses everyone. A hammer drill hammers forward and backward while spinning—perfect for concrete. An impact driver spins and adds rotational impacts—perfect for driving long screws. They solve different problems. You can’t effectively drill into concrete with an impact driver, and a hammer drill isn’t ideal for driving 3-inch deck screws. I wrote a whole piece on what is the difference between impact driver and hammer drill if you want the deep dive.
Q: Do I really need a hammer drill for concrete?
A: For anything harder than soft brick, yes. Regular drills don’t have the power or hammer action to penetrate concrete effectively. You might make a hole in a concrete block with a regular drill after 15 minutes of frustration, but in reinforced concrete or solid stone, you’ll fail completely. Hammer drills are specifically designed for this. If you’re hanging shelves, TV mounts, or anything that needs a secure anchor in concrete, you need the right tool.
Q: How long should I drill into concrete?
A: Generally, drill for about 5-10 seconds, then pull out to clear dust. Repeat this “pecking” motion until you reach depth. For a 2-inch hole, that’s usually 15-20 cycles. Don’t just drill continuously—this overheats the bit and motor. You’ll hear the drill strain and see smoke if you’re pushing too long. Let the tool breathe, and it will last much longer.
Q: Can I use a hammer drill as a regular drill for everyday tasks?
A: Yes, and many people do. The key is switching to drill mode first. However, hammer drills are typically heavier and more powerful than standard drills. For delicate tasks like driving small screws into drywall, a lighter regular drill might be more comfortable. I keep a compact best cordless drill for those light-duty jobs and reserve the hammer drill for heavy work.
Q: Why does my hammer drill make such a loud noise in hammer mode?
A: That loud banging sound is the hammer mechanism inside. It’s literally a small hammer hitting the back of the chuck thousands of times per minute. This is normal and expected. If you’re working indoors, wear ear protection. The noise isn’t just loud—it’s a specific frequency that can damage hearing over time. I learned this after a weekend project left my ears ringing for two days.
Q: What size hammer drill do I need for home use?
A: For most DIY projects, a 1/2-inch 18V cordless hammer drill is perfect. The 1/2-inch chuck handles bits up to 1/2-inch diameter, which covers 95% of home projects. The 18V provides enough power without being too heavy. If you’re doing serious construction work, consider a 1-inch SDS rotary hammer instead—but that’s a whole different tool category.
Final Thoughts
Understanding hammer drill features explained doesn’t have to be complicated. Start with the basics: know your modes, use the right bits, and always, always use that side handle. These three things will transform your masonry work from frustrating to fantastic.
Remember that these tools are versatile. Your hammer drill isn’t just for concrete—it’s a three-in-one powerhouse that can handle wood, metal, and driving tasks too. The key is matching the feature to the job. Don’t be the person using a sledgehammer to crack a nut.
Practice makes perfect. Grab a spare concrete block from the home improvement store and drill some test holes. Get comfortable with the vibration, the noise, and the settings. By the time you’re ready for your real project, you’ll know exactly what to do.
And if you’re still unsure about any feature, don’t guess. Check your manual or watch a quick video. I’ve replaced more than one drill because I thought I knew better. Trust me, the manual is cheaper than a new tool.
Now go hang that shelf, mount that TV, or build that project. You’ve got the knowledge, and that hammer drill has the power. Together, you’ll make quick work of any masonry job that comes your way.
