
This guide covers everything you need to know about using the normal mode on your hammer drill. We’ll show you when to use it, how to set it up properly, and tips for perfect results on wood, metal, and plastic. Master your drill basics fast with our simple step-by-step instructions and expert advice.
Key Takeaways
- Know the difference: Normal mode is for wood, metal, and plastic. Hammer mode is for masonry only.
- Right bits matter: Use twist bits for wood and metal, masonry bits only for hammer mode.
- Speed control: Start slow. Adjust speed based on material and bit size.
- Safety first: Always wear eye protection and secure your workpiece.
- Proper pressure: Let the drill do the work. Apply steady, moderate pressure.
- Depth control: Use the depth stop for consistent hole depths.
- Maintenance: Keep your drill clean and bits sharp for best performance.
Introduction: Your Quick Start to Hammer Drill Normal Mode
You bought a hammer drill and now you’re staring at that mode switch wondering what “normal mode” really means. Don’t worry—this guide cuts through the confusion. In the next few minutes, you’ll learn exactly how to use your hammer drill’s normal mode for everyday projects around the house. We’ll cover setup, safety, techniques, and troubleshooting in plain English. No technical jargon. Just clear, actionable steps that get results.
By the end of this guide, you’ll confidently drill clean holes in wood, metal, and plastic without damaging your materials or your drill. Let’s get started.
Understanding Hammer Drill Normal Mode: What It Actually Does
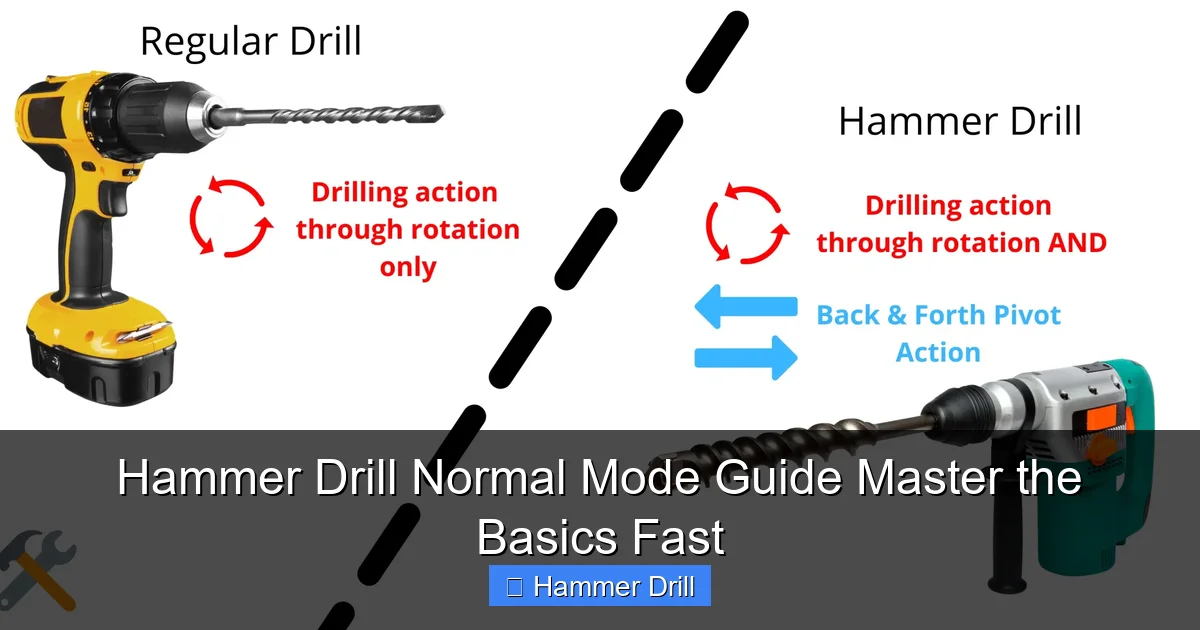
Your hammer drill has two main settings: normal mode and hammer mode. Understanding the difference is crucial for success. Normal mode turns your drill into a standard power drill. It spins the bit without any hammering action. This is perfect for most materials you’ll work with daily.
Visual guide about Hammer Drill Normal Mode Guide Master the Basics Fast
Image source: toolsgalorehq.com
Think of it this way: normal mode is like a smooth, steady hand guiding the bit through material. Hammer mode is like a tiny jackhammer pounding while it spins. Using hammer mode on wood or metal will damage both your bit and your workpiece.
Most modern hammer drills have a simple switch or button that toggles between modes. You’ll typically find it near the gear shift or on the top of the tool. When you select normal mode, you disable the hammering mechanism completely. This saves battery life and reduces wear on your drill.
For a deeper dive into the technical differences, check out our guide on the difference between a hammer drill and regular drill. This will help you understand why your tool has both modes and when each one shines.
When to Use Normal Mode: Your Go-To Applications
Normal mode handles 90% of your drilling tasks. Here’s your quick reference list:
Visual guide about Hammer Drill Normal Mode Guide Master the Basics Fast
Image source: i.ytimg.com
Wood Projects
Normal mode excels at drilling into all types of wood. Whether you’re working with soft pine or hard oak, this mode gives you clean, controlled holes. Use it for:
- Building shelves and furniture
- Installing door handles and hinges
- Creating pilot holes for screws
- Drilling dowel holes
- Making holes for wiring
Metal Work
Drilling metal requires patience and the right speed. Normal mode provides the variable speed control you need. Perfect for:
- Sheet metal for crafts
- Metal brackets and hardware
- Aluminum frames
- Copper pipes (for plumbing)
- Steel studs (light gauge)
Plastic and Composite Materials
Plastics can melt or crack if you use too much heat or pressure. Normal mode keeps things cool and controlled. Use it for:
- PVC pipes and fittings
- Acrylic sheets
- Composite decking
- Fiberglass panels
- Plastic storage containers
Remember this simple rule: if it’s not brick, concrete, or stone, use normal mode. Your bits will last longer, and your results will be cleaner.
Essential Safety Precautions Before You Start
Safety isn’t optional—it’s critical. A few seconds of protection prevents a lifetime of regret. Here’s your non-negotiable safety checklist:
Visual guide about Hammer Drill Normal Mode Guide Master the Basics Fast
Image source: i.ytimg.com
Personal Protective Equipment (PPE)
Always wear:
- Safety glasses: Flying debris can blind you. Even a tiny wood chip causes permanent damage.
- Work gloves: Protect your hands from sharp edges and splinters.
- Ear protection: Drills get loud, especially in enclosed spaces.
- Dust mask: Wood and metal dust is harmful to breathe.
Workpiece Safety
Secure your material properly. A loose workpiece can twist violently, causing injury. Use clamps or a vise to hold everything steady. Never hold small items in your hand while drilling.
Check your workpiece for hidden dangers. Scan for nails, screws, or metal studs in wood. These can damage your bit and cause kickback.
Tool Safety
Inspect your drill before each use. Look for:
- Cracked or damaged power cord (for corded models)
- Loose battery pack (for cordless models)
- Worn or damaged chuck
- Cracked or missing bits
Ensure the trigger works smoothly and returns to the off position when released. Test the mode switch to confirm it’s firmly in normal mode.
Step-by-Step Setup for Hammer Drill Normal Mode
Proper setup makes the difference between a professional result and a frustrating mess. Follow these steps every time.
Step 1: Select the Correct Mode
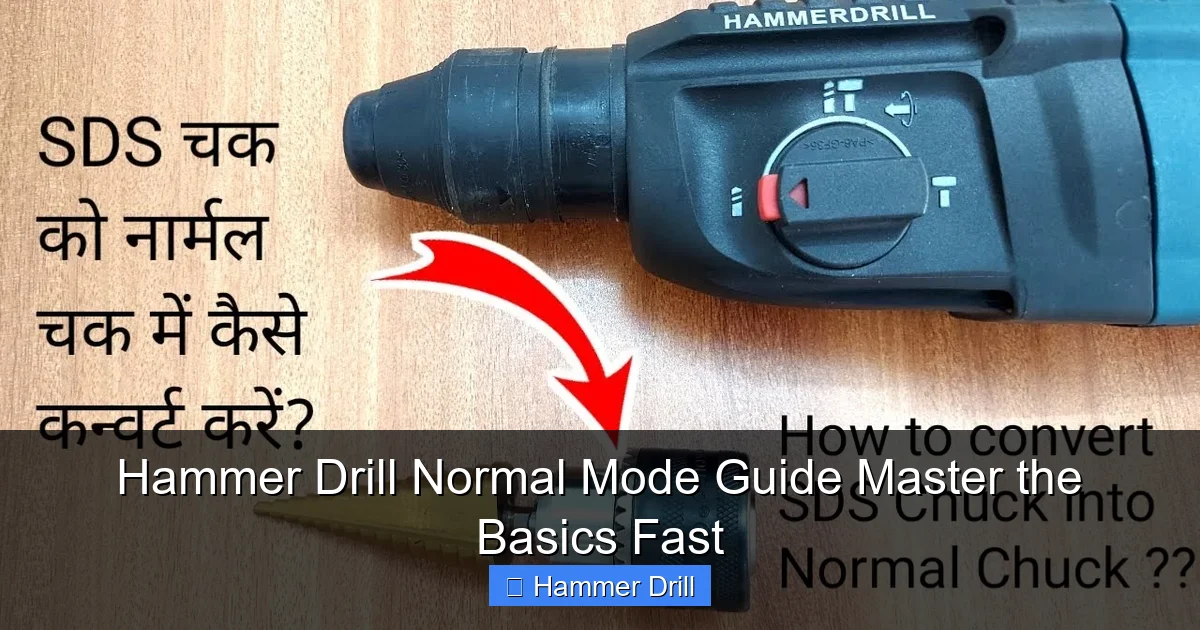
Turn off your drill completely. Locate the mode switch—usually marked with icons. You’ll see a drill bit icon for normal mode and a hammer icon for hammer mode. Slide or press the switch until it clicks into the normal position. Double-check by looking at the indicator window if your drill has one.
Step 2: Choose and Install the Right Drill Bit
Open the chuck by rotating it counterclockwise. Insert your selected bit fully into the chuck. Make sure the shank touches the back of the chuck. Then rotate the chuck clockwise to tighten. For keyless chucks, hand-tighten firmly. For keyed chucks, use the key to tighten all three jaws evenly. Give the bit a gentle tug to ensure it’s secure.
Step 3: Adjust Speed Settings
Most hammer drills have a gear selector. For normal mode:
- Gear 1 (Low): Use for large bits and hard materials like metal
- Gear 2 (High): Use for small bits and soft materials like wood
Set the gear selector before turning on the drill. Never change gears while the drill is running.
Step 4: Set the Depth Stop
If you need a specific hole depth, adjust the depth stop rod or collar. Loosen the locking nut, extend or retract the stop to your desired depth, then tighten the nut. This prevents drilling too deep and damaging surfaces underneath.
Step 5: Mark Your Hole Location
Measure twice, drill once. Use a pencil or awl to mark your exact spot. For better accuracy, create a small pilot dent with a center punch or nail. This prevents the bit from wandering when you start drilling.
Choosing the Right Drill Bits for Normal Mode
Using the wrong bit ruins your project and damages your drill. Here’s your bit selection guide.
Twist Bits: Your All-Purpose Choice
High-speed steel (HSS) twist bits work for wood, metal, and plastic. They’re the most common bit type. For wood, you can use cheaper carbon steel bits, but they dull faster on metal.
Bit size matters. Use smaller bits (1/8″ to 3/8″) for most tasks. Large bits (1/2″ and above) require more torque and work best in gear 1.
Brad-Point Bits: Precision Wood Drilling
These bits have a sharp point that holds position perfectly. Use them for woodworking where accuracy is critical. The spur edges cut clean entry holes and prevent splintering.
Step Bits: Versatile Metal Work
Step bits drill multiple hole sizes without changing bits. They’re excellent for thin metal, plastic, and electrical projects. Use them in gear 2 at moderate speed.
Spade Bits: Fast Wood Boring
Spade bits make quick, rough holes in wood. Use them for framing and plumbing where appearance doesn’t matter. Always use them in gear 1 with moderate pressure.
Forstner Bits: Clean Wood Holes
Forstner bits create flat-bottomed holes with smooth sides. Use them for cabinet hinges and furniture hardware. They require a drill press or extreme steadiness in hand.
Pro tip: Keep a variety bit set handy. You’ll save time and get better results by matching the bit to the material.
Drilling Techniques for Different Materials
Each material needs a slightly different approach. Master these techniques for perfect holes every time.
Drilling Wood: Clean Entry and Exit
Wood is forgiving but can splinter. Here’s how to drill clean holes:
- Start at slow speed until the bit bites
- Gradually increase to full speed
- Apply steady, moderate pressure
- Back the bit out halfway through to clear chips
- Slow down as you exit to prevent tear-out
For plywood, place a scrap wood backing behind your workpiece. This eliminates exit splintering.
Drilling Metal: Patience and Lubrication
Metal generates heat and dulls bits quickly. Use these steps:
- Use sharp HSS bits only
- Start at very slow speed (500 RPM)
- Apply cutting fluid or lubricant for thick metal
- Use light pressure—let the bit cut
- Pulse the trigger to prevent overheating
- Clear metal chips frequently
For sheet metal, clamp a wooden backing to prevent burrs. Drill through thin metal in one pass. Thick metal may require a pilot hole.
Drilling Plastic: Prevent Melting and Cracking
Plastic is tricky. Too much heat melts it. Too much pressure cracks it. Follow this method:
- Use sharp bits with high spiral flutes
- Start at medium speed
- Apply very light pressure
- Keep the bit moving in and out
- Never force the drill
- Use a backing board to prevent exit cracking
For acrylic and polycarbonate, use a step bit at low speed. These materials drill cleanly with minimal heat.
Drilling Drywall and Soft Materials
Drywall and soft plastics need minimal effort:
- Use the smallest bit that will work
- Start at low speed
- Apply barely any pressure
- Stop immediately when you feel breakthrough
For electrical boxes in drywall, use a hole saw attachment. Set your drill to gear 2 and use light pressure.
Advanced Tips for Professional Results
These pro techniques separate good work from great work.
The Angle Trick
Always hold your drill perpendicular to the surface. Use a square to check your angle. For awkward positions, use a right-angle drill attachment. This keeps your holes straight even in tight spaces.
Pilot Holes for Screws
When installing screws, drill a pilot hole slightly smaller than the screw’s core diameter. Then drill a countersink hole if needed. This prevents wood splitting and makes screw driving easier. Our guide on how to use a drill for screws into a wall covers this in detail.
Preventing Bit Walking
Bits wander on smooth surfaces. Create a starter dimple with a center punch. Or drill at a 45-degree angle first, then straighten up once the groove forms. This works great for metal and glossy wood.
Extension Cord Safety
For corded drills, use the shortest, thickest extension cord possible. A 14-gauge cord up to 25 feet works for most drills. Longer cords need 12-gauge wire. This prevents voltage drop and overheating.
Battery Management for Cordless Drills
Cordless hammer drills need proper battery care. Keep batteries at room temperature. Never fully discharge them. Store with partial charge. For extended use, have a second battery ready. This keeps you working without interruption.
Troubleshooting Common Problems in Normal Mode
Even pros run into issues. Here’s how to fix the most common problems.
Problem: Bit Won’t Stay Centered
Symptom: Your bit walks across the surface instead of drilling.
Solution: Create a starter hole with a nail or awl. Use a drill guide block. Check that your bit is sharp and properly seated in the chuck. Ensure you’re holding the drill perpendicular to the work surface.
Problem: Drill Overheats Quickly
Symptom: The motor smells hot or shuts down.
Solution: You’re likely using too much pressure or the wrong speed. Reduce pressure and let the bit cut. Switch to a lower gear for large bits. Check that you’re in normal mode, not hammer mode. Clean any blocked ventilation holes on the drill.
Problem: Bits Break Frequently
Symptom: Bits snap, especially in metal.
Solution: You’re using too much pressure or the wrong bit type. Switch to high-speed steel bits for metal. Reduce pressure significantly. Use cutting fluid. Ensure you’re using the correct speed for the material thickness.
Problem: Holes Are Oversized or Rough
Symptom: Holes are bigger than the bit size or have jagged edges.
Solution: Your bit is dull or wobbling. Replace dull bits immediately. Check that the bit is centered in the chuck. Tighten the chuck properly. For wood, slow down as you exit the hole. Use a backing board to prevent tear-out.
Problem: Drill Vibrates Excessively
Symptom: The tool shakes violently during use.
Solution: This usually means the bit is bent or the chuck is loose. Turn off the drill and inspect the bit for straightness. Remove and reinsert the bit, tightening the chuck firmly. Check that the mode switch is fully engaged in normal mode.
Problem: Trigger Sticks or Won’t Release
Symptom: The drill keeps running after you release the trigger.
Solution: Turn off the drill immediately. This is a switch malfunction. Do not use the drill until repaired. Contact the manufacturer or a qualified repair technician. Continuing to use it risks injury.
Maintenance Tips to Keep Your Drill Running Forever
Proper maintenance extends your drill’s life dramatically. Do these simple tasks regularly.
Clean After Every Use
Wipe down the housing with a dry cloth. Blow out dust from the vents using compressed air. Clean the chuck jaws with a wire brush. Remove all debris from the bit and work area.
Inspect Weekly
Check the power cord for frays or damage. Test the trigger for smooth operation. Verify the mode switch clicks firmly into position. Inspect the chuck for cracks or excessive wear. Make sure all screws are tight.
Lubricate Moving Parts
Apply a drop of lightweight oil to the chuck threads monthly. This prevents seizing and makes bit changes easier. Wipe off excess oil to avoid attracting dust.
Store Properly
Keep your drill in its case when not in use. Store in a dry, temperature-controlled area. Never leave batteries on the charger indefinitely. Remove batteries if you won’t use the drill for months.
Sharpen Bits Regularly
Dull bits cause poor results and damage your drill. Use a bench grinder or bit sharpener every few months. Or learn to hand-sharpen with a file. Sharp bits cut cleaner and last longer.
Replace Worn Brushes
Most drills have carbon brushes that wear out. When your drill loses power or sparks excessively, check the brushes. Replacement is simple and costs just a few dollars. Consult your manual for location and replacement procedure.
Conclusion: You’re Ready to Drill Like a Pro
You now know everything about using hammer drill normal mode effectively. Remember the key points: use normal mode for wood, metal, and plastic; select the right bit; start slow; apply moderate pressure; and always prioritize safety.
Practice these techniques on scrap material before tackling important projects. Within a few sessions, you’ll drill cleaner, faster, and with more confidence. Your hammer drill is a versatile tool—mastering normal mode unlocks 90% of its potential.
Keep this guide handy for reference. When in doubt, come back and review the troubleshooting section. Soon you’ll be teaching others the basics. Happy drilling!
