
Your hammer drill problems end here! This targeted guide provides instant solutions for common issues like bit slippage, excessive vibration, and power loss. Save time and money with step-by-step troubleshooting designed specifically for hammer drills.
Key Takeaways
- Verify hammer mode is engaged for masonry work; incorrect settings prevent hammering action.
- Clean vents regularly to prevent overheating and motor damage during extended use.
- Tighten the chuck securely before operation to avoid bit slippage or wobble.
- Reduce excessive vibration by applying steady, moderate pressure and using sharp bits.
- Replace worn carbon brushes promptly to maintain motor performance and prevent failure.
- Store drills properly in dry conditions to avoid internal corrosion and component damage.
Why This Matters: When Your Hammer Drill Throws a Wrench in the Works
We’ve all been there. You’re in the middle of a project—maybe hanging heavy shelves, tackling a bathroom remodel, or securing that new deck—and your trusty hammer drill decides to act up. It might start making a strange noise, refuse to hammer, or simply won’t drill straight. In that moment, it’s not just a tool problem; it’s a progress problem.
A hammer drill is a fantastic beast for concrete, brick, and masonry. But unlike a regular drill, its dual action of rotation and concussive hammering introduces more moving parts that can, and will, occasionally act up. Don’t panic. Most issues are common and surprisingly fixable. This hammer drill problem solving guide is here to walk you through quick solutions, so you can get back to building, not browsing for a replacement.
Think of it like this: you wouldn’t ignore a weird sound from your car. Treat your power tools with the same respect. A little troubleshooting can extend their life and save you a lot of frustration (and money).
What You Need in Your Troubleshooting Toolkit
Before we dive into the nitty-gritty, let’s make sure you’re set up for a successful diagnosis. You don’t need a full workshop, just a few key items.
Visual guide about Hammer Drill Problem Solving Guide Quick Solutions Here
Image source: i2.wp.com
- Your Hammer Drill: Obviously. But try to observe the problem when it’s safe—don’t force it.
- Basic Hand Tools: A set of screwdrivers (Phillips and flathead) and an Allen key set. Most housings are secured with these.
- A Clean Workspace: Good lighting and a tidy bench make inspection 100 times easier.
- Safety Gear: Safety glasses and a dust mask. You’ll be checking for debris and wear.
- The User Manual: It’s the Rosetta Stone for your specific model. Lost it? A quick online search for “[Your Brand & Model] manual PDF” usually does the trick.
- Replacement Parts (Potentially): Based on our guide, you might identify a worn carbon brush or a grease issue. Having the right part on hand speeds up the fix.
Having these ready turns a frustrating experience into a methodical process. Now, let’s get to the heart of your hammer drill problem solving guide.
Step-by-Step Guide to Hammer Drill Problem Solving: Quick Solutions Here
This section is the core of our guide. We’ll tackle the most frequent issues one by one. Remember, always disconnect the drill from power (remove the battery or unplug it) before any inspection or maintenance.

Visual guide about Hammer Drill Problem Solving Guide Quick Solutions Here
Image source: i.ytimg.com
Step 1: Diagnosing the “No Hammering Action” Problem
This is the classic. The drill spins, but that satisfying chik-chik-chik sound is absent. Your hole is just getting hot and dusty, not deep.
First, check the mode selector. It’s easy to accidentally bump the switch. Ensure it’s firmly locked into the “Hammer Drill” position, not just “Drill.” You should feel a distinct click.
Next, inspect the drill bit. Are you using a standard twist bit? For hammer mode, you need a carbide-tipped masonry bit with a straight shank. A bent bit or one with a worn carbide tip can slip in the chuck, preventing the hammer mechanism from engaging properly. Try a fresh, correct bit.
Listen for grinding or slipping. With the drill OFF, squeeze the trigger. If you hear a loud grinding or a slipping clutch sound from inside, the hammer mechanism’s clutch plates (often made of brass or fiber) might be worn out. This requires opening the housing to inspect and replace the clutch plates.
The Fix: 9 times out of 10, it’s the mode selector or the bit. If those are good, worn clutch plates are the likely culprit for a complete lack of hammer action.
Step 2: Fixing a Drill That’s Not Spinning (But the Motor Sounds Like It’s Trying)
The motor whines, you feel vibration, but the chuck is stubbornly still. This points to a power transmission issue.
Check the chuck first. Is it tightened securely? A loose chuck can seize on the spindle. Use the chuck key to give it an extra quarter-turn.
Assess the gears. This is more common in corded models or older drills. The plastic or nylon gears inside the gear housing can strip, especially if the drill was jammed or overloaded. You’ll need to open the housing to see this. If you see shiny plastic shavings or broken gear teeth, it’s a gear replacement job.
The Fix: Tighten the chuck. If that fails, stripped gears are a common failure point and are relatively inexpensive to replace as a set.
Step 3: Solving Excessive Vibration, Strange Noises, or Overheating
A little vibration is normal in hammer mode, but violent shaking or a high-pitched squeal is not. Overheating is a major red flag.
Clean the vents immediately. Sawdust and concrete slurry are the enemies of airflow. Use compressed air to blow out the motor vents and the gear housing vents. Do this regularly, but especially now.
Check for bit wobble. A bent drill bit or a worn chuck jaw will cause terrible vibration. Inspect the bit and try tightening a different bit to see if the wobble persists.
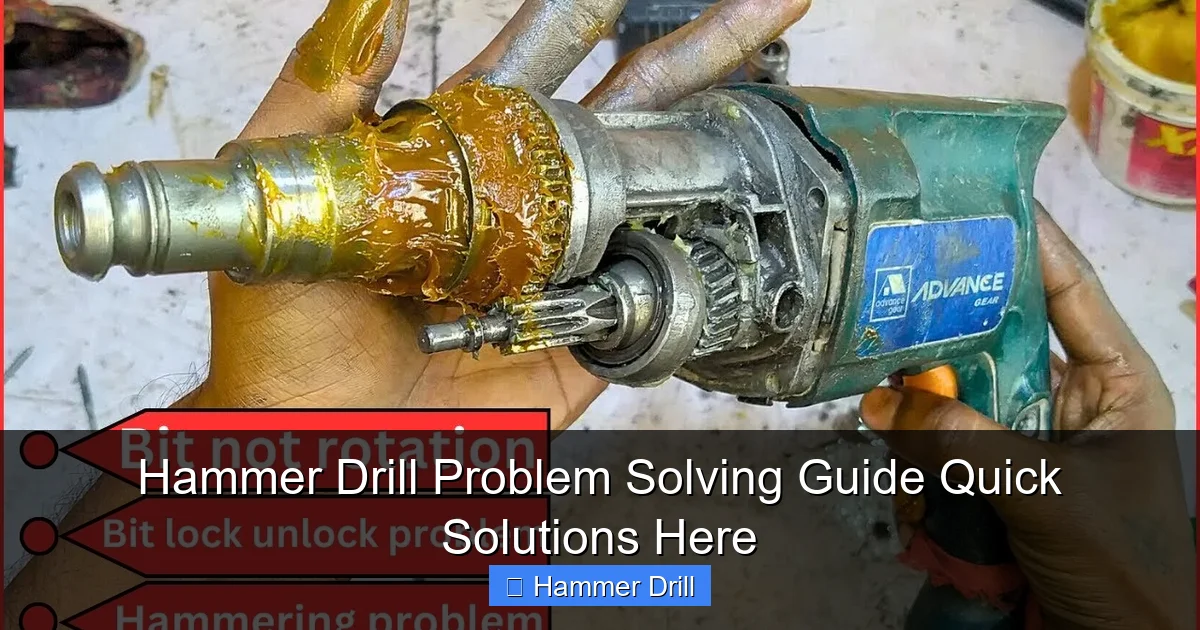
Listen to the noise. A grinding noise could mean a lack of lubrication in the gears. A hammer drill’s gears need specific grease. Over time, this grease can dry out or wash away. Opening the gear housing and applying a fresh layer of high-temperature, high-pressure grease (often EP2 lithium complex grease) can work wonders.
The Fix: Clean the vents. Replace bent bits. If noise and vibration persist after cleaning, the internal gears likely need re-greasing—a simple but messy DIY task.
Step 4: Addressing Trigger and Speed Control Issues
The trigger feels sticky, doesn’t return, or the speed is erratic—sticking at one speed or not increasing smoothly.
Clean around the trigger. Debris can jam the mechanism. Spray some electronic contact cleaner into the trigger housing (with the battery removed) and work the trigger back and forth to flush it out.
Inspect the speed control dial (if equipped). Some drills have a separate dial for maximum speed. Make sure it’s not stuck or set to its lowest setting.
The Fix: Contact cleaner is your best friend here. If the trigger mechanism itself is physically broken, replacement is usually the most reliable fix.
Pro Tips & Common Mistakes to Avoid
After years of tinkering, here are the lessons I learned the hard way—so you don’t have to.
Visual guide about Hammer Drill Problem Solving Guide Quick Solutions Here
Image source: i.ytimg.com
Pro Tip: The Magic of Grease. I used to think all grease was the same. It’s not. Using automotive grease in your hammer drill is a recipe for slinging grease everywhere and poor performance. Always use a high-quality, sticky grease designed for power tools or high-pressure applications. A small tub will last you years.
Warning: Don’t Ignore Carbon Brushes. Most people open the housing looking for gears and forget the brushes. These little carbon blocks conduct power to the motor. If they’re worn down to a nub, the motor will struggle, overheat, and eventually fail. Most have a wear indicator—replace them when they’re half their original length. It’s the cheapest insurance for your motor.
Common Mistake #1: Using It as a Regular Hammer. A hammer drill is not a mini-sledgehammer. The hammering action is rotational and concussive, designed to break up masonry as it drills. Pounding on it sideways to chisel will destroy the mechanism.
Common Mistake #2: Forgetting the Difference. Confused about when to use which tool? You might be using the wrong one for the job! Check out our article on the difference between an impact driver and a hammer drill. An impact driver is fantastic for driving long screws into wood, but it won’t do a thing on concrete. Using the wrong tool is a fast track to frustration and tool damage.
Common Mistake #3: Skipping the Pilot Hole. For large anchors in masonry, even with a hammer drill, starting with a smaller bit for a pilot hole reduces strain on the tool and ensures accuracy. It’s a simple step that makes a big difference.
FAQs About Hammer Drill Problem Solving: Quick Solutions Here
Let’s tackle some questions that come up a lot.
Q: Can I use my hammer drill just as a regular drill?
A: Absolutely! That’s one of their best features. Simply switch the mode selector to “Drill” (no hammer icon). This disengages the hammer mechanism, letting you use it perfectly on wood, metal, and plastic without any issue. It’s like having two tools in one.
Q: How do I know if my carbon brushes need replacing?
A: The most obvious sign is a decrease in power or the drill cutting out under load. You might also see small sparks from the motor vents or a burning smell. The definitive way is to open the brush caps (usually on the sides of the motor housing) and pull the brushes out. If the carbon is less than 1/4 inch long, it’s time for new ones.
Q: Why is my drill smoking?
A: Stop using it immediately. Smoke is a sign of severe overheating, often from blocked vents, worn brushes, or a stalled motor. Continuing to use it will cause permanent damage. Unplug it, let it cool completely, and then work through the steps in this guide—focusing on ventilation and brush wear.
Q: My hammer drill is making a clicking or ratcheting sound. What’s that?
A: This is often the mechanical clutch engaging. It’s a normal sound when the drill encounters high resistance and the clutch slips to prevent you from losing control of the tool. However, if it’s clicking constantly in light material, the clutch adjustment might be set too low.
Q: Is it worth repairing an old hammer drill?
A: It depends on the problem and the tool’s quality. If it’s a high-end, professional-grade drill (like a Milwaukee, DeWalt, or Hilti) and the issue is worn brushes, grease, or a simple gear set, repairing it is often more cost-effective and environmentally friendly than replacing it. For a cheap, lightweight model with major internal damage, replacement might be the better call.
Final Thoughts: Keep Hammering Away
Your hammer drill is a powerhouse, and like any hard-working tool, it needs a little TLC to keep performing. This hammer drill problem solving guide isn’t about turning you into a full-time repair tech. It’s about empowering you to understand the common hiccups, fix the simple stuff, and know when to call in a professional.
Start with the basics: the mode selector, the bit, and the vents. Those solve the majority of issues. Remember, a well-maintained tool is a joy to use and lasts for years. If you’re ever installing shelves or anchors, and you’re unsure about the process, our comprehensive guide on using a drill for screws into a wall is a great companion read.
So, the next time your drill acts up, take a deep breath, grab your tools, and think of it as a quick puzzle to solve. You’ve got this. Now get back out there and build something great.
