
This guide provides a complete, step-by-step hammer drill safety checklist to ensure every project is completed without injury. You will learn how to inspect your tool and workspace, choose the right personal protective equipment, and operate the drill using correct techniques. Following this checklist is the key to confidently and safely tackling masonry, concrete, and other tough materials.
Key Takeaways
- PPE is Non-Negotiable: Always wear safety glasses, a dust mask, and hearing protection. Gloves and sturdy boots are also essential to prevent injuries from vibration, debris, and falling tools.
- Pre-Operation Inspection is Critical: Before every use, check the drill for damage, ensure the chuck is tight, and verify the battery or cord is in perfect condition. A faulty tool is a dangerous tool.
- Know What’s Behind the Wall: Always use a stud finder or cable detector to scan for electrical wires, plumbing, or rebar before you drill. Hitting these can cause severe shock, flooding, or tool damage.
- Use the Correct Technique, Not Just Force: Let the hammer drill’s action do the work. Apply steady, firm pressure without leaning on the tool. For deep holes, regularly pull out to clear dust and prevent bit binding.
- Secure Your Workspace and Yourself: Keep the area clean, dry, and well-lit. When working off the ground, use a properly secured ladder or stable platform, never overreach. Our guide on securing ladders at the correct height is a vital companion read.
- Choose the Right Tool for the Job: Understand that a hammer drill is specifically for hard, brittle materials like concrete and masonry. For driving screws or drilling into wood, a regular drill or impact driver is more appropriate and safer.
- Maintenance Ensures Long-Term Safety: Keep the drill’s air vents clear, store it properly, and regularly inspect bits for wear. A well-maintained tool performs better and is less likely to fail dangerously.
Master The Hammer Drill Safety Checklist: Your Guide to Confident, Injury-Free Drilling
A hammer drill is a powerhouse tool. It combines rapid rotation with a pounding hammering action to chew through concrete, brick, and stone. This makes it incredibly useful, but also introduces significant risks—from flying debris and deafening noise to violent kickback and electrical hazards. Simply put, power demands respect.
This guide isn’t just a list of rules. It’s your complete system for hammer drill safety. We’ll walk you through a logical, step-by-step checklist that covers everything before you pull the trigger to after you put the tool away. By integrating these practices, you transform a potentially hazardous job into a controlled, safe, and successful project. Let’s build your safety foundation.
Section 1: Personal Safety Preparation (Gear Up First)
Your body is your most important tool. Protect it before you even touch the hammer drill. This is your first and most critical line of defense.
Visual guide about Master The Hammer Drill Safety Checklist
Image source: sitemate.com
1.1 Eye Protection: Non-Negotiable
Safety glasses with side shields or a full-face shield are mandatory. Drilling into masonry creates fine, sharp dust and can launch tiny fragments at high speed. Regular eyeglasses are not sufficient.
1.2 Respiratory Protection: Breathe Easy
Concrete and masonry dust contains silica, which is harmful to your lungs. Always wear a NIOSH-approved N95 particulate respirator or a higher-grade dust mask. For extensive work, consider a respirator with P100 filters.
1.3 Hearing Protection: Save Your Ears
Hammer drills are loud. Prolonged exposure can cause permanent hearing damage. Use foam earplugs or protective earmuffs. For maximum protection and comfort, use both (plugs under muffs).
1.4 Hand Protection: Grip and Guard
Wear sturdy, well-fitting work gloves. They improve your grip on the tool, reduce vibration transfer to your hands (helping prevent long-term issues like HAVS), and protect against minor abrasions and heat from the bit and motor housing.
1.5 Footwear and Clothing
Wear leather, steel-toe, or composite-toe boots for foot protection. Avoid loose clothing, sleeves, or jewelry that could get caught in the rotating chuck. Tie back long hair.
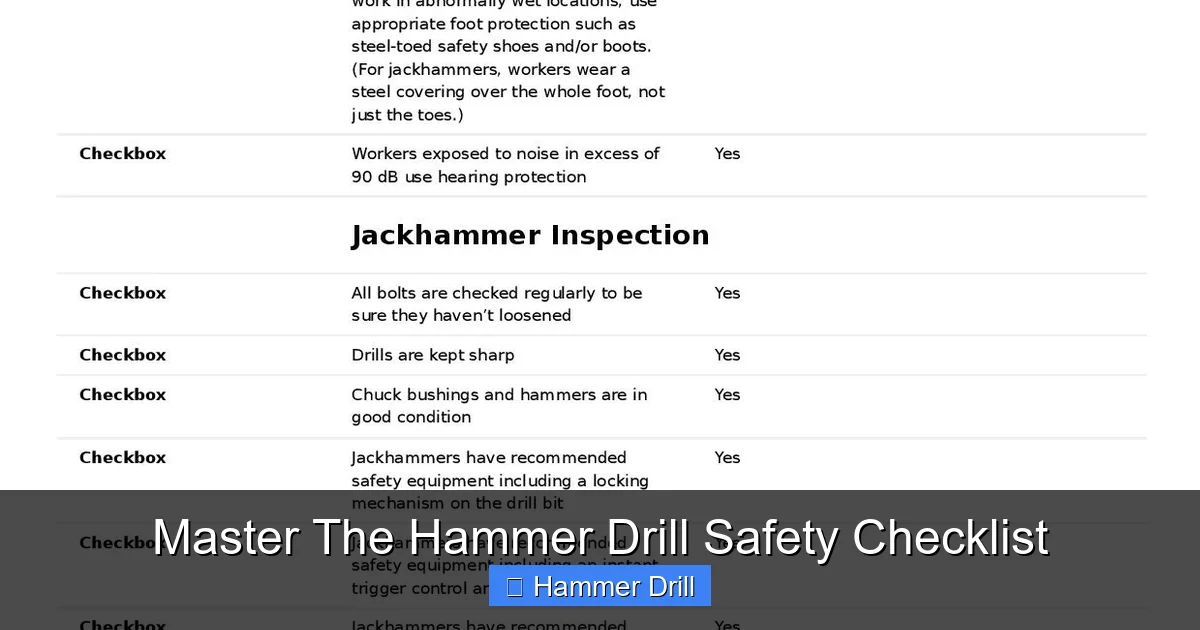
Section 2: Workspace & Material Inspection
A safe environment prevents slips, trips, falls, and other accidents. Never rush this step.
Visual guide about Master The Hammer Drill Safety Checklist
Image source: imgv2-2-f.scribdassets.com
2.1 Clear and Clean the Area
Ensure your work area is clean, dry, and well-lit. Remove any trip hazards like cords, debris, or tools. Make sure you have stable, unobstructed footing.
2.2 The Most Critical Step: Check for Hidden Hazards
You must know what’s behind the surface you’re drilling. Use a high-quality stud finder with AC wire detection or a dedicated multi-scanner to check for:
- Electrical Wires: Hitting a live wire can cause fatal electrocution or severe tool damage.
- Plumbing Pipes: Drilling into a water or gas line can cause flooding or gas leaks.
- Rebar or Conduit: Hitting steel rebar in concrete can break your bit, damage the drill, or cause violent kickback.
Mark any hazards clearly and adjust your drilling location.
2.3 Secure the Workpiece
If you’re drilling into a loose material (like a concrete block or brick), clamp it securely to a workbench. Never try to hold it with your hand or body weight.
2.4 Working at Height: Ladder Safety
If your project requires a ladder, safety is paramount. Always maintain three points of contact (two feet and one hand, or two hands and one foot). The ladder must be on firm, level ground and secured at the top and bottom. For a deep dive on this crucial aspect, please review our detailed resource on understanding ladder safety. Furthermore, ensure you follow essential safety tips for climbing ladders every single time.
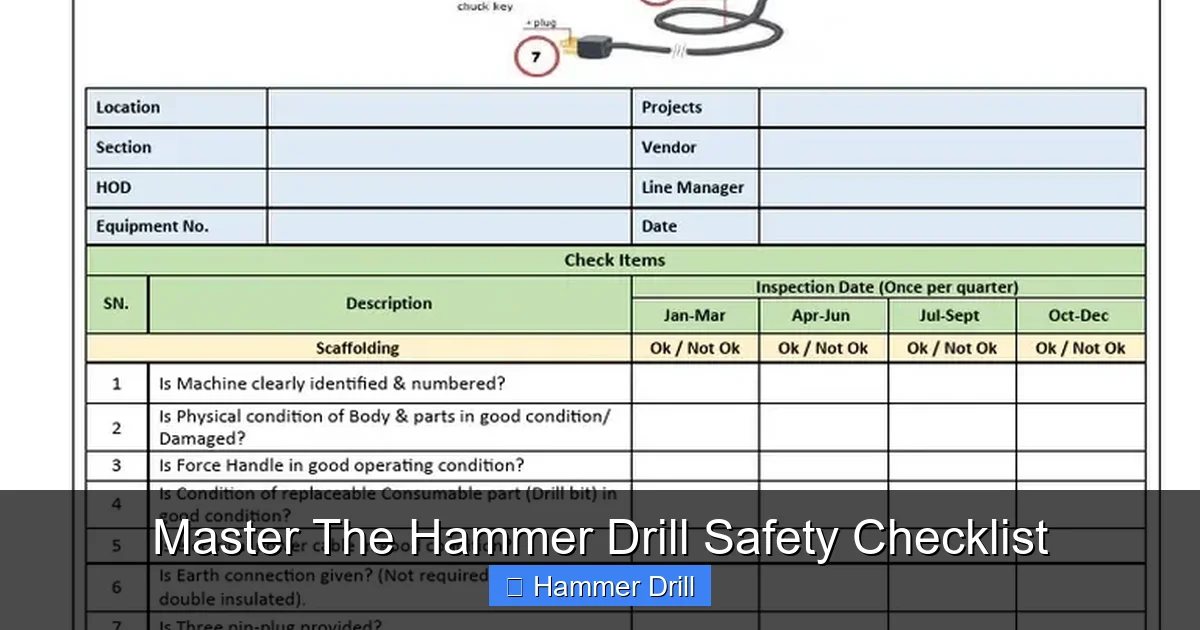
Section 3: Hammer Drill & Bit Pre-Use Checklist
Now, focus on the tool itself. A quick 2-minute inspection can prevent a major accident.
Visual guide about Master The Hammer Drill Safety Checklist
Image source: 3.bp.blogspot.com
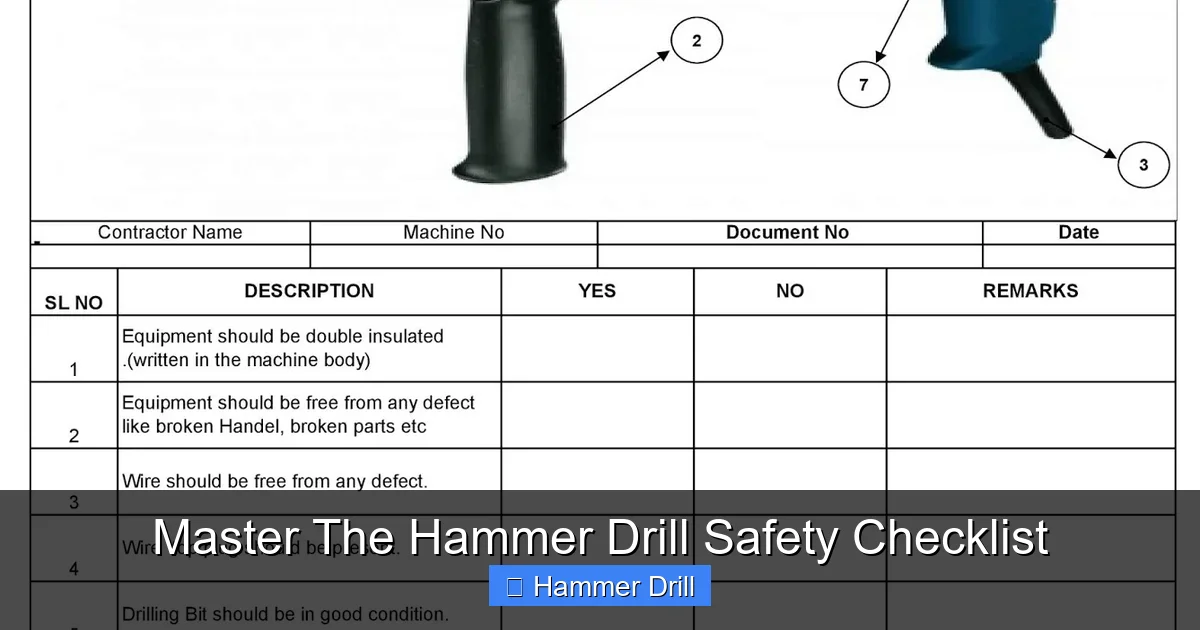
3.1 Power Source Inspection
Corded Drills: Inspect the entire power cord for cuts, frays, or exposed wires. Ensure the plug is not damaged. Use a GFCI outlet if possible.
Cordless Drills: Check the battery for cracks, leaks, or swelling. Ensure it is fully seated in the tool. A faulty battery can fail dangerously.
3.2 Tool Body and Switch Check
Visually inspect the drill housing for cracks or damage. Ensure the auxiliary handle (side handle) is present and tightly secured. Test the trigger switch and the forward/reverse selector for smooth operation. Check that the mode selector (drill, hammer drill, drill-only) clicks firmly into place.
3.3 Chuck and Bit Inspection & Installation
Open the chuck jaws fully. Inspect for worn or broken jaws. Select the correct carbide-tipped masonry bit for your material and hole size. The bit shank must be clean and undamaged. Insert the bit fully into the chuck, tighten the chuck by hand, and then use the chuck key (or final hand-tighten on a keyless chuck) to secure it very tightly. A loose bit will spin and destroy the chuck.
3.4 Functional Test
With the bit not contacting any surface, pull the trigger briefly. Listen for unusual noises (grinding, screeching). Feel for excessive vibration. Ensure the bit is centered and not wobbling. Check that the hammer mechanism engages correctly when switched to hammer mode.
Section 4: Safe Operation & Drilling Technique
You’re geared up, the area is clear, and the tool is ready. Now, let’s drill safely and effectively.
4.1 Assume the Correct Stance
Stand with your feet shoulder-width apart for balance. If drilling horizontally, place one foot slightly forward. Grip the drill firmly with both hands: your dominant hand on the trigger grip and your other hand firmly on the rotating side handle. This gives you maximum control against kickback.
4.2 Start with a Pilot Indentation (For Precision)
For accuracy, start the hole by running the drill in “drill-only” mode (no hammer) at low speed. This creates a small guide dent that prevents the bit from “walking” across the surface when you engage the hammer action.
4.3 Apply the Right Pressure
Let the tool do the work. Apply firm, steady pressure directly in line with the bit. Do not lean on the drill or apply excessive force. This can overheat the bit, stall the motor, or cause a dangerous bind.
4.4 Clear Dust from Deep Holes
When drilling holes deeper than an inch, periodically pull the rotating bit partially out of the hole to clear the dust (this is called “pecking”). Accumulated dust can bind the bit, cause overheating, and make drilling much harder.
4.5 Beware of Breakthrough
As you near the back side of the material, reduce pressure. The bit can suddenly punch through, causing a loss of control. Maintain a firm grip and be prepared.
4.6 Know When to Stop
If the drill binds, stalls, or makes a drastic change in sound, release the trigger immediately. Hold the tool firmly, unplug it or remove the battery, and investigate the cause. It could be hitting rebar or a rock.
Section 5: Post-Use & Maintenance Safety
Safety continues after the drilling is done. Proper care extends tool life and ensures it’s safe for next time.
5.1 Power Down and Cool Down
Release the trigger. Set the mode selector to “off” or “lock.” For corded tools, unplug them. For cordless, remove the battery. Allow the drill and bit to cool completely before handling or storing. Bits can get very hot.
5.2 Clean the Tool
Wipe down the drill with a dry cloth to remove dust and debris. Use a small brush or compressed air (wear eye protection!) to clear dust from the chuck and ventilation slots. A clogged motor can overheat.
5.3 Store Properly
Coil cords neatly without kinks. Store the drill, batteries, charger, bits, and chuck key in a clean, dry case or toolbox, out of reach of children. Hang or lay the tool flat; don’t store it resting on the bit.
5.4 Bit Care
Inspect bits for dullness, chipping, or bending. A dull bit requires more force, heats up faster, and is more likely to bind or break. Sharpen or replace worn bits. This is a key difference between a hammer drill and a regular drill; the bits are designed for extreme impact. For more on tool selection, see our comparison on the difference between a drill and a hammer drill.
Troubleshooting Common Safety Issues
Problem: Excessive vibration or wobbling.
Likely Cause: Loose chuck, bent bit, or worn chuck jaws.
Solution: Stop immediately. Check and tighten the chuck. Replace the bit if bent. If the chuck itself is damaged, the tool needs professional repair.
Problem: Drill slows down or smells like burning.
Likely Cause: Overheating due to excessive pressure, a dull bit, or blocked vents.
Solution: Stop and let the tool cool. Check the bit, clear the vents, and resume with less pressure.
Problem: Hammer mechanism not engaging.
Likely Cause: Mode selector not fully in hammer mode, or internal mechanism failure.
Solution: Ensure selector is clicked into the correct icon. If it still doesn’t work, do not use the tool on masonry; it will damage the drill. Seek repair.
Conclusion: Safety is a Habit
Mastering the hammer drill safety checklist isn’t about memorizing a one-time list. It’s about building a systematic habit of safety that becomes second nature. Every time you pick up this powerful tool, you are in control. By gearing up properly, inspecting your workspace and tool, using correct technique, and maintaining your equipment, you confidently eliminate the major risks associated with hammer drills. This allows you to focus on what matters: getting the job done right, efficiently, and safely. Remember, a safe craftsman is a skilled and productive craftsman. Now go forth and drill with confidence.
