
Choosing the wrong tool can turn a simple project into a nightmare. This guide clearly explains the critical differences between a hammer drill and a rotary hammer, including their mechanisms, power, and ideal applications. You’ll learn exactly which tool to use for tasks like drilling anchor holes in brick or chiseling through concrete, saving you time, money, and frustration.
Key Takeaways
- Mechanism Matters: A hammer drill uses a percussive “bumping” action, while a rotary hammer uses a piston-driven hammering system for significantly more impact energy.
- Size and Power Define the Job: Use a hammer drill for small holes (under 1/2″) in brick or block. Choose a rotary hammer for larger holes (over 1/2″) or heavy-duty chiseling in concrete.
- Bit Systems are Not Interchangeable: Hammer drills use standard SDS or keyed chucks. Rotary hammers typically require SDS-Plus or SDS-Max bits, which lock in securely for high-impact work.
- Don’t Over-Tool for Simple Tasks: For light masonry work, a quality hammer drill is sufficient and more versatile. Save the rotary hammer rental for foundation bolts or tile removal.
- Safety is Non-Negotiable: Always wear safety glasses, gloves, and a dust mask when using either tool. Secure your workpiece and be mindful of hidden wires and pipes.
Essential Hammer Drill vs Rotary Hammer Guide for DIYers
Stepping up to a masonry project? Hanging shelves on a brick wall? Installing a patio? You know you need more than a regular drill. But the choice between a hammer drill and a rotary hammer can be confusing. Picking the wrong one means wasted money, broken tools, and a half-finished project.
Don’t worry. This guide is your roadmap. We’ll cut through the jargon. You’ll learn how each tool works, what it’s best for, and how to choose with confidence. Let’s get your project done right.
Understanding the Core Difference: It’s All in the Action
At first glance, they look similar. Both make holes in hard stuff. But inside, they are worlds apart. This difference decides everything.
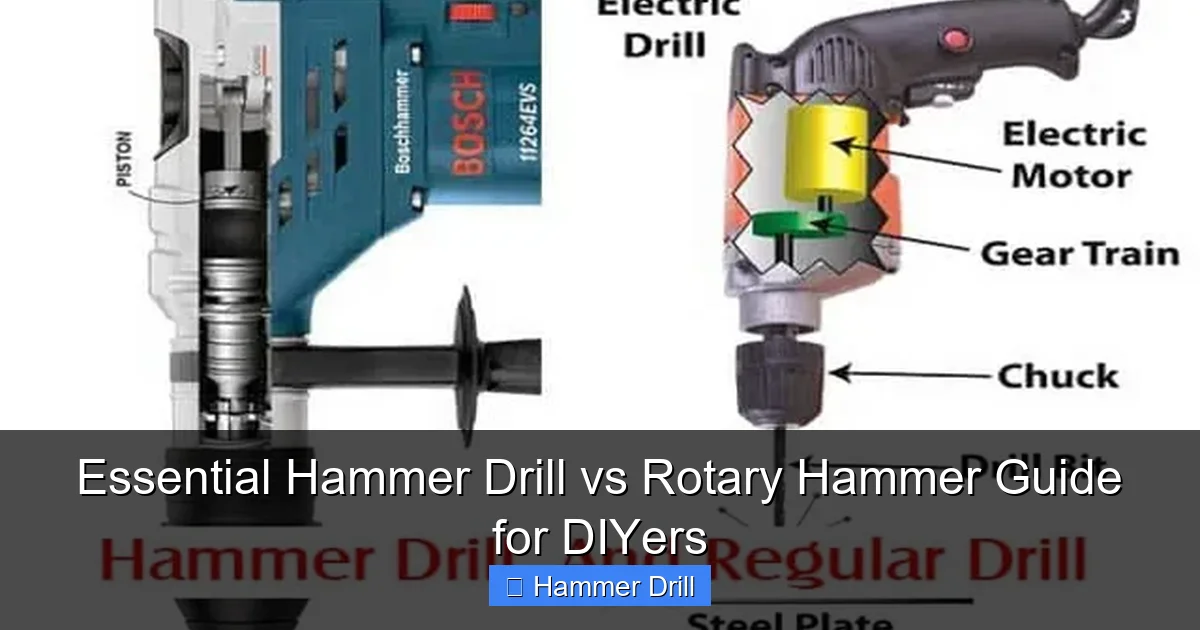
Visual guide about Essential Hammer Drill vs Rotary Hammer Guide for DIYers
Image source: ourhometools.com
How a Hammer Drill Works
Think of a hammer drill like a super-charged regular drill. It has a special mechanism. Two ridged discs (called “hammer” and “anvil”) click past each other very fast. This creates a rapid, hammering “bump” as the drill bit spins. The action is forceful but relatively shallow. It’s perfect for breaking through tough materials like brick or concrete block, but it has its limits. For driving screws into studs, you’d want a different approach, which we cover in our guide on how to use a drill for screws into a wall.
How a Rotary Hammer Works
A rotary hammer is a true powerhouse. It uses an electric motor to drive a piston inside a cylinder. The piston compresses air, which slams a ram into a striker. This drives the bit forward with a massive, piston-like blow. The impact energy is measured in joules (ft-lbs), and it’s much higher than a hammer drill. Many also have a “hammer-only” or “chisel” mode, letting you break tile or chip concrete without rotation.
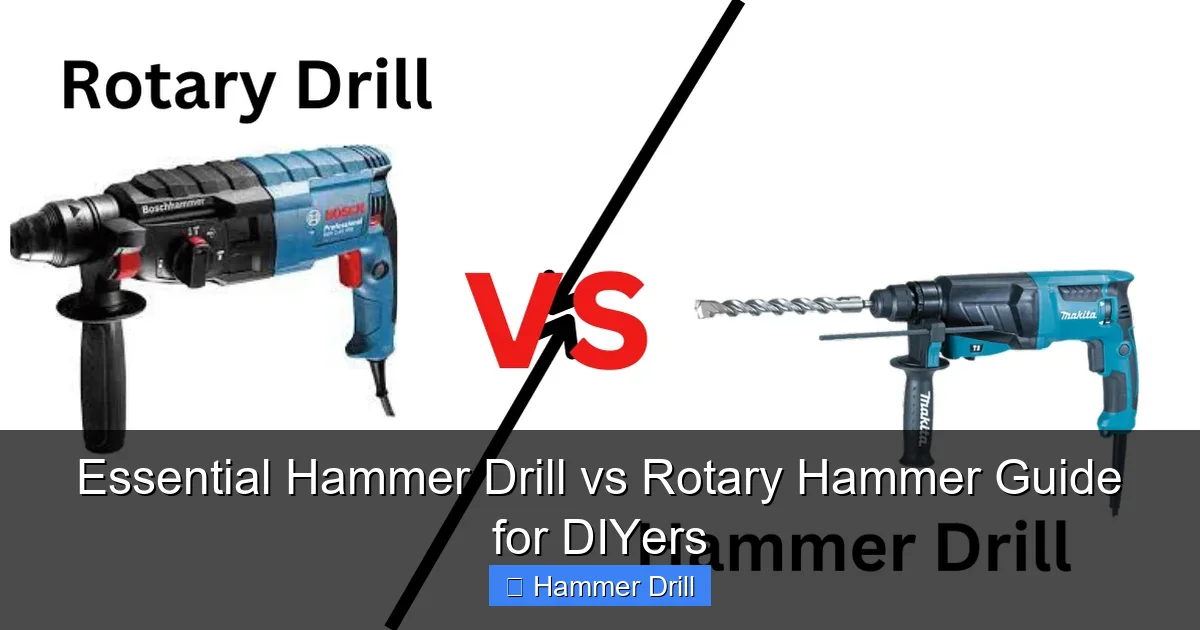
Side-by-Side Comparison: Hammer Drill vs. Rotary Hammer
Let’s put them head-to-head. This table shows the clear differences.

Visual guide about Essential Hammer Drill vs Rotary Hammer Guide for DIYers
Image source: allflavorworkshop.com
- Primary Mechanism: Hammer Drill: Cam/Action Plate. Rotary Hammer: Electro-Pneumatic Piston.
- Impact Energy: Hammer Drill: Low to Moderate. Rotary Hammer: High (Measured in Joules).
- Best For Hole Size (in concrete): Hammer Drill: Up to 1/2 inch (13mm). Rotary Hammer: 1/2 inch (13mm) and up.
- Chuck Type: Hammer Drill: Keyed or Keyless Chuck (sometimes SDS). Rotary Hammer: SDS-Plus or SDS-Max.
- Vibration & User Fatigue: Hammer Drill: Moderate (can be tiring). Rotary Hammer: High (requires two hands).
- Weight & Size: Hammer Drill: Similar to a standard drill. Rotary Hammer: Larger, heavier, bulkier.
- Key Feature: Hammer Drill: Often has a “Drill Only” mode for wood/metal. Rotary Hammer: Often has “Hammer Only” mode for chiseling.
- Price Point: Hammer Drill: $$ (Moderate). Rotary Hammer: $$$ (Higher).
Step-by-Step: How to Choose the Right Tool for Your Project
Now for the big question. Which one do *you* need? Follow these steps.
Visual guide about Essential Hammer Drill vs Rotary Hammer Guide for DIYers
Image source: wikipowertools.com
Step 1: Assess Your Project Scope
Ask yourself these questions.
- What material am I drilling into? (Soft brick, poured concrete, stone?)
- How many holes do I need to make?
- How large are the holes? (Diameter and depth?)
- Will I need to chisel or break material?
Step 2: Match the Tool to Common DIY Tasks
Choose a Hammer Drill For:
- Drilling holes for wall plugs in brick or block walls.
- Installing curtain rods or shelves on masonry.
- Small anchor holes (1/4″ to 3/8″) for light fixtures.
- Projects where you also need to drill into wood or metal (using drill mode).
Choose a Rotary Hammer For:
- Drilling large holes (1/2″ and above) in concrete for deck footings or pipe.
- Installing concrete anchors or shield anchors.
- Demolition work like removing tile, chipping away old mortar, or breaking small concrete sections.
- Drilling into very hard materials like reinforced concrete or solid rock.
Step 3: Consider Power Source and Chuck Type
Corded tools offer consistent power for big jobs. Cordless tools offer superb convenience. For rotary hammers, corded is often best for heavy work.
The chuck is critical. Most rotary hammers use SDS bits. They slide in and lock with a twist. They can move back and forth in the chuck to absorb the piston’s blow. Never use a standard drill bit in an SDS chuck without an adapter (and it’s not recommended for heavy work). If you’re building your tool collection, understanding these fundamentals is key. Learn more about drill types in our article on the difference between a drill and a hammer drill.
Practical Tips for Using Your Chosen Tool
If You’re Using a Hammer Drill:
- Start slow. Let the tool do the work. Don’t push hard.
- Use a sharp, carbide-tipped masonry bit. Dull bits cause overheating.
- Pull the bit out periodically to clear dust from the hole.
- For deep holes, mark your bit with tape so you know your depth.
If You’re Using a Rotary Hammer:
- Always use two hands. The torque and kick can be surprising.
- Let the tool’s weight provide the downward force. You are mostly guiding it.
- In chisel mode, wear heavy gloves and secure your workpiece.
- For deep concrete drilling, consider a drill bit with a spiral flute to eject debris.
Troubleshooting Common Problems
Even with the right tool, issues can pop up. Here’s how to fix them.
Problem: The drill is spinning but not making progress.
Likely Cause: A dull bit or the wrong type of bit for the material.
Solution: Stop immediately. Check your bit. Is the carbide tip worn down? Replace it with a new, high-quality masonry bit. Ensure you’re not trying to drill steel with a masonry bit.
Problem: The tool is overheating or smoking.
Likely Cause: Overworking the tool, lack of lubrication (for rotary hammers), or a clogged air vent.
Solution: Unplug the tool and let it cool completely. For rotary hammers, check the grease chamber and add specialty grease if needed. Clear any dust from the motor vents. Don’t push the tool beyond its capacity.
Problem: The bit keeps getting stuck in the hole.
Likely Cause: Not clearing debris from the hole, causing the bit to bind.
Solution: Get into a rhythm: drill for a few seconds, pull out to clear dust, drill a little more. For rotary hammers, use a bit with a good debris removal flute.
Safety First: Non-Negotiable Practices
These tools are not toys. Safety is paramount.
- Eye Protection: Concrete dust and flying chips are dangerous. Always wear safety glasses or a full-face shield.
- Respiratory Protection: Silica dust from concrete is a serious health hazard. Use a NIOSH-rated respirator or dust mask.
- Hearing Protection: Both tools are loud. Use earplugs or earmuffs.
- Secure Your Work: Use clamps or a vise. Never hold material in your hand while drilling.
- Check for Hazards: Use a stud finder with AC detection to check for wires and pipes before you drill into any wall. If your project requires getting up high, such as for gutter cleaning, make sure your access is safe. Our resource on the best ladder for gutter cleaning can help you choose the right equipment.
Conclusion: Making Your Final Decision
So, hammer drill vs rotary hammer? The choice is clear when you know your project.
For the average DIYer tackling occasional masonry, a quality hammer drill is the most versatile and cost-effective choice. It handles most wall-anchoring tasks and can still function as a regular drill. Many combo kits include one, making it a great value.
Reserve the rotary hammer for the big, heavy, concrete-specific jobs. For a one-time project like installing a handrail in a concrete porch, renting a rotary hammer is a smart move.
Remember, the goal isn’t to own the biggest tool. It’s to own the *right* tool. By understanding the core differences laid out in this guide, you can invest wisely, work safely, and finally conquer those masonry projects with confidence. If you’re also in the market for a versatile drill for all-around use, you might want to check out our picks for the best cordless drill to complement your toolkit.
