
At its core, a cordless drill converts battery power into rotational force through an electric motor that spins a chuck holding drill bits. This motor’s output passes through a planetary gearbox that multiplies torque and provides multiple speed ranges, while an adjustable clutch disengages at preset torque limits to prevent damage. A variable-speed trigger and forward/reverse switch give users precise control for drilling holes or driving fasteners with ease.
Key Takeaways
- Lithium-ion batteries provide the essential portable power source for cordless operation.
- An electric motor converts battery power into high-speed rotational force for drilling.
- Variable speed triggers allow precise control over drilling speed for different materials.
- The adjustable clutch prevents stripping screws by limiting maximum torque output.
- A keyless chuck enables quick and easy bit changes without tools.
- Planetary gearing efficiently manages speed and torque for demanding tasks.
Why This Matters / Understanding the Problem
I’ll never forget the first time I held a cordless drill. It felt like magic in my hand. No cord. Just pull the trigger and it goes. But that magic turned to frustration when I stripped my first screw or killed a battery mid-project. Sound familiar?
Understanding how your cordless drill works isn’t just for engineers. It’s for anyone who wants to work smarter, not harder. When you know what’s happening inside that plastic shell, you make better choices. You stop guessing. You stop breaking things. You start building with confidence.
That’s why I’m walking you through the simple mechanism explained here. No engineering degree required. Just you, me, and a cup of coffee talking about the tool that probably lives in your garage right now.
The cordless drill is a masterpiece of miniaturization. It packs enough power to drive a deck screw into hardwood yet fits in your palm. But how? Let’s pull back the curtain on this everyday marvel.
What You Need
You don’t need a toolbox full of gear to understand how cordless drill works. The simple mechanism explained needs just a few basics.
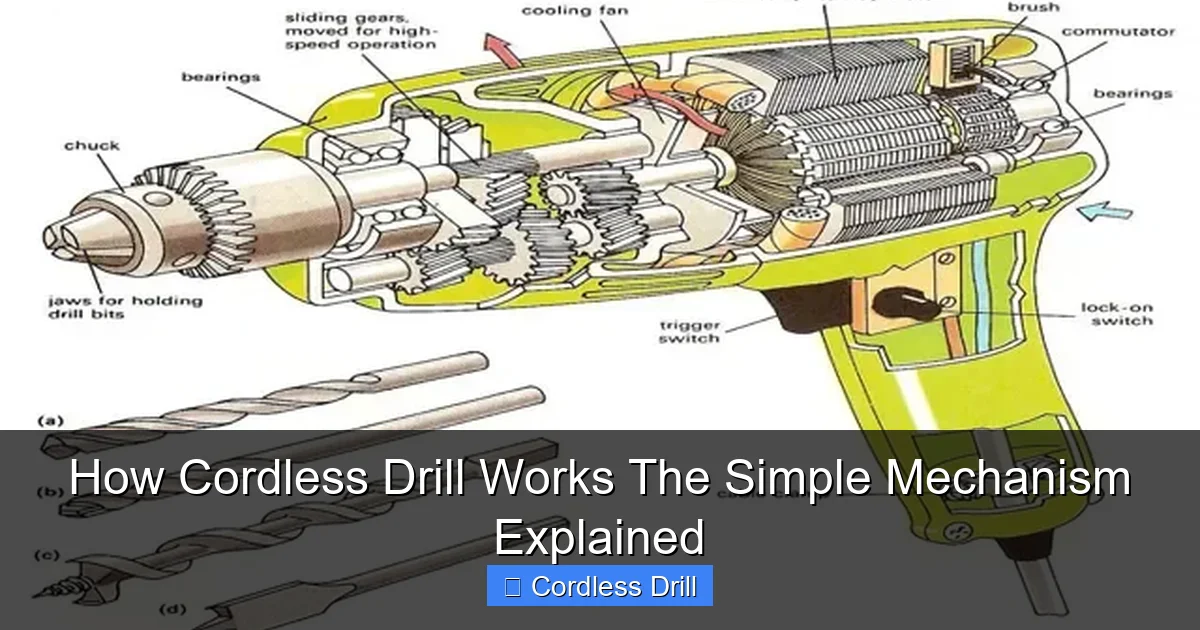
Visual guide about How Cordless Drill Works The Simple Mechanism Explained
Image source: ourhometools.com
- Your cordless drill – Have it nearby to reference as we go
- Safety glasses – If you plan to examine it closely
- Your drill battery – We’ll talk about this powerhouse
- A spare minute – No rush, let’s enjoy this
That’s it. No fancy multimeters or technical manuals. I’m going to show you what each part does using plain English and real-world examples. Think of this as a friendly chat about your tool, not a textbook chapter.
Step-by-Step Guide to How Cordless Drill Works The Simple Mechanism Explained
Let’s break down the journey from battery to spinning bit. It’s a beautiful chain reaction of physics and engineering, but I promise to keep it light and clear.
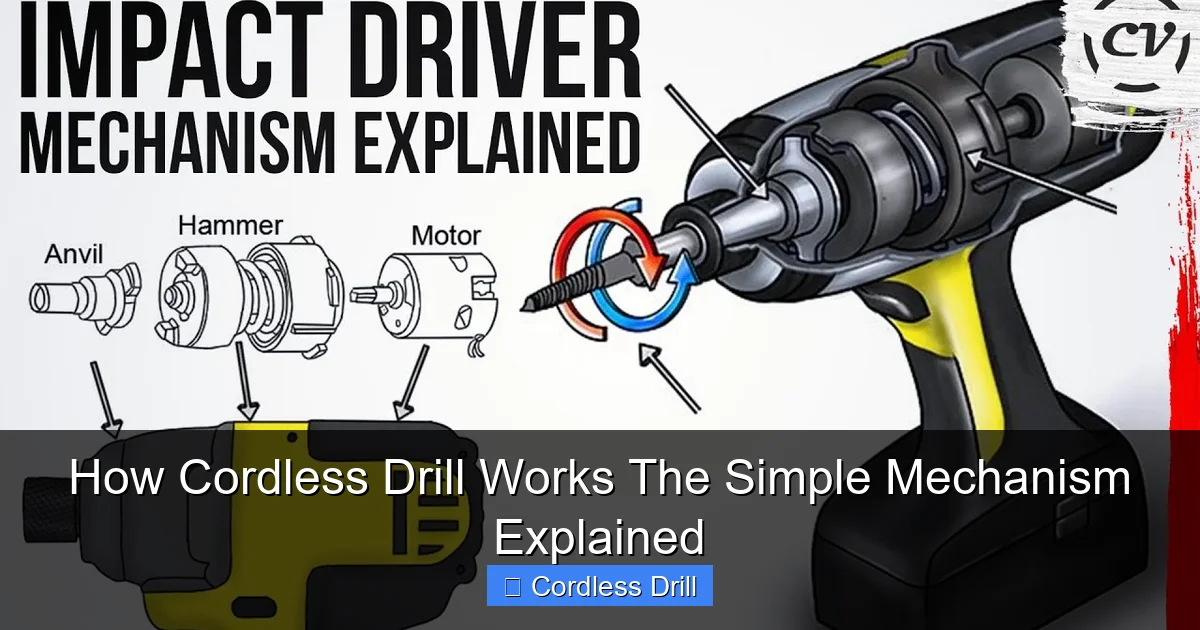
Visual guide about How Cordless Drill Works The Simple Mechanism Explained
Image source: i.ytimg.com
Step 1: The Battery – Your Drill’s Energy Tank
Everything starts here. Your drill battery is like a tiny chemical power plant. Inside that plastic case, you’ve got several battery cells working together. Most modern drills use lithium-ion cells. They’re light, powerful, and don’t suffer from that annoying “memory effect” older batteries had.
When you slap that battery onto your drill, you’re completing a circuit. The battery terminals connect with contacts inside the drill handle. It’s like flipping a switch that says “power available.” The voltage rating (12V, 18V, 20V) tells you how much push that battery has. Higher voltage means more power for tougher jobs.
Here’s something cool. That battery isn’t just sitting there. It’s constantly communicating with your drill. Modern batteries have a tiny computer inside that monitors temperature, charge level, and even how hard you’re working. It protects against overheating and over-discharging. Pretty smart, right?
Step 2: The Trigger Switch – Your Control Center
Now, let’s talk about that trigger under your finger. This is where the magic begins. When you pull the trigger, you’re not just turning something on. You’re controlling a sophisticated switch that manages power delivery.
The farther you pull the trigger, the more power flows from the battery to the motor. It’s like a dimmer switch for your lights, but for torque. Light pull equals slow spin. Full pull equals maximum speed. This variable control is what lets you drive a tiny screw into drywall without tearing through it.
Most triggers also have a forward/reverse switch right on top. Flip it one way, and electricity flows forward. Flip it the other way, and the current reverses. That’s how your drill can both drive screws in and back them out. Simple but brilliant.
Step 3: The Motor – The Heart of the Operation
Here’s where electricity becomes motion. Your drill’s motor is an electric motor, plain and simple. It takes that electrical energy and converts it into rotational force. But how?
Inside the motor, you have two main parts. The stator stays still. The rotor spins. When electricity flows through the motor, it creates a magnetic field. This field pushes against the rotor, making it turn. It’s basic physics, but the result is pure power in your hand.
You might have heard of brushed and brushless motors. Brushed motors have little carbon contacts that wear out over time. Brushless motors are more efficient and last longer because they don’t have those physical contacts. If your drill feels hot after heavy use, that’s a brushed motor working hard and losing some energy as heat.
Step 4: The Gearbox – Controlling the Spin
Your drill probably has two speed settings. Maybe three. That’s the gearbox at work. After the motor spins, the rotation goes into a set of gears that either speed it up or slow it down.
First gear gives you high torque and low speed. Perfect for driving big screws into hardwood. Second gear gives you high speed and lower torque. Great for drilling holes in soft materials. The gearbox is like the transmission in your car. It matches the motor’s power to the task at hand.
Inside that gearbox, you’ll find planetary gears. They’re called that because they spin around a central gear like planets around the sun. This design is compact but incredibly strong. It’s what lets your drill fit in your hand while still delivering enough power to sink a 3-inch screw.
Step 5: The Clutch – Your Screw-Setting Assistant
This is my favorite feature. That ring with numbers on your drill’s collar? That’s the clutch. It’s a clever torque-limiting device that prevents you from overdriving screws.
When you set the clutch to a low number, it slips early. That means the drill stops applying force when the screw is just barely flush. Set it to a high number, and it slips later, letting you drive the screw deeper. The clutch works using spring pressure and a ball-detent mechanism. When the torque gets too high, the balls pop out of their detents and the drive slips.
Here’s where people get confused. They use drill mode (high speed) with a high clutch setting and wonder why they strip screws. The clutch is designed for driving screws, not drilling holes. When you’re drilling, you want that selector in the drill icon position, not a numbered setting.
Step 6: The Chuck – Holding It All Together
That’s the part at the business end that holds your bits. Most modern drills have a keyless chuck. You twist it by hand to open or close the jaws. Inside the chuck, three jaws move in unison to grip your bit tightly.
When you twist the chuck to tighten, you’re actually pulling a collet mechanism that forces those jaws together. It’s a precise piece of engineering that keeps your bit centered and secure. A good chuck won’t let your bit wobble or slip, even under heavy load.
Pro tip: Always tighten your chuck with the drill off. Trying to change bits while the trigger is pulled is a recipe for a sore thumb and a frustrating morning. Trust me, I learned this the hard way.
Step 7: Putting It All Together – The Complete Cycle
Now let’s watch the whole process in action. You pull the trigger. Electricity flows from the battery through the trigger switch to the motor. The motor spins at a speed you control. That spin goes through the gearbox, which adjusts it for torque or speed. The spinning shaft connects to the chuck, which holds your bit.
If you’re driving a screw, the clutch monitors the resistance. When the screw meets enough force, the clutch slips and stops driving. If you’re drilling, the clutch is bypassed and full power goes to the bit.
It all happens in a fraction of a second. From chemical energy in your battery to mechanical motion in your bit. That’s the simple mechanism explained. No smoke and mirrors, just smart engineering you can count on.
Pro Tips & Common Mistakes to Avoid
Let me save you some headaches. I’ve made these mistakes so you don’t have to.

Visual guide about How Cordless Drill Works The Simple Mechanism Explained
Image source: i.ytimg.com
Don’t murder your battery. Lithium-ion batteries hate being completely drained. Try to stop at 20% if you can. And never leave a hot battery in a hot car. Heat is the number one enemy of battery life.
Another big one: using the wrong bit. That Phillips head bit won’t drill a hole in concrete. I know, I tried. It was a mess. Match your bit to your material. Wood bits for wood. Masonry bits for concrete. Metal bits for metal. Your drill manual usually has a handy chart.
Here’s a sneaky mistake. People often force the drill when it’s struggling. Don’t. Let the tool do the work. If you’re forcing it, you’re probably using the wrong speed or the wrong bit. Ease up, check your setup, and try again.
Battery storage matters more than you think. Store them at about 50% charge if you won’t use them for a while. And keep them in a cool, dry place. Not your hot garage workbench in July.
One last tip: clean the battery contacts on both your drill and battery every few months. A little dirt or corrosion can cause poor performance. Just wipe them with a dry cloth. It takes 30 seconds and keeps the connection solid.
FAQs About How Cordless Drill Works The Simple Mechanism Explained
You’ve got questions. I’ve got answers. Let’s tackle the most common ones I hear.
Q: What’s the real difference between brushed and brushless motors?
A: Brushed motors have physical contacts that wear out. Brushless motors use electronic controllers instead. Brushless drills last longer, run cooler, and are about 15-20% more efficient. You’ll pay more upfront, but save money in the long run. For most DIYers, a good brushed drill is perfectly fine.
Q: How long should my battery last before needing replacement?
A: Most lithium-ion batteries give you 300-500 full charge cycles. That’s about 2-3 years of typical use. But “typical” is tricky. If you’re constantly running the drill hard and draining the battery completely, you’ll see fewer cycles. Take good care of it, and it’ll last longer.
Q: Can I use any charger with my drill battery?
A: No. Use the charger that came with your drill. Different batteries need different charging profiles. Using the wrong charger can damage your battery or even be dangerous. I learned this when I tried to use an old NiCad charger on a new lithium battery. Smelled awful. Won’t do that again.
Q: Why does my drill have two speeds? When should I use each?
A: Speed 1 is high torque, low speed. Use it for driving big screws, mixing paint, or anything that needs power over speed. Speed 2 is high speed, lower torque. Use it for drilling holes in wood, metal, or plastic. If your drill struggles in speed 2, switch to speed 1. The motor will thank you.
Q: What’s the difference between torque and speed?
A: Think of torque as turning force and speed as how fast you turn. Torque is what drives a screw into hardwood. Speed is how quickly you drill a hole. You need both, but different tasks need them in different amounts. Your drill lets you balance this with the speed selector and clutch.
Q: How do I know which torque setting to use?
A: Start low. Set your clutch to 3 or 4 and try driving a screw. If it keeps going and won’t stop, increase the setting. If it stops too early and the screw isn’t flush, decrease it. It’s a feel thing. Soft materials like drywall need low settings. Hard materials like oak need high settings. When in doubt, test on a scrap piece first.
Q: Can I take my cordless drill on a plane?
A: Yes, but with rules. The battery must stay in your carry-on luggage, not checked bags. You should protect the battery terminals from shorting. Many travelers put tape over the contacts or use the original case. Check the latest TSA rules before you fly, but generally, cordless drills are allowed. Just don’t try to bring a spare battery in your checked luggage.
🎥 Related Video: The Clever Mechanism That Gives Cordless Drills So Much Torque
📺 Deconstructed
In this 3D animation, we demonstrate how to use a cordless drill and take a close look at the internal mechanism to understand …
Final Thoughts
So there you have it. The simple mechanism explained. From battery chemistry to spinning bit, your cordless drill is a masterpiece of modern engineering. But it’s not magic. It’s physics you can understand and use to your advantage.
Now when you pick up your drill, you’ll know exactly what’s happening inside. You’ll choose the right speed, set the clutch properly, and treat that battery with care. You’ll work faster, smarter, and with more confidence.
Remember, the best tool is the one you know how to use. Take a few minutes to read your manual. Practice on scrap wood. Get comfortable with the settings. Your projects will thank you.
If you’re in the market for a new drill, check out our guide to the best cordless drill options for every budget. And once you’ve got your drill, learn how to use a drill for screws into a wall without making a mess of things.
Happy drilling, and may your batteries stay charged and your screws go in straight.
