
To change the blade on a Ryobi table saw, first unplug the saw for safety. Then, use the blade wrench to loosen the arbor nut and remove the old blade.
Changing the blade on your Ryobi table saw is essential for maintaining cutting efficiency. Over time, blades can dull, impacting the quality of your work. A sharp blade ensures cleaner cuts and smoother finishes. Understanding how to replace the blade properly can enhance both your safety and the saw’s performance.
This guide will walk you through the steps, ensuring you can tackle this task with confidence. Regular maintenance, including blade changes, will keep your projects on track and your tools in top shape. Follow these straightforward steps to make the process simple and efficient.
Introduction To Ryobi Table Saw Maintenance
Maintaining your Ryobi table saw is crucial for performance. Regular upkeep extends the saw’s lifespan. A sharp blade ensures clean cuts. Changing the blade is a key maintenance step. This guide covers how to change the blade safely.
Importance Of Regular Blade Changes
Changing the blade regularly offers several benefits:
- Improved Cut Quality: A sharp blade cuts smoothly.
- Increased Safety: Dull blades can kick back.
- Better Efficiency: A sharp blade requires less effort.
- Extended Tool Life: Proper maintenance prevents wear.
Schedule regular blade changes based on usage. For heavy use, change blades every few weeks. For occasional use, check every few months.
Safety First: Preparing For The Change
Safety is vital when changing your table saw blade. Follow these steps:
- Unplug the saw to prevent accidental starting.
- Wear safety goggles to protect your eyes.
- Use gloves to avoid cuts from the blade.
- Read the user manual for specific instructions.
Gather necessary tools before starting:
| Tool | Purpose |
|---|---|
| Wrench | To loosen blade bolts |
| New Blade | Replacement for the dull blade |
| Safety Goggles | Protects eyes during the process |
Following these steps ensures a safe and effective blade change.
Credit: www.reddit.com
Identifying When To Change The Blade
Changing the blade on your Ryobi table saw is essential for optimal performance. Knowing when to replace it can save time and improve cuts. Here are key signs to watch for.
Signs Of A Dull Blade
Look for these signs to determine if your blade is dull:
- Burn Marks: Dark streaks on the wood indicate overheating.
- Uneven Cuts: Jagged edges show the blade struggles to cut.
- Excessive Resistance: Difficulty pushing wood through the saw.
- Frequent Binding: The wood gets stuck during cutting.
- Increased Noise: Louder sounds mean the blade may be worn.
Effects Of Wear And Tear On Performance
Wear and tear affect the table saw’s cutting ability. Here are some common effects:
| Effect | Description |
|---|---|
| Reduced Precision | Inaccurate cuts lead to wasted materials. |
| Increased Effort | More force is needed to make cuts. |
| Shortened Blade Life | Neglecting dull blades can damage the saw. |
| Safety Risks | Defective blades can cause accidents. |
Regularly inspect your blade. Replace it as soon as you notice any signs of dullness. Keeping a sharp blade ensures clean cuts and a safer workspace.
Selecting The Right Blade For Your Saw
Choosing the correct blade is vital for your Ryobi table saw. A well-suited blade enhances cutting performance and safety. Different blades serve various purposes. Understanding these options will help you make informed decisions.
Blade Types And Their Uses
Table saw blades come in several types. Each type has unique features. Here is a brief overview:
| Blade Type | Description | Best For |
|---|---|---|
| General Purpose | Versatile blade for various cuts. | Softwood, hardwood, and plywood. |
| Rip Blade | Designed for cutting along the grain. | Ripping wood boards. |
| Crosscut Blade | Perfect for cutting across the grain. | Crosscutting boards and panels. |
| Combination Blade | Offers both ripping and crosscutting capabilities. | General woodworking tasks. |
| Specialty Blade | Used for specific tasks, like laminate or dado. | Unique materials and cuts. |
Matching Blade To Material
Selecting the right blade depends on the material being cut. Different materials require different blade types. Here’s a quick guide:
- Softwood: Use a general purpose or rip blade.
- Hardwood: A crosscut blade works best.
- Plywood: Combination blades provide smooth cuts.
- Laminate: Use a specialty blade for clean edges.
- Metal: Select a blade designed for metal cutting.
Choosing the right blade ensures cleaner cuts and better results. Always check the specifications of your saw and the blade. This way, you maintain safety and efficiency.
Tools And Materials Needed For Blade Replacement
Changing the blade on your Ryobi table saw is essential for safe and effective cutting. To do this job right, you need the right tools and materials. Below is a list of essential tools and additional equipment that will help you replace your blade easily.
Essential Tools For The Job
- Wrench – Required for loosening the blade bolt.
- Blade Guard – Protects you during the blade change.
- Replacement Blade – Choose a blade suitable for your project.
- Screwdriver – Helps in removing screws if needed.
Additional Helpful Equipment
| Equipment | Purpose |
|---|---|
| Safety Goggles | Protects your eyes from debris. |
| Gloves | Prevents cuts while handling the blade. |
| Tape Measure | Ensures accurate blade alignment. |
| Clean Cloth | Wipes off dust and debris from the saw. |
Gather these tools and equipment before starting the blade replacement. Preparation makes the process smoother and safer.
Step-by-step Guide To Removing The Old Blade
Changing the blade on your Ryobi table saw is essential for clean cuts. Follow this simple guide to safely remove the old blade.
Power Off And Unplug The Saw
Safety is the top priority. Follow these steps:
- Turn off the table saw using the power switch.
- Unplug the power cord from the outlet.
- Double-check that the saw is off.
These steps prevent accidental startups during blade removal.
Accessing The Blade: Removing Guards
To access the blade, you need to remove the guards. This process is straightforward:
- Locate the blade guard assembly.
- Use a screwdriver to loosen the screws.
- Gently lift off the blade guard.
Once the guard is off, you can see the blade clearly. This step is necessary for safely removing the old blade.
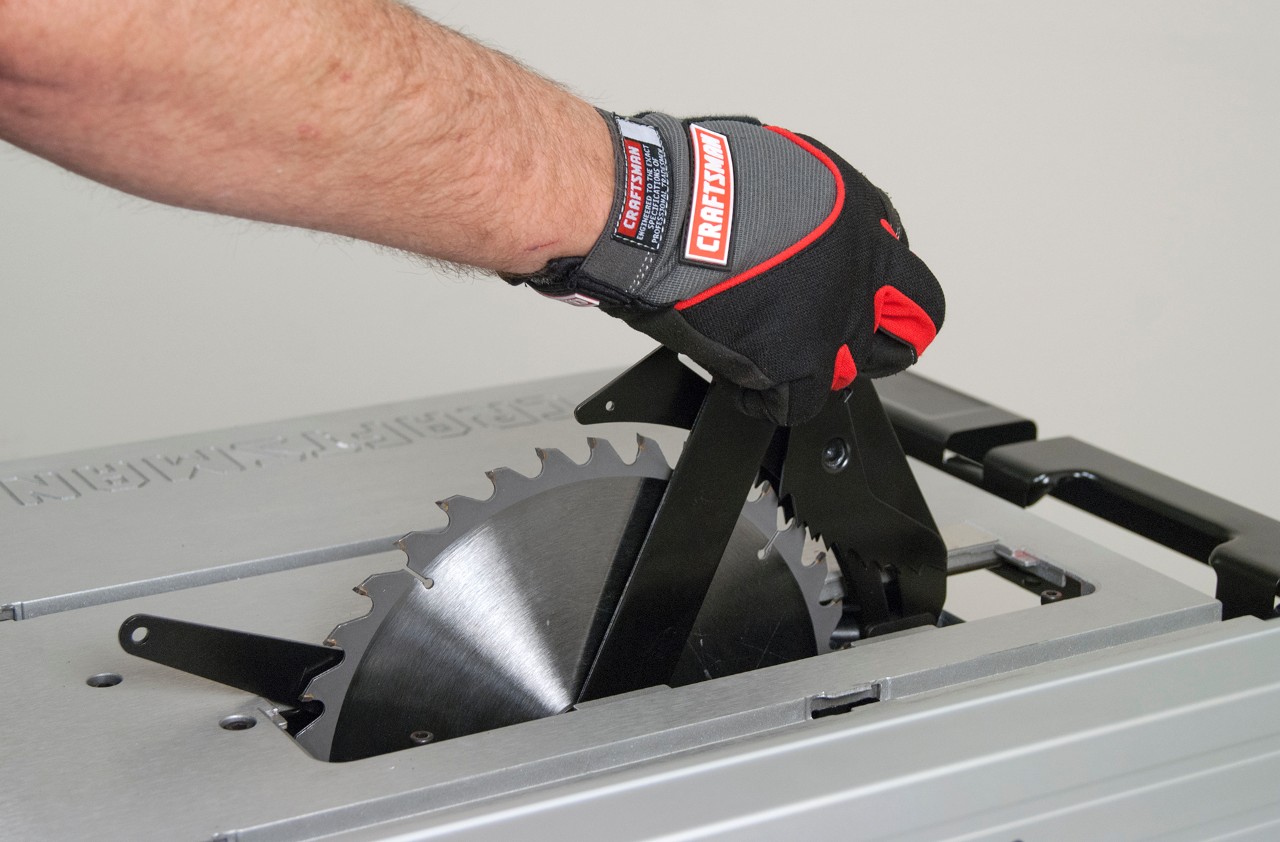
Credit: www.searspartsdirect.com
Installing The New Blade
Installing a new blade on your Ryobi table saw is crucial for precision. A sharp blade enhances cutting efficiency and safety. Follow these steps to ensure proper installation.
Aligning The Blade Correctly
Proper alignment is vital for accurate cuts. Here’s how to align the blade:
- Remove the old blade carefully.
- Inspect the arbor for any debris.
- Place the new blade on the arbor.
- Align the blade teeth with the table slot.
- Check the alignment using a square.
Alignment should be precise. Misalignment can cause uneven cuts.
Securing The Blade: Tightening Techniques
Securing the blade is essential for safety. Follow these tightening techniques:
- Use the blade wrench provided by Ryobi.
- Turn the arbor nut clockwise to tighten.
- Ensure it is snug but not overly tight.
Check the blade security by trying to wiggle it. It should be firm and stable.
| Step | Description |
|---|---|
| 1 | Remove the old blade. |
| 2 | Inspect the arbor. |
| 3 | Place the new blade. |
| 4 | Align the blade teeth. |
| 5 | Tighten the arbor nut. |
Follow these steps carefully. This ensures a safe and effective cutting experience.
Safety Checks And Testing
Safety is crucial when working with power tools. Always follow safety protocols. Proper checks can prevent accidents. Let’s focus on two important steps: inspecting the blade installation and performing a test cut.
Inspecting The Blade Installation
Check the blade installation carefully. Follow these steps:
- Turn off the table saw and unplug it.
- Remove the throat plate to access the blade.
- Inspect the blade for any damage. Look for:
- Cracks
- Chips
- Worn teeth
- Ensure the blade is installed correctly. Check:
- Blade direction (arrows on blade)
- Tightness of the arbor nut
- Alignment with the fence
- Reattach the throat plate securely.
Performing A Test Cut
After checking the blade, conduct a test cut. This confirms proper installation.
Follow these steps for a safe test cut:
- Plug in the table saw.
- Select a scrap piece of wood.
- Set the blade height to match the wood thickness.
- Adjust the fence for a straight cut.
- Wear safety gear: goggles and ear protection.
- Power on the saw and make the cut.
- Observe the cut quality. Look for:
- Smooth edges
- No burning or splintering
Perform these checks regularly. This practice ensures safety and efficiency.
Maintenance Tips For Longevity
Keeping your Ryobi table saw in top shape ensures its longevity. Regular maintenance is key. Follow these tips to extend the life of your tool.
Regular Cleaning And Storage
Clean your table saw after each use. Dust and debris can cause damage. Here are some steps to follow:
- Unplug the saw before cleaning.
- Use a soft brush or vacuum to remove dust.
- Wipe down surfaces with a damp cloth.
- Check for any sawdust buildup in crevices.
Proper storage is also essential. Store your saw in a dry, cool place. Avoid exposing it to moisture. Use a protective cover to prevent dust accumulation.
When To Seek Professional Help
Some issues require expert attention. Watch for these signs:
- Strange noises during operation.
- Unusual vibrations while cutting.
- Blade misalignment.
- Electrical problems or burnt smells.
Don’t hesitate to call a professional. Regular inspections can prevent bigger issues. Keeping your saw in top condition saves money in the long run.
Troubleshooting Common Issues
Changing the blade on your Ryobi table saw can lead to some common issues. Understanding how to troubleshoot these problems can save time and improve your woodworking experience. Below are two common issues and their solutions.
Resolving Alignment Problems
Alignment issues can affect the accuracy of your cuts. Here’s how to fix them:
- Check the Blade Alignment: Ensure the blade is parallel to the miter slot.
- Adjust the Fence: Make sure the fence is square to the blade.
- Use a Straightedge: Place a straightedge against the blade to check alignment.
If adjustments are needed, follow these steps:
- Loosen the screws on the blade mount.
- Realign the blade using the straightedge.
- Tighten the screws once the alignment is correct.
Dealing With Vibrations And Noise
Excess vibrations and noise can occur during operation. Here are some common causes and fixes:
| Issue | Solution |
|---|---|
| Loose Blade | Tighten the blade according to manufacturer instructions. |
| Worn Bearings | Inspect and replace bearings if needed. |
| Unbalanced Blade | Replace with a high-quality, balanced blade. |
Follow these tips to reduce noise:
- Use ear protection during operation.
- Check for debris around the motor.
- Keep the table saw on a stable surface.
Addressing these common issues enhances safety and performance. Enjoy your woodworking projects with a well-maintained table saw.
Blade Changing
Changing the blade on a Ryobi table saw is straightforward. Following the proper steps ensures safety and efficiency. Regular blade changes enhance your saw’s performance. Let’s recap the essential steps and emphasize the importance of routine maintenance.
Recap Of Key Steps
- Unplug the saw to ensure safety.
- Remove the blade guard for easy access.
- Loosen the arbor nut using the appropriate wrench.
- Remove the old blade carefully.
- Install the new blade with the teeth facing the right direction.
- Tighten the arbor nut securely.
- Reattach the blade guard before use.
Follow these steps for a smooth blade change every time.
Encouraging Routine Maintenance
Routine maintenance keeps your Ryobi table saw in top shape. Here are some tips:
- Check the blade regularly for dullness or damage.
- Clean the table saw after each use.
- Inspect the power cord for any wear or frays.
- Keep the work area tidy to avoid accidents.
Implementing regular maintenance increases the lifespan of your equipment. Always prioritize safety and efficiency in your woodworking projects.
Frequently Asked Questions
- How Do I Remove The Blade From A Ryobi Table Saw?
To remove the blade, disconnect the power, raise the blade, and use the blade wrench to loosen the arbor nut.
- What Tools Do I Need To Change The Blade?
You’ll need a blade wrench, a new blade, and possibly a screwdriver for securing the blade guard.
- How Often Should I Change My Table Saw Blade?
Change your table saw blade every 20-50 hours of use or when cuts become rough and jagged.
- Can I Use Any Blade On My Ryobi Table Saw?
Not all blades fit. Ensure the blade matches the arbor size and is suitable for your cutting needs.
- What Safety Precautions Should I Take?
Always unplug the saw, wear safety glasses, and ensure the blade guard is properly installed after changing the blade.
Conclusion
Changing the blade on your Ryobi table saw is crucial for optimal performance. Regular maintenance ensures clean cuts and enhances safety.
Always remember to disconnect power before starting. With the right tools and careful steps, you can easily perform this task.
Keep your saw in top shape and enjoy your woodworking projects!