
Installing attic ladders can seem daunting. But it’s simpler than you think.
With the right tools and steps, anyone can do it. Attic ladders offer convenient access to your attic space. They are perfect for storing items or creating extra room. Installing one can enhance your home’s functionality. Whether you’re a DIY enthusiast or a beginner, this guide will help you.
We’ll walk you through each step, ensuring a smooth installation process. From gathering materials to final adjustments, everything will be covered. By the end, you will confidently know how to install an attic ladder. So, let’s get started and transform that unused attic space!

Credit: www.youtube.com
Choosing The Right Ladder
Choosing the right attic ladder is crucial. It affects both safety and convenience. There are different types and sizes to consider. Your attic’s size and your needs will determine the best ladder. This section will help you make an informed decision.
Types Of Attic Ladders
There are various types of attic ladders available. Each type serves different needs and space constraints. Here are some common types:
- Wooden Attic Ladders: These ladders are sturdy and durable. They provide a classic look and are ideal for larger attics.
- Aluminum Attic Ladders: These are lightweight and rust-resistant. They are easy to install and maintain.
- Folding Attic Ladders: These ladders fold up into the ceiling. They save space and are great for smaller attics.
- Telescoping Attic Ladders: These ladders extend and retract. They are perfect for tight spaces.
Measuring Your Space
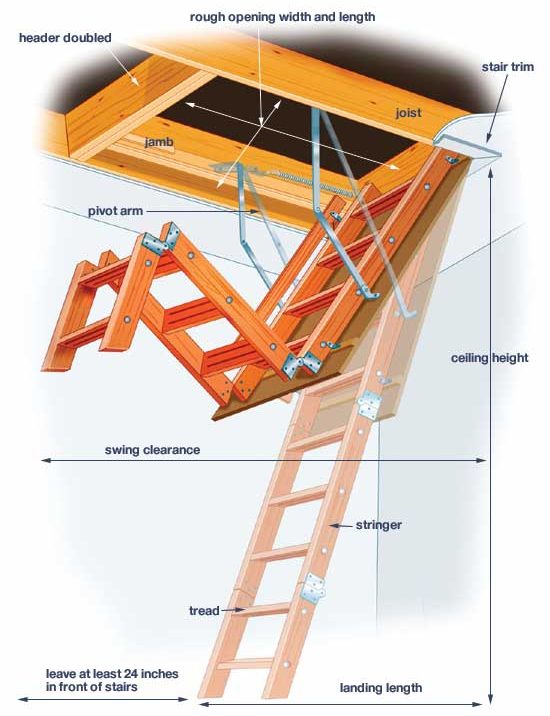
Accurate measurements are key to choosing the right attic ladder. Here’s how to measure your space:
- Ceiling Height: Measure the distance from the floor to the ceiling. This ensures the ladder reaches the floor when extended.
- Opening Size: Measure the size of the attic opening. This helps you choose a ladder that fits perfectly.
- Floor Space: Measure the available floor space around the attic opening. This ensures there is enough room to use the ladder safely.
Using these measurements, you can find a ladder that fits your space. Choose a ladder that meets your needs and is safe to use.
Credit: atticladderguy.com
Preparing The Installation Area
Before installing attic ladders, it’s crucial to prepare the installation area. Proper preparation ensures a smooth installation process and enhances safety. This section will guide you through gathering necessary tools and clearing the workspace for attic ladder installation.
Gathering Necessary Tools
First, you need to gather all the tools required for the installation. Having everything ready will save time and reduce stress. Here’s a list of essential tools:
- Measuring tape: For precise measurements.
- Carpenter’s pencil: To mark cut lines.
- Hand saw or power saw: For cutting the opening.
- Drill: To make pilot holes.
- Screwdriver: For fastening screws.
- Hammer: To secure nails.
- Ladder: To reach the attic space safely.
- Safety gear: Including gloves and goggles.
Clearing The Work Space
Once you have the tools, it’s time to clear the workspace. A clean area ensures you can move freely and reduces the risk of accidents. Follow these steps:
- Remove furniture: Move any furniture or objects out of the way.
- Cover flooring: Lay down a drop cloth to protect the floor.
- Ensure lighting: Make sure the area is well-lit for better visibility.
- Secure pets and children: Keep them away from the work area.
- Ventilate the space: Open windows for proper air circulation.
Clearing the workspace not only makes the job easier but also enhances safety. By following these steps, you can ensure a smooth and efficient installation process.
Cutting The Ceiling Opening
Cutting the ceiling opening is a crucial step when installing attic ladders. This step requires precision and the right tools. A well-cut opening ensures the ladder fits perfectly and functions safely. Below, we break down the steps for cutting the ceiling opening into two main parts: marking the cut lines and using the right saw.
Marking The Cut Lines
First, determine the location for your attic ladder. Measure the ladder’s dimensions. Use these measurements to mark the ceiling.
Tools needed:
- Measuring tape
- Pencil
- Level
With your measuring tape, measure and mark the length and width of the attic ladder on the ceiling. Use a pencil for marking. This ensures you can erase if needed. Ensure the lines are straight using a level. This helps in accurate cutting.
Using The Right Saw
Choosing the right saw is crucial for a clean cut. A jigsaw or a reciprocating saw works best for this job.
Steps to follow:
- Wear safety goggles.
- Position the saw at one corner of the marked lines.
- Cut along the lines slowly and steadily.
- Keep the saw blade straight to avoid uneven cuts.
Be cautious as you cut to prevent damage to the surrounding ceiling. After cutting, remove the ceiling piece. You now have the opening for your attic ladder.
Following these steps ensures a precise and safe ceiling opening. This is essential for a successful attic ladder installation.
Installing The Ladder Frame
Properly installing the ladder frame is crucial for a safe and functional attic ladder. Follow these steps to ensure a secure and stable installation.
Positioning The Frame
First, measure the opening where the ladder will go. Ensure the frame fits perfectly. Use a measuring tape for accurate dimensions.
Next, place the ladder frame in the opening. Align it with the edges. Make sure the frame is level. Use a level tool to check this.
Once the frame is in position, double-check the alignment. The frame must sit flush with the ceiling. This ensures stability and safety.
Securing The Frame
After positioning, secure the frame with screws. Use a drill for this task. Ensure the screws are tight and firm.
Place screws at each corner of the frame. This provides even support. Add more screws along the sides for extra stability.
Check the frame’s stability after securing. Give it a gentle shake. If it moves, add more screws. The frame should not wobble.
Lastly, fill any gaps between the frame and ceiling. Use insulation or caulk. This prevents air leaks and keeps the attic energy-efficient.
Tools Needed
- Measuring tape
- Level tool
- Drill
- Screws
- Insulation or caulk
Final Adjustments And Safety Tips
The installation of attic ladders can be tricky. After securing the ladder in place, making final adjustments and observing safety tips is crucial. This ensures the ladder fits perfectly and is safe to use.
Ensuring Proper Fit
After the ladder is secured, check its alignment. Ensure the ladder is flush against the floor and ceiling. If not, make necessary adjustments.
Next, confirm the hinges are tight. Loose hinges can cause accidents. Use a wrench to tighten them securely.
Check the length of the ladder. If it’s too long, trim it to fit. Use a saw for a clean cut. Sand any rough edges.
Finally, test the ladder. Open and close it several times. This ensures smooth operation and proper fit.
Safety Precautions
Safety is paramount. Always follow these tips:
- Wear protective gear. This includes gloves and safety goggles.
- Ensure the ladder is stable. Do not use it until it is properly secured.
- Do not overload the ladder. Check the weight limit and adhere to it.
- Keep the area around the ladder clear. Avoid clutter to prevent tripping.
- Inspect the ladder regularly. Look for any signs of damage or wear.
Following these steps ensures your attic ladder is safe and functional. Enjoy easy access to your attic without worry.

Credit: www.reddit.com
Frequently Asked Questions
How Do I Choose The Right Attic Ladder Size?
Measure your attic opening. Check ladder dimensions to match. Consider weight capacity too.
What Tools Do I Need To Install An Attic Ladder?
You need a saw, drill, screws, tape measure, and a ladder. Safety gear too.
How Long Does It Take To Install An Attic Ladder?
It typically takes about 3 to 4 hours. Experience level can affect time.
Can I Install An Attic Ladder By Myself?
Yes, but it’s easier with help. Safety is crucial. Follow the instructions carefully.
Are Attic Ladders Safe To Use?
Yes, if installed properly. Regularly check for wear and tear. Ensure it locks securely.
Conclusion
Installing attic ladders can be a straightforward process. Follow the steps carefully. Ensure you have all the necessary tools. Safety should always come first. Proper measurements are key to a good fit. Take your time with each step. This will prevent mistakes.
Once installed, attic ladders provide easy access. They also help maximize storage space. Enjoy the convenience they bring. Happy installing!