
Accurate saw blade measurements prevent wasted materials and dangerous kickbacks. This guide teaches you exactly how to measure diameter, arbor size, and tooth count for every cut. Master these skills to boost precision and safety in your workshop.
Key Takeaways
- Diameter is critical: Always measure from tooth tip to tooth tip across the center for true size.
- Arbor size prevents wobble: Match your saw’s arbor hole exactly to avoid dangerous vibrations.
- Tooth count affects finish: Higher TPI = smoother cuts; lower TPI = faster rough cuts.
- Kerf width matters: Thinner kerfs save material; thicker kerfs handle demanding tasks.
- Worn blades ruin cuts: Check for missing teeth or reduced diameter regularly.
- Safety first: Always unplug tools and wear gloves when handling blades.
- Document measurements: Keep a log for quick reference during blade swaps.
Why Measuring Saw Blades Accurately is Non-Negotiable
Ever watched sawdust fly while your cut veers off-course? Or felt that unsettling wobble as a blade spins? Chances are, your blade measurements were off. Whether you’re a weekend DIYer or a seasoned pro, knowing how to measure saw blades correctly is the secret sauce to perfect cuts, extended blade life, and most importantly – safety. A mismeasured blade doesn’t just waste wood; it can cause dangerous kickbacks, damage your saw, and turn a simple project into a costly disaster.
This guide cuts through the confusion. We’ll walk you through every measurement that matters – from the obvious diameter to the often-overlooked kerf width. You’ll learn pro techniques using basic tools you already own, plus when to call in specialized gear. By the end, you’ll confidently select, install, and maintain blades that deliver laser-accurate results cut after cut. No more guessing, no more frustration – just clean, precise work that makes you look like a master craftsman.
Essential Tools for Measuring Saw Blades
You don’t need a fancy lab to measure saw blades accurately. These everyday tools deliver pro-level precision:

Visual guide about How to Measure Saw Blades for Perfect Cuts Every Time
Image source: woodindustry-media.s3.amazonaws.com
- Tape measure or ruler: For quick diameter checks (use the metric side for accuracy)
- Digital calipers: The gold standard for arbor and kerf measurements ($15-$25 on Amazon)
- Marker and paper: For tooth count and documentation
- Safety gloves: Always protect your hands – blades are razor-sharp!
- Workbench or flat surface: Ensures stable, accurate measurements
Pro Tip: Keep your calipers calibrated! Drop them in rice overnight if they get wet, and avoid banging them on hard surfaces. A $20 caliper outlasts most tape measures for precision work.
Why Calipers Beat Tape Measures for Critical Dimensions
While tape measures work for rough diameter checks, digital calipers give you surgical precision where it counts. Consider this: A standard 10-inch blade might actually be 9.875 inches due to wear. That 0.125-inch difference might seem small, but it translates to a 1/8-inch error in your cut – enough to ruin a cabinet joint. Calipers measure to 0.001 inches, catching wear before it wrecks your project. They’re also essential for measuring arbor holes (typically 5/8″ or 1″) and kerf widths (often 1/8″ to 3/32″).
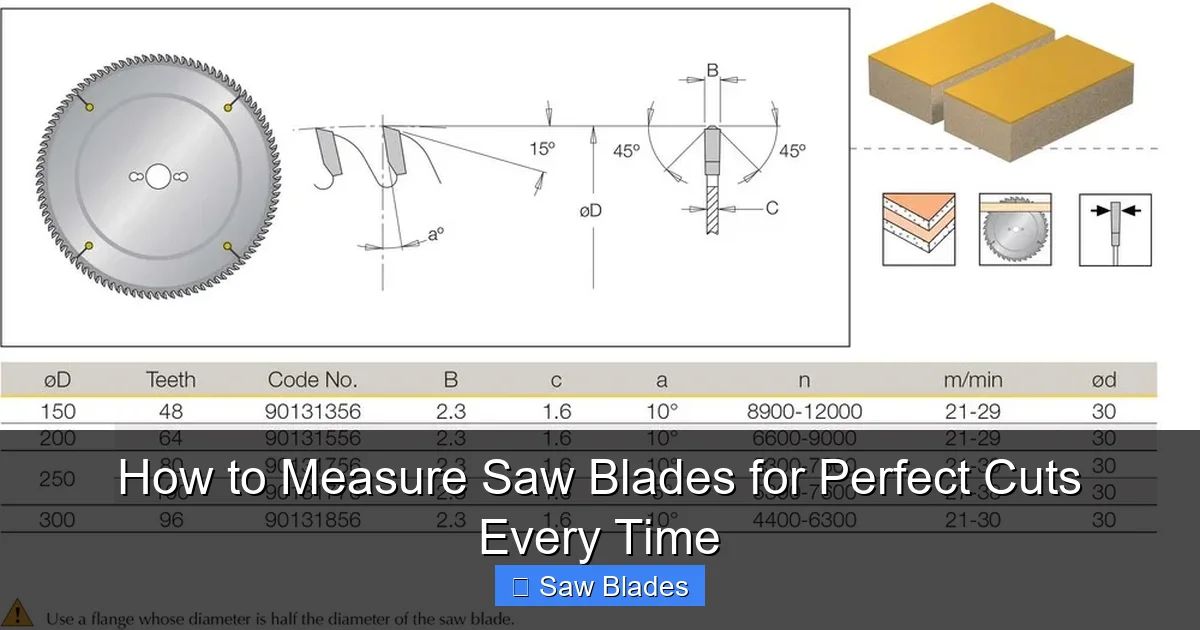
Step 1: Measuring Blade Diameter Like a Pro
The diameter is the most visible measurement – but also the easiest to mess up. Here’s how to get it right:
Visual guide about How to Measure Saw Blades for Perfect Cuts Every Time
Image source: dimar.com.au
Method 1: The Tooth-to-Tooth Technique (Most Accurate)
- Unplug your saw and remove the blade (reference our guide on changing circular saw blades for safety steps).
- Place the blade flat on your workbench, teeth facing up.
- Position your tape measure or calipers from the highest point of one tooth to the highest point of the opposite tooth, passing through the center arbor hole.
- Read the measurement where the scale crosses the tooth tip.
Example: If you measure 9.92 inches on a blade labeled “10-inch,” it’s worn down by 0.08 inches. While still usable for rough cuts, it’s time to replace for precision work.
Method 2: The Circumference Shortcut (For Quick Checks)
When you’re mid-project and need a fast check:
- Wrap a flexible tape measure around the blade’s outer edge (following the tooth path).
- Divide the circumference by 3.14 (pi).
- Example: 31.1-inch circumference ÷ 3.14 = 9.9-inch diameter.
Warning: This method is less accurate due to tooth geometry but works in a pinch. Always verify with Method 1 for critical cuts.
Step 2: Measuring Arbor Size – The Hidden Safety Factor
The arbor hole is where your blade mounts to the saw’s shaft. A mismatched size causes dangerous wobble and premature wear. Here’s how to measure it:

Visual guide about How to Measure Saw Blades for Perfect Cuts Every Time
Image source: img.freepik.com
Using Digital Calipers for Precision
- Set your calipers to “inside measurement” mode.
- Open the jaws and place them inside the arbor hole, ensuring they’re perpendicular to the blade surface.
- Gently close the jaws until they touch the hole’s edges without forcing.
- Read the measurement. Common sizes are 5/8″ (0.625″), 1″, or 3/4″ (0.75″).
Pro Tip: If your calipers show 0.615″ on a 5/8″ blade, the hole is worn. Replace the blade – a loose fit risks the blade slipping mid-cut!
What If You Don’t Have Calipers?
Use a drill bit set as a gauge:
- Select a bit slightly smaller than the expected arbor size (e.g., 1/2″ bit for a 5/8″ hole).
- Insert the bit into the arbor hole. If it fits snugly but doesn’t bind, your arbor is close to that size.
- Test progressively larger bits until you find the best match.
Critical Note: Never force a blade onto an undersized arbor. If your saw requires a 5/8″ arbor but you only have a 1″ blade, use a reducing washer (available at hardware stores). Never use tape or shims – they’ll fail under pressure.
Step 3: Counting Teeth and Understanding TPI
Teeth Per Inch (TPI) determines your cut speed and finish quality. Higher TPI = smoother cuts; lower TPI = faster rough cuts. Here’s how to measure it:
The 1-Inch Rule
- Place a ruler or tape measure against the blade’s edge.
- Mark a 1-inch section starting at a tooth root.
- Count all teeth within that inch (including partial teeth at the edges).
- Example: 14 teeth in 1 inch = 14 TPI.
Pro Tip: For blades under 4 inches, count teeth in a 2-inch section and divide by 2. This avoids errors from small measurement zones.
Matching TPI to Your Material
- 3-6 TPI: Demolition, thick wood, PVC (fast but rough)
- 8-14 TPI: General woodworking (balanced speed/finish)
- 18-24 TPI: Plywood, melamine, fine furniture (smooth finish)
- 30+ TPI: Metal, laminate, delicate trim (slow but precise)
Real-World Example: Cutting 3/4″ oak plywood? Use an 18-24 TPI blade. A 6 TPI blade will splinter the edges; a 36 TPI blade will overheat and burn the wood.
Step 4: Measuring Kerf Width – The Material Saver
Kerf is the width of the cut made by the blade. Thinner kerfs save material; thicker kerfs handle heavy use. Measure it like this:
Using Calipers on a Test Cut
- Make a straight test cut in scrap wood using the blade.
- Let the wood cool completely (heat can warp measurements).
- Place calipers in “outside measurement” mode across the cut edges.
- Read the kerf width. Standard kerfs range from 1/16″ (0.0625″) to 1/4″ (0.25″).
Pro Tip: For blades without a test cut, measure the carbide tip width with calipers. Add 0.005″ for heat expansion during cutting.
Why Kerf Matters More Than You Think
A 1/8″ kerf vs. a 3/32″ kerf might seem trivial – but on a 10-foot board, that’s a 1.5-inch difference in material loss! For large projects like decking or cabinetry, choosing a thin-kerf blade (1/16″ to 3/32″) can save significant wood. However, thin kerfs are less durable for dense materials like hard maple or metal. Always match kerf to your task:
- Thin kerf (1/16″-1/8″): Plywood, softwoods, finish work
- Standard kerf (1/8″-3/32″): General construction, framing
- Heavy kerf (1/4″+): Concrete, masonry, aggressive demolition
When working with specialty blades like diamond blades, check our guide on assessing diamond blade wear – kerf consistency is a key indicator of blade health.
Step 5: Checking for Wear and Damage
A worn blade ruins cuts even if measurements seem correct. Inspect these areas:
Visual and Tactile Inspection
- Missing or chipped teeth: Run a gloved finger along the teeth. Rough spots indicate damage.
- Burn marks: Dark streaks on the blade body mean overheating – often from dull teeth.
- Wobble test: Mount the blade on your saw (unplugged!) and spin it by hand. Excessive side-to-side movement means warped plate or worn arbor.
- Diameter reduction: Compare current measurement to original specs (usually stamped on the blade). More than 1/16″ wear = replace.
Pro Tip: Keep a “blade log” noting installation date, cuts made, and measurements. When diameter drops below 95% of original size, it’s time for retirement.
When to Sharpen vs. Replace
Most woodworking blades can be sharpened 3-5 times before tooth geometry degrades. Signs it’s sharpening time:
- Cutting requires excessive force
- Burn marks appear on wood
- Kerf widens significantly
Replace immediately if:
- More than 2 teeth are missing
- Blade shows cracks or deep gouges
- Diameter is more than 1/8″ below spec
For bandsaw blades, see our sharpening guide – they have unique measurement considerations.
Troubleshooting Common Measurement Problems
Even pros hit snags. Here’s how to solve them:
Problem: Blade Won’t Fit the Arbor
Cause: Incorrect arbor measurement or worn hole.
Solution: Double-check with calipers. If the hole is oversized, replace the blade. Never force it – a 0.005″ mismatch can cause catastrophic failure at high RPM. For table saws, ensure you’re using the correct arbor flange (reference our Ryobi table saw blade change guide for model-specific tips).
Problem: Cuts Drift or Bind
Cause: Worn blade diameter or incorrect TPI for material.
Solution: Measure diameter – if it’s undersized, the blade can’t maintain proper tension. Also verify TPI: Too few teeth for hardwoods causes binding; too many for thick stock causes drift.
Problem: Excessive Vibration
Cause: Warped plate or arbor mismatch.
Solution: Perform the wobble test (Step 5). If vibration persists with a new blade, check your saw’s arbor bearings – they may need replacement.
Problem: Inconsistent Kerf Width
Cause: Worn carbide tips or damaged plate.
Solution: Inspect teeth for uneven wear. If kerf varies along the cut, the blade plate is likely bent – replace it.
Blade Measurement Cheat Sheet for Common Saws
Quick reference for popular tools:
- Circular Saw: 7-1/4″ diameter, 5/8″ arbor, 18-24 TPI for wood
- Table Saw: 10″ diameter, 5/8″ arbor, 24-80 TPI depending on task
- Miter Saw: 10″ or 12″ diameter, 5/8″ arbor, 60-100 TPI for trim
- Reciprocating Saw: Blade length varies (6″-12″), TPI 5-24 (see our reciprocating blade guide for details)
- Jigsaw: Blade length 3″-4″, TPI 10-24, shank type matters more than diameter
Remember: Always check your saw’s manual for exact specs. A “10-inch” table saw blade might actually be 10.125″ for proper tension.
Conclusion: Precision Starts With Measurement
Mastering how to measure saw blades transforms your workshop from frustrating to flawless. It’s not just about numbers on a ruler – it’s about understanding how each dimension affects safety, efficiency, and the beauty of your final piece. By taking 5 minutes to verify diameter, arbor size, TPI, and kerf before every project, you’ll avoid costly mistakes, extend blade life, and achieve cuts so clean they look factory-made.
Remember: The best blade is worthless if it doesn’t fit your saw correctly. Invest in calipers, keep a measurement log, and never skip the wobble test. Whether you’re building a deck or carving dovetails, these skills ensure your tools work for you – not against you. Now grab that blade, measure with confidence, and make your next cut perfect.
🎥 Related Video: How to perfectly measure your cuts knowing kerf – DIY Shorts
📺 Colton Crump DIY
The wood a blade cuts out is called kerf. When you measure, knowing your measurements take into account kerf, you can make …
