
To use a dovetail saw, grip the handle firmly and align the blade with your cutting line. Make smooth, controlled strokes to create precise cuts.
A dovetail saw is an essential tool for woodworkers, particularly for joinery tasks. Its fine teeth enable clean, accurate cuts, making it ideal for creating dovetail joints. This type of saw features a rigid back that keeps the blade straight, providing more control during cutting.
Understanding how to use a dovetail saw effectively can enhance the quality of your woodworking projects. Whether you are a beginner or an experienced craftsman, mastering this tool can improve your joinery skills and elevate your craftsmanship. With the right technique, you can achieve professional-looking results with ease.
Introduction To The Dovetail Saw
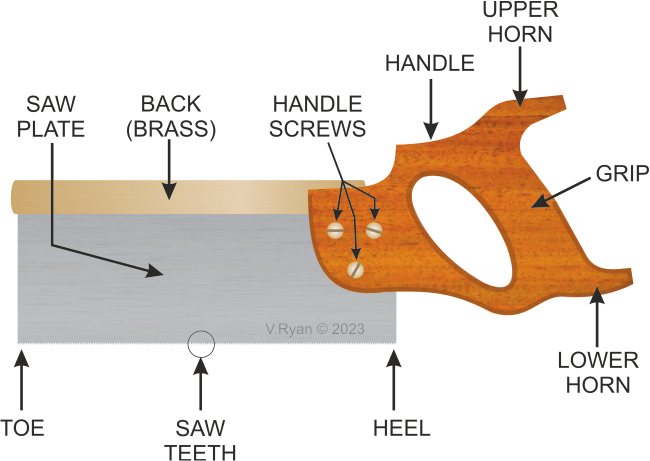
The dovetail saw is a specialized hand saw. It is designed for precision cuts. Craftsmen use it for making dovetail joints. These joints are strong and beautiful. Perfect for fine woodworking projects.
Its unique design allows for tight, accurate cuts. This saw is essential for furniture making and cabinetry. Understanding its features is key to using it effectively.
Key Features
- Blade Width: Narrow for precise cuts.
- Teeth Count: More teeth provide smoother cuts.
- Handle Design: Comfortable grip for better control.
- Tooth Geometry: Sharp, angled teeth for clean cuts.
| Feature | Description |
|---|---|
| Blade Length | Typically ranges from 10 to 14 inches. |
| Material | High-carbon steel for durability. |
| Weight | Lightweight for easy maneuverability. |
Choosing The Right Saw
- Consider the project type. Choose based on your needs.
- Check the blade size. Longer blades cut deeper.
- Look for a comfortable handle. It should fit your grip.
- Assess the tooth count. Higher counts give smoother finishes.
Buying the right dovetail saw can improve your work. Look for quality brands. Read reviews to ensure you choose wisely.
Credit: technologystudent.com
Preparing Your Workspace
Setting up your workspace correctly is crucial for using a dovetail saw. A clean and organized area helps you work safely and efficiently. Here are the key steps to prepare.
Safety First
- Wear safety goggles to protect your eyes.
- Use ear protection if you’re in a noisy environment.
- Keep your hands clear of the saw blade.
- Work in a well-lit area to see your cuts clearly.
- Ensure your workspace is free of clutter.
Organizing Tools And Materials
Having your tools and materials organized saves time. It also prevents accidents. Follow these steps:
- Gather your dovetail saw and measuring tools.
- Find a stable workbench or table.
- Place all materials within easy reach.
- Keep a trash bin nearby for waste.
| Tool/Material | Purpose |
|---|---|
| Dovetail Saw | For making precise cuts. |
| Measuring Tape | For accurate measurements. |
| Clamps | To secure your workpiece. |
| Pencil | For marking cut lines. |
Take time to prepare. A well-organized workspace enhances safety and precision.
Understanding Dovetail Joints
Dovetail joints are strong and attractive connections in woodworking. They are popular for their unique shape and durability. Using a dovetail saw, you can create precise cuts for these joints. Let’s explore the types of dovetail joints and their applications in woodworking.
Types Of Dovetail Joints
There are several types of dovetail joints, each serving different purposes. Here are the most common types:
| Type of Dovetail Joint | Description | Best Used For |
|---|---|---|
| Through Dovetail | Visible tails on both sides. | Drawer fronts and boxes. |
| Half-Blind Dovetail | Tails hidden on one side. | Drawer construction. |
| Blind Dovetail | No visible tails or pins. | Fine furniture pieces. |
| Sliding Dovetail | One piece slides into another. | Joinery for shelves. |
Applications In Woodworking
Dovetail joints are widely used in woodworking projects. Here are some common applications:
- Furniture Making: Dovetail joints provide strength and beauty.
- Cabinetry: Ideal for drawer construction and cabinet frames.
- Boxes: Perfect for crafting decorative boxes and storage.
- Frames: Used in making photo frames and art frames.
- Joinery: Commonly found in high-end joinery work.
Understanding these joints helps improve your woodworking skills. Use a dovetail saw to create precise cuts. Practice makes perfect!
Credit: technologystudent.com
Marking And Measuring For Precision
Precision is key when using a dovetail saw. Accurate marking and measuring ensure clean cuts. This section covers tools and techniques for effective marking.
Tools You’ll Need
- Measuring Tape: Essential for accurate length measurements.
- Square: Helps create right angles for precise cuts.
- Pencil: Use a sharp pencil for clear, visible lines.
- Marking Gauge: Provides consistent marking depth.
- Ruler: Ensures straight, even measurements.
Techniques For Accurate Marking
- Measure Twice: Always double-check your measurements before marking.
- Use the Square: Align the square with your edge for perfect angles.
- Mark Lightly: Make faint lines to adjust if necessary.
- Follow the Grain: Mark along the wood grain for smoother cuts.
- Check Depth: Use a marking gauge to ensure even depths.
Following these techniques helps create accurate cuts. This leads to better craftsmanship and cleaner joints.
Mastering The Cut
Using a dovetail saw can enhance your woodworking skills. Mastering the cut requires practice and focus. This section covers important techniques for using a dovetail saw effectively.
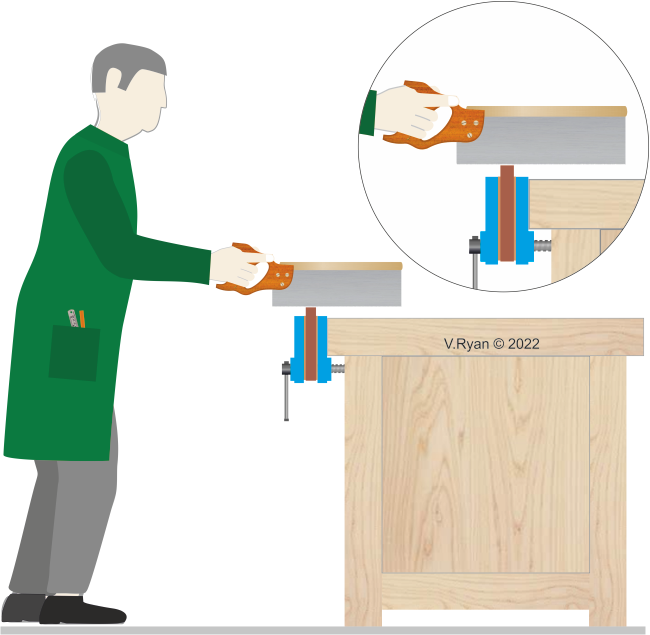
Holding The Saw
Proper grip is crucial for accurate cuts. Follow these steps to hold your dovetail saw correctly:
- Use your dominant hand to hold the handle.
- Wrap your fingers firmly around the handle.
- Keep your thumb on the opposite side for stability.
- Use your other hand to guide the saw along the cut line.
Maintaining a steady grip helps keep the saw aligned. Your body should stay relaxed while cutting.
Making Your First Cut
Start by marking your cut line clearly. Follow these steps for your first cut:
- Position the saw at a 45-degree angle to the wood.
- Align the saw teeth with your marked line.
- Start with a gentle push to create a groove.
- Maintain a steady motion, applying light pressure.
- Continue cutting until you reach the end of the line.
Practice makes perfect. Start with scrap wood before moving to your project.
| Step | Description |
|---|---|
| 1 | Mark your cut line clearly. |
| 2 | Position the saw at a 45-degree angle. |
| 3 | Start with a gentle push to create a groove. |
| 4 | Maintain steady motion and light pressure. |
| 5 | Cut until reaching the end of the line. |
With practice, your cuts will become more precise. Mastering the cut with a dovetail saw enhances your woodworking projects.
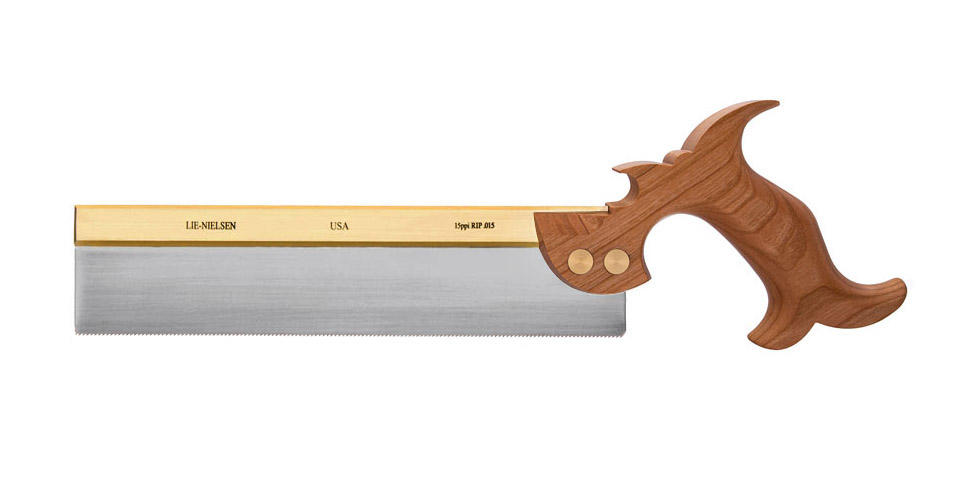
Credit: www.lie-nielsen.com
Fine-tuning And Adjustments
Using a dovetail saw requires precision. Fine-tuning enhances accuracy and fit. Making adjustments helps correct mistakes and achieve the best results.
Correcting Mistakes
Mistakes happen, even to the best woodworkers. Here are steps to correct them:
- Identify the Mistake: Look closely at the cut.
- Assess the Damage: Determine how deep or wide the error is.
- Use a Chisel: Carefully chisel away excess wood.
- Sand Smooth: Sand the area for a clean finish.
Common mistakes include:
- Uneven cuts
- Over-cutting
- Incorrect angles
Always double-check measurements before making cuts. This reduces mistakes.
Achieving A Perfect Fit
A perfect fit is crucial for strong joints. Follow these tips:
- Test Cuts: Make practice cuts on scrap wood.
- Measure Twice: Always measure before cutting.
- Adjust Blade Angle: Ensure the saw is at the right angle.
Use the following table for checking fit:
| Joint Type | Fit Requirement |
|---|---|
| Dovetail | Tight and flush |
| Finger Joint | Even gaps |
| Box Joint | Snug |
Regular practice leads to better results. Keep refining your technique.
Finishing Touches
Finishing touches elevate your project’s overall appearance. Proper techniques enhance the beauty of your dovetail joints. This section covers sanding, smoothing, and applying finish.
Sanding And Smoothing
Sanding is crucial for a polished look. Use fine-grit sandpaper for smooth surfaces. Follow these steps:
- Start with medium-grit sandpaper (120-150 grit).
- Sand along the grain of the wood.
- Switch to fine-grit sandpaper (220 grit) for a smooth finish.
- Inspect the joints for any rough spots.
- Use a sanding block for even pressure.
For hard-to-reach areas, use a sanding sponge. This tool molds to the surface shape.
Applying Finish
Applying finish protects the wood and enhances its beauty. Choose the right finish for your project:
| Finish Type | Features | Best For |
|---|---|---|
| Varnish | Durable and water-resistant | Furniture and cabinets |
| Oil | Penetrates deep, enhances grain | Cutting boards and kitchenware |
| Polyurethane | Strong and protective | High-traffic areas |
Follow these steps to apply finish:
- Clean the surface to remove dust.
- Use a clean brush or cloth for application.
- Apply thin, even coats.
- Allow each coat to dry completely.
- Sand lightly between coats for a smooth finish.
Finishing adds durability. Choose a finish that suits your project’s needs.
Advanced Techniques And Tips
Mastering a dovetail saw involves advanced techniques. These tips will enhance your skills and improve your results. Focus on precision and practice regularly. Each technique will help you create strong joints.
Working With Different Woods
Different woods require different approaches. Each type has unique characteristics. Here are some popular woods and tips:
| Wood Type | Characteristics | Tip |
|---|---|---|
| Softwoods | Easy to cut, less resistant | Use a slower saw speed |
| Hardwoods | More resistant, requires more effort | Apply consistent pressure |
| Plywood | Layered, can splinter | Use masking tape to prevent splinters |
- Practice on scrap pieces first.
- Adjust your technique based on wood hardness.
- Use sharp blades for clean cuts.
Creating Complex Joints
Complex joints require careful planning. Follow these steps to achieve great results:
- Sketch your joint design first.
- Measure accurately. Use a ruler and square.
- Mark cut lines clearly.
- Cut slowly along the marked lines.
- Check fit before final assembly.
For more intricate designs, consider these tips:
- Use a chisel for precise corners.
- Practice with different joint types.
- Keep your saw at a consistent angle.
Complex joints can elevate your woodworking projects. Practice makes perfect.
Frequently Asked Questions
- How Do I Start Using A Dovetail Saw?
Begin by selecting the right dovetail saw size for your project. Mark your cutting lines clearly before sawing.
- What Materials Can I Cut With A Dovetail Saw?
Dovetail saws work best on hardwood and softwood, making them ideal for precise joinery tasks.
- How Do I Maintain My Dovetail Saw?
Regularly clean the blade and store it in a protective case. Sharpen the teeth when necessary for optimal performance.
- What Makes Dovetail Saws Unique?
Dovetail saws have fine teeth and a rigid blade, allowing for precise, controlled cuts in tight spaces.
- Can Beginners Use A Dovetail Saw?
Yes, beginners can use a dovetail saw with practice. Focus on technique and accuracy for the best results.
Conclusion
Mastering the use of a dovetail saw can elevate your woodworking skills. With practice, you’ll achieve precise and clean cuts.
Remember to focus on technique and maintain your tools for the best results. Embrace the art of joinery, and enjoy the satisfaction that comes with beautiful, handcrafted projects.
Happy sawing!