
A 1% agarose gel is typically used for DNA laddering. This concentration provides good resolution for most DNA fragments.
DNA laddering is a molecular biology technique. It helps in visualizing DNA fragments. Scientists often use it for various analyses. Agarose gel electrophoresis is the main method here. The gel separates DNA based on size. A 1% agarose gel is standard.
It balances resolution and run time. This concentration works well for most DNA fragments. The process is straightforward and reliable. It helps in gene identification and cloning. Both students and professionals use this method. Understanding this technique is essential in genetics. It is a fundamental skill in many labs.
Credit: wiki.rice.edu
Introduction To Dna Laddering
DNA laddering is a crucial technique in molecular biology. It helps to separate and analyze DNA fragments by size. This method is essential for many applications, including gene cloning, PCR analysis, and genetic fingerprinting.
Purpose Of Dna Laddering
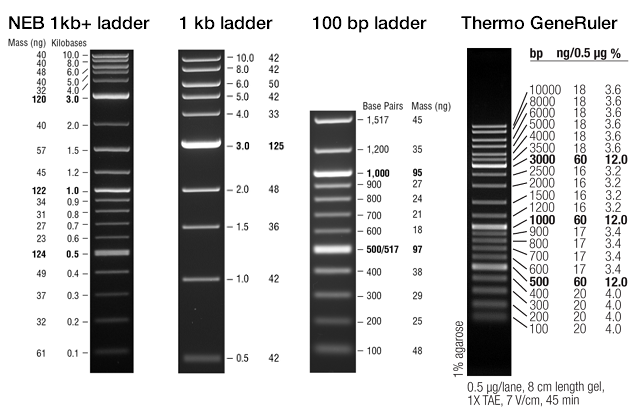
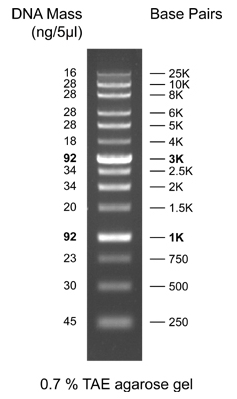
The primary purpose of DNA laddering is to determine the size of DNA fragments. Scientists use agarose gel electrophoresis for this purpose. A DNA ladder is a mixture of DNA fragments of known sizes. This ladder acts as a reference for comparing unknown DNA samples.
Agarose gel is the medium where DNA fragments separate. Different percentages of agarose affect the resolution of DNA fragments. For DNA laddering, typically 0.7% to 1.5% agarose gels are used.
Importance In Molecular Biology
DNA laddering is vital in molecular biology for several reasons:
- Verifying PCR products: It confirms the presence and size of amplified DNA.
- Checking DNA purity: It helps ensure DNA samples are free from contaminants.
- Analyzing restriction digests: It allows scientists to see patterns of DNA fragments.
In gene cloning, DNA laddering ensures the correct fragment sizes are cloned. In genetic fingerprinting, it helps identify individuals based on DNA patterns. The right percentage of agarose gel is key to successful DNA laddering.
Here’s a table summarizing the typical agarose percentages for DNA laddering:
| Agarose Percentage | Fragment Size Range |
|---|---|
| 0.7% | 5,000 – 10,000 bp |
| 1.0% | 1,000 – 7,000 bp |
| 1.2% | 400 – 6,000 bp |
| 1.5% | 200 – 3,000 bp |
Choosing the correct agarose percentage ensures clear and accurate DNA fragment separation.

Credit: www.researchgate.net
Choosing Agarose Concentration
Choosing the right agarose concentration is crucial for DNA laddering. The concentration of agarose affects the resolution and separation of DNA fragments. Different concentrations are used for different sizes of DNA fragments.
Factors Influencing Agarose Percentage
- Size of DNA Fragments: Larger fragments require lower agarose concentrations. Smaller fragments need higher concentrations.
- Resolution: Higher concentrations give better resolution for small fragments. Lower concentrations provide better resolution for large fragments.
- Electrophoresis Speed: Higher agarose concentrations slow down the migration of DNA. Lower concentrations allow faster migration.
Common Percentages Used
Common agarose concentrations range from 0.5% to 3%. Here are some typical uses:
| Agarose Percentage | Size of DNA Fragments |
|---|---|
| 0.5% | 1,000 to 30,000 base pairs (bp) |
| 1.0% | 500 to 10,000 bp |
| 1.5% | 200 to 3,000 bp |
| 2.0% | 100 to 2,000 bp |
| 3.0% | 50 to 1,000 bp |
Always choose the agarose percentage that matches your DNA fragment size.
Preparing Agarose Gel
Creating an agarose gel is essential for DNA laddering. This process ensures proper DNA separation during electrophoresis.
Materials Needed
- Agarose powder
- Electrophoresis buffer (TAE or TBE)
- Microwave-safe flask
- Gel casting tray
- Gel comb
- Microwave oven
- DNA ladder
- Loading dye
- Pipettes
Step-by-step Guide
- Weigh 0.8-1% agarose powder for the gel.
- Mix agarose powder with the buffer.
- Heat the mixture in the microwave until clear.
- Allow the agarose solution to cool slightly.
- Set up the gel casting tray.
- Insert the gel comb into the tray.
- Pour the agarose solution into the tray.
- Let the gel solidify at room temperature.
- Remove the comb carefully.
- Place the gel in the electrophoresis tank.
- Add the running buffer to cover the gel.
- Load the DNA ladder and samples.
- Run the electrophoresis until the dye reaches the desired position.
Loading And Running The Gel
Loading and running the gel is a crucial step in DNA laddering. The process ensures accurate results. Different percent agarose gels are used depending on the DNA fragment size.
Sample Preparation
Preparing your DNA samples properly is vital. Use a buffer to mix with your DNA samples. The buffer ensures better loading.
You will need to add a loading dye to the samples. The dye helps you see the samples. It also makes the samples sink into the wells.
The table below shows common components for sample preparation:
| Component | Purpose |
|---|---|
| DNA Sample | Main analyte |
| Loading Buffer | Ensures proper loading |
| Loading Dye | Visibility and density |
Electrophoresis Process
The electrophoresis process separates DNA fragments. First, set up your agarose gel. Use a gel percentage suited to your DNA size.
Pour the gel into the tray. Allow it to set. Place the gel in the electrophoresis tank. Fill the tank with electrophoresis buffer.
Load your DNA samples into the wells. Use a micropipette for accuracy. Turn on the power supply. The DNA fragments will start to migrate.
Below is a step-by-step list of the electrophoresis process:
- Set up the agarose gel.
- Pour and set the gel.
- Place the gel in the tank.
- Fill the tank with buffer.
- Load DNA samples.
- Turn on the power supply.
The DNA fragments move towards the positive end. Smaller fragments move faster. This creates a pattern, known as DNA laddering.
Interpreting Results
Interpreting the results of agarose gel electrophoresis involves understanding the band patterns. Different percentages of agarose can affect the resolution of the DNA fragments. Proper analysis ensures accurate DNA laddering results.
Band Patterns
The band patterns on the agarose gel indicate the size of DNA fragments. Smaller fragments move faster and appear near the bottom. Larger fragments move slower and stay near the top. Each band represents a specific DNA size. Comparing these bands with a DNA ladder helps determine the fragment sizes.
| Band Size (bp) | Distance Traveled (cm) |
|---|---|
| 100 | 5.0 |
| 500 | 3.0 |
| 1000 | 2.0 |
A clear pattern with distinct bands indicates successful DNA separation. Use a 1% agarose gel for general DNA laddering. Adjust the percentage based on fragment size. For smaller fragments, use a higher percentage agarose gel. For larger fragments, use a lower percentage agarose gel.
Troubleshooting Common Issues
Several common issues can arise during DNA laddering. Here are solutions to some typical problems:
- Smearing Bands: Ensure the agarose gel is fresh. Old gels can cause smearing. Also, check the loading buffer concentration.
- Faint Bands: Increase the DNA sample concentration. Ensure proper staining of the gel.
- Uneven Bands: Verify the gel is level during polymerization. Uneven pouring can cause this issue.
Always run a DNA ladder alongside your samples. This acts as a reference for troubleshooting. Regular maintenance of electrophoresis equipment also helps avoid common issues.
Expert Tips And Best Practices
DNA laddering is a critical technique in molecular biology. Using the right percent agarose is key for accurate results. This section offers expert tips and best practices. Learn how to optimize your results and ensure safety during the process.
Optimizing Results
Using the correct percent agarose ensures clear DNA bands. Typically, 1% agarose is used for DNA laddering. It provides good resolution for fragments between 500 bp and 10 kb.
For smaller DNA fragments, use a higher percent agarose. A 2% agarose gel is ideal for fragments between 50 bp and 500 bp. For larger fragments, a 0.7% agarose gel works best.
Gel preparation tips:
- Dissolve agarose in buffer (like TAE or TBE).
- Heat until fully melted.
- Cool slightly before pouring into the gel tray.
- Allow the gel to set at room temperature.
Safety Considerations
Safety is crucial in any lab procedure. Always wear protective gear. This includes gloves, lab coat, and safety goggles.
Handle ethidium bromide with care. It is a common stain but toxic. Consider using safer alternatives like SYBR Safe.
When heating agarose, use a microwave or hot plate. Avoid overheating to prevent burns or fire hazards.
Dispose of used gels and chemicals properly. Follow your lab’s safety protocols and waste disposal guidelines.
Credit: www.geneon.net
Frequently Asked Questions
What Percent Agarose For Dna Laddering?
Typically, 1-2% agarose gel is used for DNA laddering.
Why Use 1% Agarose Gel?
1% agarose provides good resolution for larger DNA fragments.
Can I Use 2% Agarose Gel?
Yes, 2% agarose is useful for resolving smaller DNA fragments.
How To Prepare 1% Agarose Gel?
Mix 1 gram of agarose powder with 100 ml of buffer solution.
What Buffer Is Used For Agarose Gels?
TAE or TBE buffer is commonly used for agarose gels.
Conclusion
Choosing the right agarose percentage is key for DNA laddering. For most uses, 0. 8% to 1. 2% agarose works best. It helps in clear band separation. Ensure you adjust the percentage based on your DNA size. Follow these tips to get accurate results every time.
Happy experimenting!