
For DNA laddering, use a 1-2% agarose gel. This percentage works best for most DNA fragments.
DNA laddering is a technique used in molecular biology. It helps in the separation and analysis of DNA fragments. Using the right gel percentage is crucial. A 1-2% agarose gel is ideal for many DNA sizes. This concentration provides clear, distinct bands.
It ensures accurate results. The process involves running DNA samples through the gel. An electrical current helps separate the fragments. The different sizes of DNA create a ladder-like pattern. This method is vital for research and diagnostics. It helps scientists identify and study DNA. Proper gel concentration ensures reliable data. This makes DNA laddering an essential tool in genetic research.
Introduction To Dna Laddering
DNA laddering is a technique in molecular biology. It helps determine the size of DNA fragments. Researchers use this method to analyze DNA samples.
In DNA laddering, DNA fragments are separated by gel electrophoresis. The fragments form bands that resemble a ladder. Each band corresponds to a specific DNA size.
Purpose Of Dna Laddering
The main purpose of DNA laddering is to measure DNA fragment sizes. Researchers use it to compare the sizes of different DNA samples. This technique is essential in many genetic studies.
DNA laddering helps identify gene mutations. It also aids in DNA sequencing and cloning. Scientists use it to diagnose genetic disorders.
Importance Of Gel Percentage
The percentage of the gel affects DNA separation. Different percentages help separate different sizes of DNA fragments.
For small DNA fragments, use a higher gel percentage. For larger DNA fragments, use a lower gel percentage. This ensures clear and accurate DNA banding patterns.
| Gel Percentage | DNA Fragment Size Range |
|---|---|
| 0.8% | 1,000 – 10,000 base pairs |
| 1.0% | 500 – 8,000 base pairs |
| 1.2% | 400 – 6,000 base pairs |
| 1.5% | 200 – 3,000 base pairs |
| 2.0% | 50 – 2,000 base pairs |
Choosing the right gel percentage is crucial. It ensures the DNA fragments are well-separated and visible. This makes analysis easier and more accurate.

Credit: www.researchgate.net
Choosing The Right Gel Percentage
Choosing the right gel percentage is crucial for DNA laddering. The gel percentage affects the resolution of DNA fragments. This guide will help you choose the right gel percentage for your DNA laddering needs.
Factors Affecting Gel Choice
Several factors influence your gel choice. These include:
- Size of DNA fragments: Smaller fragments need higher percentage gels.
- Resolution requirement: Higher percentages offer better resolution for small fragments.
- Run time: Lower percentages can speed up the process.
Common Gel Percentages
Common gel percentages vary based on DNA fragment sizes. Here’s a quick guide:
| Gel Percentage | DNA Fragment Size (bp) |
|---|---|
| 0.7% | 1,000 – 10,000 bp |
| 1.0% | 500 – 10,000 bp |
| 1.2% | 400 – 7,000 bp |
| 1.5% | 200 – 3,000 bp |
| 2.0% | 100 – 2,000 bp |
Use this table to match your DNA fragment size with the correct gel percentage. This ensures accurate and clear results.
Preparing The Gel Solution
Preparing the gel solution is a vital step in DNA laddering. The right gel concentration ensures accurate DNA separation. Here’s how to prepare the perfect gel solution for your DNA laddering needs.
Materials Needed
- Agarose powder
- 1X TAE or TBE buffer
- Microwave or hot plate
- Gel casting tray
- Gel comb
- Graduated cylinder
- Erlenmeyer flask
- Ethidium bromide or SYBR Safe (for staining)
- Distilled water
- Measuring scale
Step-by-step Preparation
- Measure agarose powder: Use the scale to measure the correct amount.
- Mix with buffer: Combine agarose powder with 1X TAE or TBE buffer.
- Heat the mixture: Use a microwave or hot plate until the agarose dissolves.
- Cool slightly: Let the solution cool to about 60°C.
- Add stain: Mix in Ethidium bromide or SYBR Safe for DNA visualization.
- Pour into tray: Pour the solution into the gel casting tray.
- Insert comb: Place the comb at one end of the tray to create wells.
- Let it set: Allow the gel to solidify at room temperature.
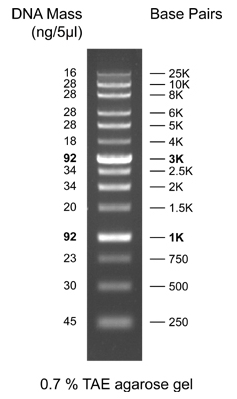
Refer to the table below for specific agarose concentrations based on DNA size:
| DNA Size Range (kb) | Agarose Concentration (%) |
|---|---|
| 0.1 – 1 | 2% |
| 0.5 – 10 | 1% |
| 1 – 30 | 0.8% |
These steps ensure you prepare the gel solution correctly. Proper preparation is key to achieving clear DNA laddering results.
Credit: www.geneon.net
Loading And Running The Gel
Choosing the right percent gel is crucial for DNA laddering. Properly loading and running the gel can impact your results. This section will cover essential steps in the process.
Sample Preparation
Prepare your DNA samples before loading them into the gel. Mix your DNA with a loading buffer. This buffer contains dye and glycerol. The dye allows you to see the sample. The glycerol helps the sample sink into the wells.
Use a small volume, typically 5-10 µl. Too much can overflow the wells. Ensure each sample is well-mixed. Pipette the sample up and down gently. This ensures an even mix.
Electrophoresis Process
Pour the agarose gel into the casting tray. Allow it to solidify. Place the gel in the electrophoresis tank. Fill the tank with TAE or TBE buffer. These buffers conduct electricity well.
Load the prepared DNA samples into the wells. Use a pipette for accuracy. Place the DNA ladder in the first or last well. This ladder acts as a reference.
Connect the tank to a power supply. Set the voltage to 100-120 volts. Run the gel for 30-45 minutes. Check the dye’s progress. Stop when the dye nears the gel’s end.
After running, remove the gel. Stain it to view the DNA bands. Use a UV transilluminator for best results. Compare your samples to the DNA ladder. This helps determine the DNA size.
Interpreting The Results
After running your DNA ladder on the gel, interpreting the results is crucial. The gel will show different bands representing various DNA fragments. Understanding these bands is key to successful DNA analysis.
Analyzing Band Patterns
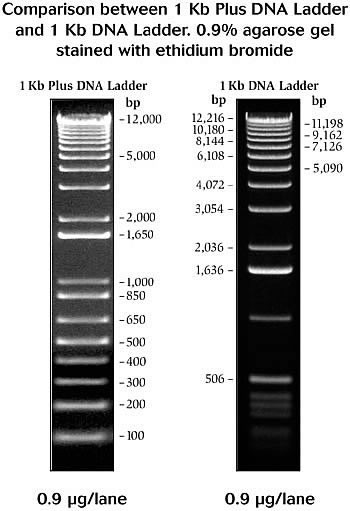
When analyzing band patterns, compare the sample bands to the DNA ladder. The ladder serves as a reference for fragment sizes. Identify the bands that align with the ladder’s markers.
- Sharp bands: Indicate clean, well-prepared DNA samples.
- Smear bands: Suggest DNA degradation or poor sample quality.
- Multiple bands: May indicate contamination or multiple DNA fragments.
Use a ruler or software to measure the distance of bands. Relate these measurements to the known sizes in the DNA ladder. This helps identify the fragment sizes in your sample.
Troubleshooting Common Issues
If you encounter issues, consider these common problems and solutions:
| Problem | Possible Cause | Solution |
|---|---|---|
| Faint bands | Low DNA concentration | Increase sample DNA amount |
| Smears | Degraded DNA | Use fresh DNA samples |
| No bands | Incorrect gel concentration | Adjust gel percentage |
Ensure your gel concentration matches the DNA fragment size. For smaller fragments, use higher gel percentages. For larger fragments, use lower gel percentages.
Credit: barricklab.org
Tips From Experts
Choosing the right percent gel for DNA laddering is crucial. Experts share valuable tips to ensure accurate results. This guide provides best practices and common mistakes to avoid.
Best Practices
Experts recommend using 1% to 2% agarose gel for DNA laddering. This range works well for most DNA fragments. Here are some best practices to follow:
- Prepare the gel with TAE or TBE buffer.
- Heat the agarose until fully dissolved.
- Cool the solution to about 50°C before pouring.
- Use a comb to create wells in the gel.
- Load the DNA ladder and samples carefully.
- Run the gel at 80-120V for clear separation.
- Stain the gel with ethidium bromide or a safer alternative.
- Visualize the bands using a UV transilluminator.
Common Mistakes To Avoid
Avoiding common mistakes ensures accurate results. Here are some pitfalls to be aware of:
- Using the wrong gel concentration can distort results.
- Not fully dissolving the agarose leads to inconsistent gels.
- Pouring the gel when it’s too hot can damage the mold.
- Overloading the wells causes smearing of DNA bands.
- Running the gel at too high voltage can overheat and melt the gel.
- Using expired staining reagents can lead to weak or no bands.
- Not wearing gloves and goggles when handling ethidium bromide.
| Mistake | Consequence |
|---|---|
| Wrong gel concentration | Distorted DNA bands |
| Hot gel pouring | Damaged gel mold |
| Overloading wells | Smearing of bands |
| High voltage | Melted gel |
| Expired reagents | Weak/no bands |
Frequently Asked Questions
What Percent Gel For Dna Laddering?
A 1-2% agarose gel is typically used for DNA laddering.
Why Use 1-2% Agarose Gel?
This concentration range provides good resolution for DNA fragments.
How To Prepare 1% Agarose Gel?
Dissolve 1g agarose in 100ml TAE buffer, then heat and pour into the gel tray.
What Buffer For Dna Gel Electrophoresis?
TAE or TBE buffer is commonly used for DNA gel electrophoresis.
Can I Use Different Agarose Gel Percentages?
Yes, higher percentages for small fragments, lower for large fragments.
Conclusion
Choosing the right gel percentage is crucial for DNA laddering. It ensures accurate results and clear separation of DNA fragments. Typically, use 1-2% agarose gel for most DNA ladders. Always follow the specific protocol for your experiment. Proper gel concentration makes DNA analysis effective and reliable.